 by
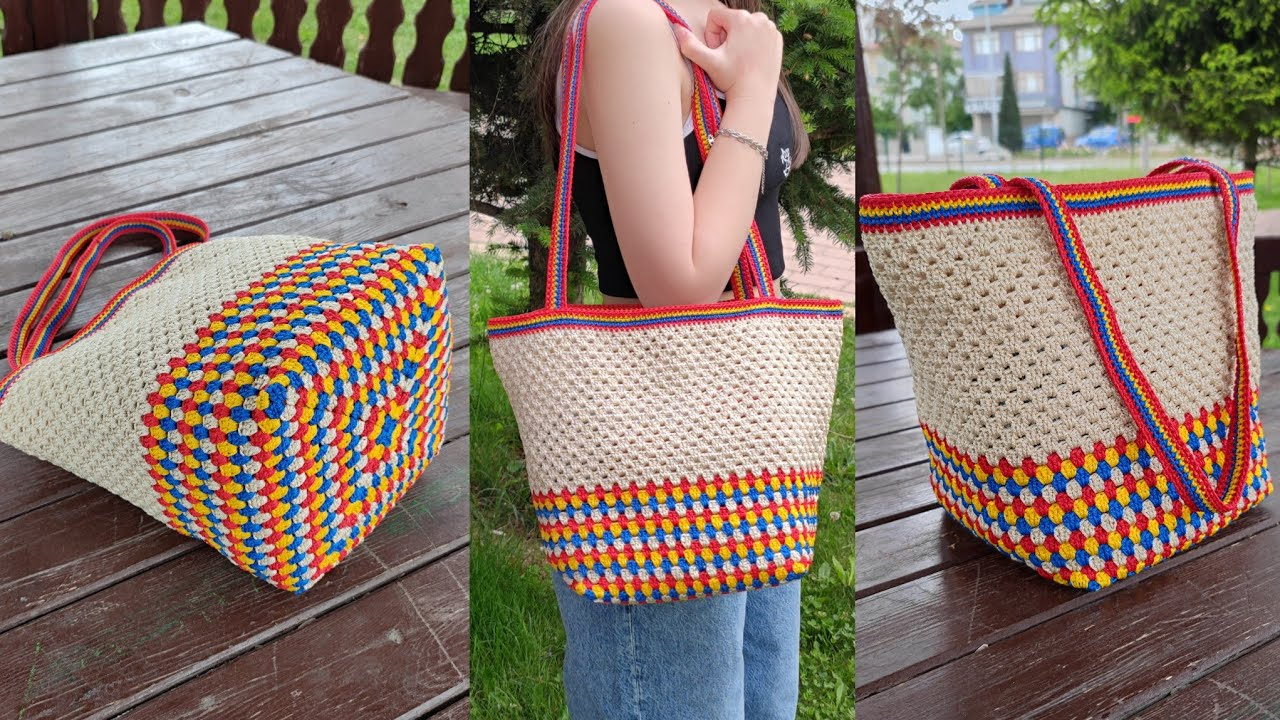
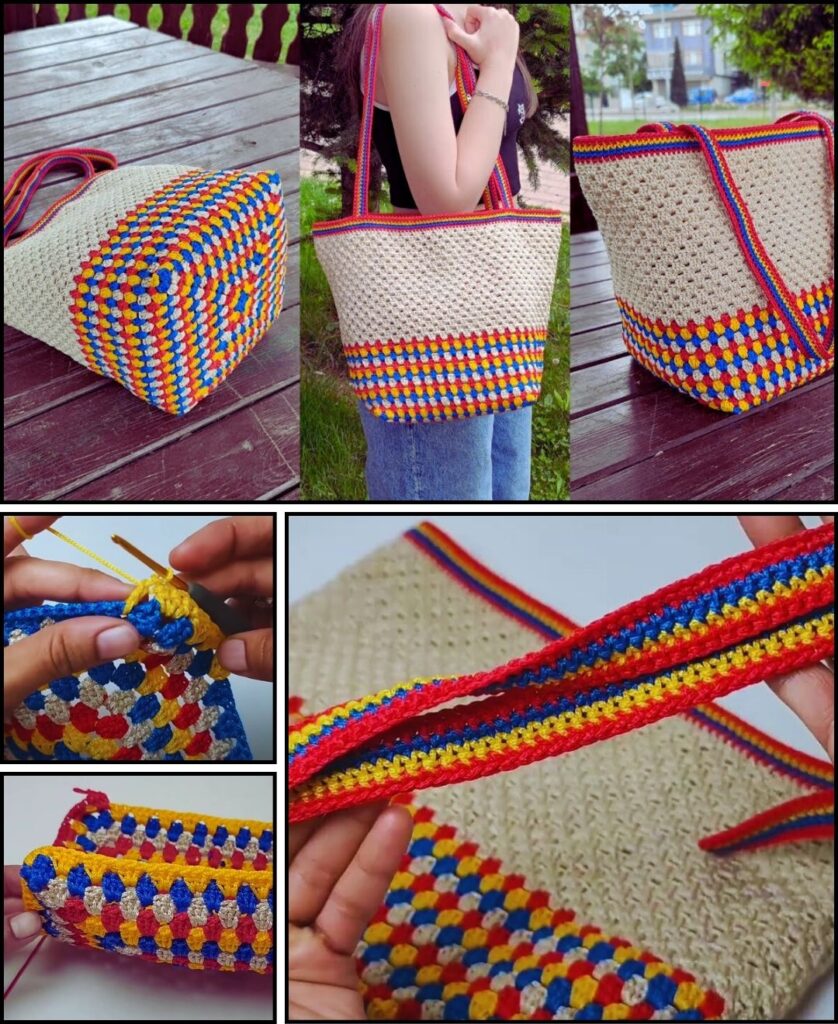
by You’re looking to crochet a tote bag! That’s a fantastic and practical project. Crochet totes are not only stylish but also incredibly versatile, perfect for groceries, beach trips, market runs, or just as an everyday carry-all. Plus, they offer a wonderful opportunity to play with colors and textures.
Since you’re in Phnom Penh, where it’s generally warm, 100% cotton yarn or a cotton blend is an excellent choice for your tote bag. Cotton is durable, has great stitch definition, and is less prone to stretching excessively compared to some other fibers, which is important for a bag that will carry weight. It’s also breathable and easy to wash, making it very practical for a tote.

How to Crochet a Sturdy Tote Bag: A Detailed Tutorial
This tutorial will guide you through creating a classic, rectangular tote bag. We’ll focus on making a sturdy base, building up the sides, and then adding durable handles.
1. Essential Materials You’ll Need
- Yarn:
- Fiber: 100% Cotton, Cotton Blend, or a sturdy Acrylic yarn are all great choices. Look for options that aren’t too “stretchy” if you plan to carry heavy items.
- Weight: Worsted Weight (Aran / Medium / Category 4) is highly recommended. It works up quickly and creates a robust fabric suitable for a bag. You could use a thicker yarn like Bulky (Category 5) for a very large, quick bag, or DK (Category 3) for a smaller, more delicate tote.
- Colors: Choose a main color for the body of the bag and optionally a contrasting color for the handles or a stripe. This is a great project for using up larger yarn scraps.
- Quantity: For a medium-sized tote (approx. 12″ wide x 14″ tall), you’ll likely need 300-500g (or 600-1000 yards) of worsted weight yarn, depending on your stitch pattern and tension.
- Crochet Hook:
- For Worsted weight yarn, a 5.0mm (US H/8) or 5.5mm (US I/9) hook is a good starting point. You want your stitches to be firm and dense to prevent too much stretching and to make the bag sturdy. If your fabric feels too loose, go down a hook size.
- Scissors: For cutting yarn.
- Yarn Needle (Tapestry Needle): Essential for weaving in ends.
- Stitch Markers (Optional but Recommended): Very helpful for marking the beginning of rounds or specific stitches, especially when shaping the base.
2. Basic Crochet Stitches You’ll Use
This pattern will primarily use straightforward, common stitches to create a solid fabric:
- Chain (ch): Used for starting.
- Slip Stitch (sl st): For joining rounds.
- Single Crochet (sc): Creates a dense, sturdy fabric, great for the base and handles.
- Half Double Crochet (hdc): A medium-height stitch, good for the main body for a quicker project.
- Double Crochet (dc): A taller stitch, can also be used for the main body for a more open fabric.
- Working in Rounds & Rows: You’ll start with rounds for the base, then work in continuous rounds for the body, and finally rows for the handles.
- Fasten Off: Securely ending your work.
- Weaving in Ends: Hiding tails for a neat finish.

Crochet Tote Bag Pattern (Medium Size)
This pattern will create a sturdy, rectangular tote bag, approximately 12 inches (30 cm) wide and 14 inches (35 cm) tall (excluding handles).
Abbreviations (US Crochet Terms):
- ch: chain
- sl st: slip stitch
- sc: single crochet
- hdc: half double crochet
- dc: double crochet
- st(s): stitch(es)
(...): work stitches into the same stitch/space[...]: repeat instructions in brackets
Part 1: The Base of the Bag (Work in Oval Rounds)
We’ll create a flat oval that will form the bottom of your tote. This is worked by crocheting around a foundation chain.
- Ch 31. (This will determine the length of your bag’s base. For a wider bag, chain more; for a shorter bag, chain less. Keep it an odd number for symmetry, or just adjust your starting point in Round 2).
- Round 1:
- Work 3 sc in the 2nd ch from your hook. (This creates the curve for one end).
- Work 1 sc in each of the next 28 chains.
- In the last chain, work 5 sc. (This creates the curve for the other end).
- Now, working down the opposite side of the foundation chain (into the unused loops): Work 1 sc in each of the next 28 chains.
- Work 2 sc into the very last stitch (which is also where you started the round).
- Join with a sl st to the top of the first sc. (66 sc total)
- You should now have a flat oval.
- Round 2:
- Ch 1 (does not count as a stitch).
- Work 2 sc in each of the first 3 sts (increases around the first curve).
- Work 1 sc in each of the next 28 sts.
- Work 2 sc in each of the next 5 sts (increases around the second curve).
- Work 1 sc in each of the next 28 sts.
- Work 2 sc in each of the next 2 sts (completes the increases for the first curve).
- Join with a sl st to the top of the first sc. (76 sc total)
- Round 3:
- Ch 1.
- Work (1 sc, inc) 3 times.
- Work 1 sc in each of the next 28 sts.
- Work (1 sc, inc) 5 times.
- Work 1 sc in each of the next 28 sts.
- Work (1 sc, inc) 2 times.
- Join with a sl st to the top of the first sc. (86 sc total)
- Round 4 (Creating the Defined Edge):
- Ch 1.
- Work 1 sc in the back loop only (BLO) of each stitch around. This creates a neat, defined edge that makes the sides of your bag turn upwards.
- Join with a sl st to the first sc. (86 sc total)
Part 2: The Body of the Bag (Working in Continuous Rounds)
You can choose between Half Double Crochet (hdc) or Double Crochet (dc) for the main body. Hdc will create a denser, sturdier fabric, while dc will be quicker and have a bit more drape. Single Crochet (sc) can also be used for a super dense, stiff bag.
Option A: Using Half Double Crochet (hdc) for a Sturdy Fabric
- Round 5 – 35 (or to desired height):
- Ch 2 (does not count as a stitch).
- Work 1 hdc in each stitch around.
- Join with a sl st to the top of the first hdc. (86 hdc total for each round)
- Repeat this round until your bag reaches your desired height. For approx. 14 inches tall, this might be around 30-35 rounds, depending on your tension.
Option B: Using Double Crochet (dc) for a Faster Project with More Drape
- Round 5 – 25 (or to desired height):
- Ch 3 (does not count as a stitch).
- Work 1 dc in each stitch around.
- Join with a sl st to the top of the first dc. (86 dc total for each round)
- Repeat this round until your bag reaches your desired height. For approx. 14 inches tall, this might be around 20-25 rounds, depending on your tension, as dc stitches are taller.
Part 3: The Top Edge / Handle Base
This section strengthens the top of the bag and provides a secure area for attaching handles. Use single crochet (sc) for durability.
- Round 1 (Top Border):
- If you finished your body with hdc, Ch 1. If you finished with dc, Ch 1.
- Work 1 sc in each stitch around.
- Join with a sl st to the first sc. (86 sc total)
- Round 2-3:
- Ch 1.
- Work 1 sc in each stitch around.
- Join with a sl st to the first sc. (86 sc total)
- This creates a firm rim for your bag.

Part 4: Crocheting and Attaching the Handles
For strength and comfort, we’ll make flat, sturdy handles.
- Determine Handle Placement:
- Lay your bag flat. The total stitch count around the top is 86.
- Divide 86 by 2 to find the center front/back (43 stitches).
- Decide how wide you want the handle attachment points to be (e.g., 10-12 stitches).
- Calculate the space between the handles on the front/back (e.g., if handles are 10 stitches wide and the side is 23 stitches, then 23 – 10 = 13 stitches in between).
- Mark: Use stitch markers to mark the start and end points of where each handle will be attached on both the front and back of the bag. Make sure they are symmetrical.
- Crochet Handles (Make 2 identical handles):
- Ch 60. (Adjust this chain length to get your desired handle length. 60 chains typically make a handle around 15-18 inches long, suitable for shoulder carry.)
- Row 1: Sc in the 2nd ch from hook and in each ch across. (59 sc)
- Rows 2-5: Ch 1, turn. Sc in each sc across. (59 sc for 4 rows)
- This creates a flat, sturdy strip. You can add more rows for a wider handle.
- Fasten off, leaving a very long tail (at least 12-18 inches / 30-45 cm) for sewing the handle to your bag.
- Attach Handles to Bag:
- Thread the long tail from one handle onto your yarn needle.
- Align one end of the handle with the marked attachment points on the inside of your bag’s top border.
- Sewing: Use strong, secure stitches to firmly attach the handle. Go through multiple layers of the bag’s top edge and the handle itself. Stitch back and forth several times in a square or “X” pattern for maximum durability.
- Repeat this for the other end of the same handle, ensuring it’s not twisted.
- Attach the second handle to the other side of the bag in the same manner, making sure it’s symmetrical to the first.

Part 5: Finishing Touches
- Weave in All Ends NEATLY: This is crucial for a polished, professional-looking tote. Use your yarn needle to carefully weave in every single yarn tail securely into the stitches on the inside of your bag. Take your time to hide them well.
- Blocking (Optional but Recommended): For a more structured and professional-looking bag, a gentle steam block or wet block can significantly help.
- Gently wet your entire bag (if using cotton/natural fibers).
- Stuff the bag lightly with towels or plastic bags to help it hold its shape.
- Lay it flat (or stand it upright if it holds its shape) and gently shape it to your desired dimensions, ensuring the base is flat and the sides are even.
- Allow it to air dry completely. Blocking helps even out your stitches and gives the bag a more refined finish.
Tips for a Great Tote Bag
- Yarn Choice Matters: A firmer, less stretchy yarn (like cotton) will make a bag that holds its shape better and can carry more weight without sagging.
- Tight Tension: Especially for the base and the first few rounds of the body, keep your tension firm to create a sturdy foundation.
- Stitch Pattern Variety: Once you’re comfortable with the basic construction, experiment with different stitch patterns for the body (e.g., moss stitch, linen stitch, single crochet ribbing) to add texture and unique flair.
- Add a Lining: For ultimate durability and to prevent small items from falling through stitches, consider adding a fabric lining. You can sew a simple fabric bag that fits inside and hand-stitch it to the top edge. This will also give your bag a very professional finish.
- Closure: You could add a simple button and loop closure, a magnetic snap, or even a zipper to the top opening if desired.
- Pockets: Crochet or sew a small pocket inside for keys or a phone.
You’re all set to create a functional and stylish crocheted tote bag! Enjoy the process of making something beautiful and practical with your own hands. What color are you thinking of for your new tote?