 by
by Creating a crochet handbag bag using granny squares is a rewarding project that lets you infuse your personal style into a functional accessory. The beauty of granny squares lies in their versatility, allowing for endless color combinations and layouts.
Given that you’re in Phnom Penh, where it’s warm, I highly recommend using 100% cotton yarn or a cotton blend. Cotton is an excellent choice for bags because it’s durable, holds its shape well, and its clear stitch definition will make your granny squares look neat and crisp. Plus, it’s breathable, which can be a real benefit in a tropical climate.

How to Crochet a Handbag Bag Using Granny Squares
This comprehensive guide will take you through the entire process, from crocheting individual granny squares to joining them, adding a sturdy border, attaching handles, and even an optional fabric lining for a professional finish.
1. Essential Materials You’ll Need
- Yarn:
- Fiber: 100% Cotton or a Cotton Blend is ideal. Acrylic yarn can work too, especially for a softer drape, but be mindful that it might stretch more over time, particularly with weight.
- Weight: Worsted Weight (Aran / Medium / Category 4) is a great choice for handbags as it creates a sturdy fabric that works up relatively quickly. DK (Double Knitting / Category 3) can also be used for a slightly smaller or lighter bag.
- Colors: Get creative! You’ll need a main color for joining the squares, the top border, and the handles, along with several contrasting or complementary colors for the granny squares themselves. This is a perfect project for using up yarn scraps!
- Quantity: The total yarn needed depends on your bag size and square dimensions. For a medium tote-style bag (around 13-16 squares), plan for approximately 200-400g of yarn.
- Crochet Hook:
- Choose a hook size appropriate for your yarn. For worsted weight, a 4.0mm (US G/6) or 5.0mm (US H/8) hook is common. A slightly smaller hook often yields a denser fabric, which is great for the structure of a bag.
- Scissors: For cutting yarn.
- Yarn Needle (Tapestry Needle): Crucial for weaving in all those yarn ends and securely joining your squares.
- Stitch Markers (Optional but helpful): To mark corners or the start of rounds.
- Measuring Tape: To ensure your squares are consistent and to check overall bag dimensions.
- Optional for Lining: Fabric (like cotton canvas or sturdy quilting cotton), sewing machine or hand-sewing needle and thread, pins.
- Optional for Handle Hardware: D-rings, metal, wooden, or bamboo purse handles (if you’re not crocheting handles).
2. Basic Crochet Stitches You’ll Use
You’ll need a solid understanding of fundamental crochet stitches, particularly those used in classic granny squares:
- Chain (ch): Used for foundation and creating chain spaces.
- Slip Stitch (sl st): For joining rounds and neatening.
- Double Crochet (dc): The main stitch for granny squares, forming the “clusters.”
- Magic Ring (MR) / Adjustable Ring: (Optional but highly recommended) Creates a tight, hole-free center for your first round. Alternatively, you can
ch 4, then sl st to joininto the first chain to form a ring.
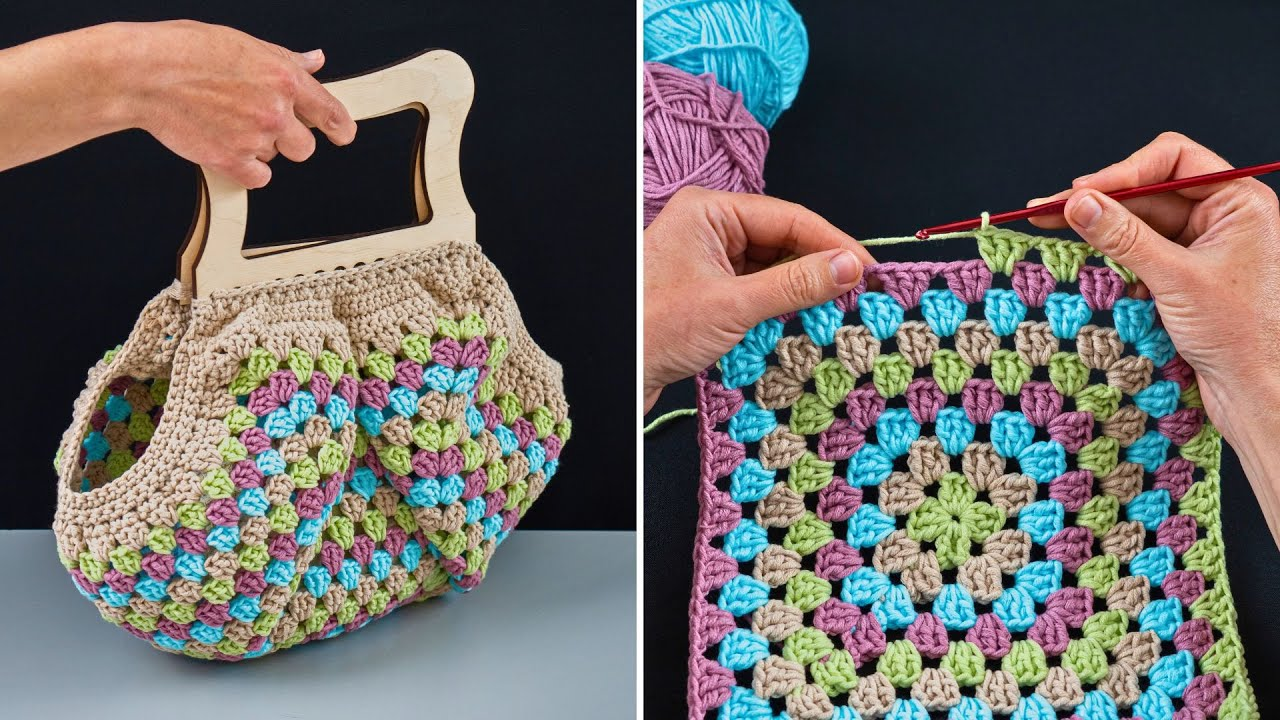
The Classic Granny Square Pattern
This is the core component of your handbag. You’ll make several of these, playing with different color combinations for each.
Abbreviations (US Crochet Terms):
- ch: chain
- sl st: slip stitch
- dc: double crochet
- sp: space
- MR: magic ring
(...): work stitches into the same stitch or space[...]: repeat instructions in brackets
Step 1: Crocheting Your Granny Squares
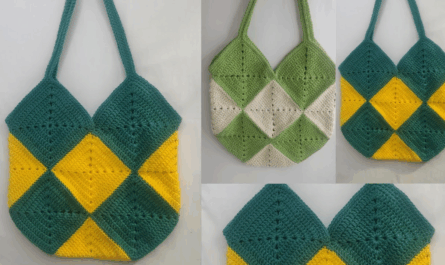
Decide on the size of your squares (how many rounds) and how many you’ll need for your desired handbag dimensions. A common layout for a simple tote-style bag uses 13 squares (9 for the main body and 4 for the bottom).
To Make One Granny Square (Example with 3 Rounds/Colors):
- Start (Color 1): With Color 1, create a Magic Ring (MR).
- (Alternatively: Ch 4, then sl st into the 1st ch to form a ring.)
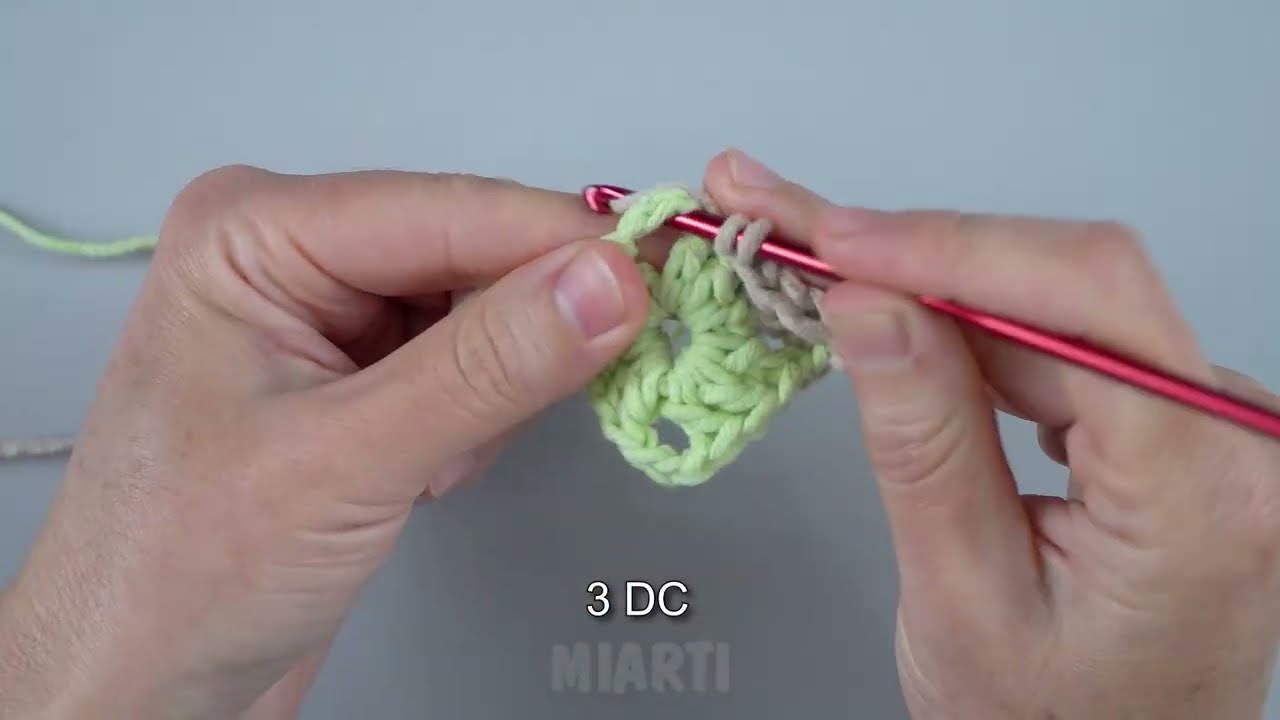
- Round 1: Ch 3 (counts as 1st dc). Work 2 dc into the ring.
*Ch 2 (creates a corner space). Work 3 dc into the ring.*Repeat from*to*2 more times. Ch 2. Join with a sl st to the top of the beginning Ch 3. (You’ll have 4 clusters of 3 dc, separated by ch-2 corner spaces).- Fasten off Color 1.
- Round 2 (Color 2): Join Color 2 with a sl st into any ch-2 corner space. Ch 3 (counts as 1st dc). Work (2 dc, ch 2, 3 dc) all into the same ch-2 corner space.
*Ch 1 (creates a side space). In the next ch-2 corner space, work (3 dc, ch 2, 3 dc).*Repeat from*to*2 more times. Ch 1. Join with a sl st to the top of the beginning Ch 3.- Fasten off Color 2.
- Round 3 (Color 3): Join Color 3 with a sl st into any ch-2 corner space. Ch 3 (counts as 1st dc). Work (2 dc, ch 2, 3 dc) all into the same ch-2 corner space.
*Ch 1. Work 3 dc into the next ch-1 side space. Ch 1. In the next ch-2 corner space, work (3 dc, ch 2, 3 dc).*Repeat from*to*2 more times. Ch 1. Work 3 dc into the last ch-1 side space. Ch 1. Join with a sl st to the top of the beginning Ch 3.- Fasten off Color 3.
- Subsequent Rounds (Optional): To make larger squares, simply continue adding rounds. Each new round, you’ll start in a corner space with
ch 3, 2 dc, ch 2, 3 dc. In each ch-1 side space, you’ll work3 dc. Remember toch 1between side clusters andch 2for the corner spaces. - Weave in ALL yarn ends on each individual granny square as you complete them, or at least before you start joining. This will save you a lot of time later!
Step 2: Planning Your Handbag Layout
Before joining, lay out all your completed granny squares on a flat surface. This visual step is important for finalizing your bag’s shape and planning the joining sequence.
- Simple Tote Bag Layout (Beginner-Friendly Example):
- Main Body: Arrange 9 squares into a 3 rows by 3 squares grid. When folded, the middle column forms the front and back of your bag, and the outer columns become the sides.
- Bottom: Arrange 4 squares into a 2 rows by 2 squares grid for the base.
[SQ] [SQ] [SQ] <-- Top edge of front/back panel [SQ] [SQ] [SQ] [SQ] [SQ] [SQ] -------------- (Bottom edge of main body panel) [SQ] [SQ] <-- Bottom of bag panel [SQ] [SQ] - Other Layouts: You can experiment! For a simpler pouch, use two large squares for the front and back. For a more rectangular tote, you might use fewer squares wide but more squares tall.
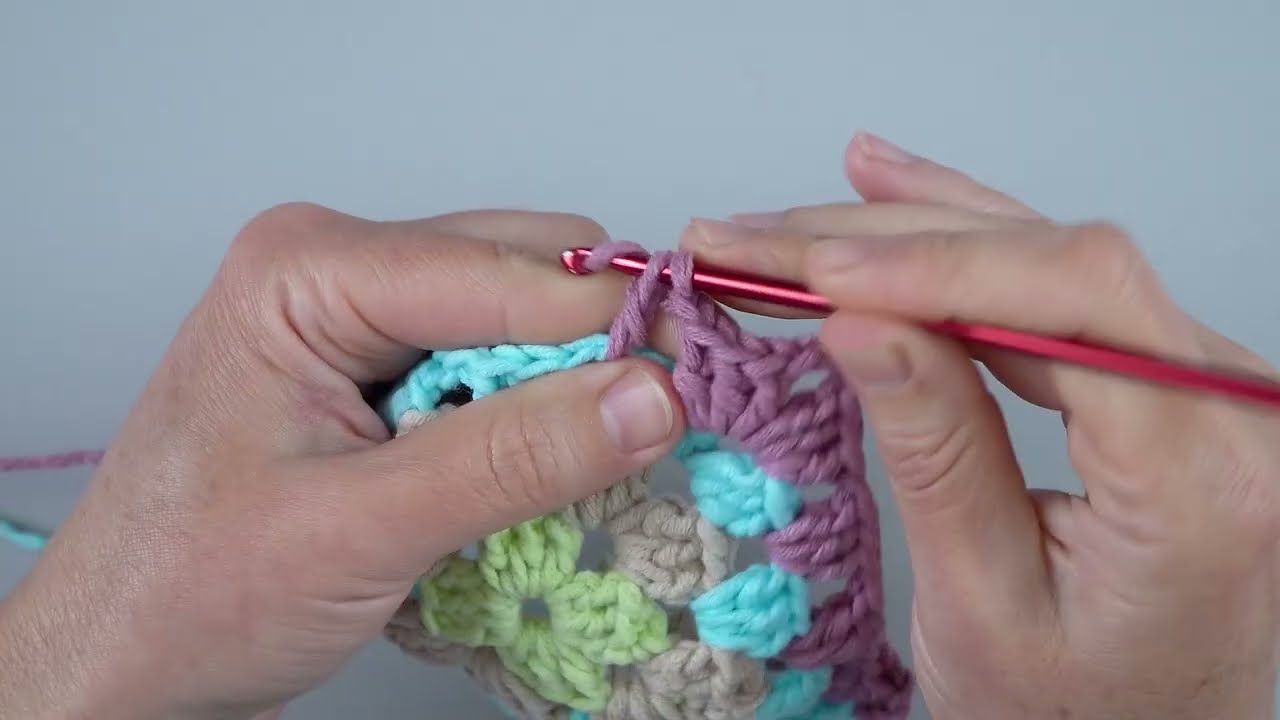
Step 3: Joining Your Granny Squares
This step brings your individual squares together to form the bag structure. Use your main color yarn for consistency.
Common Joining Methods (Choose one based on your preference):
- Whip Stitch (with Yarn Needle):
- Result: Creates a neat, nearly invisible seam.
- How: Line up two squares with their wrong sides facing each other. Use your yarn needle to whip stitch through either the back loops or both loops of both squares along the entire edge.
- Slip Stitch Join (with Crochet Hook):
- Result: Creates a slightly raised, visible ridge. It’s generally quicker than hand-sewing.
- How: Line up two squares (wrong sides together for an external ridge, or right sides together for an internal ridge). Insert your hook through corresponding loops of both squares, yarn over, and pull through all loops on your hook to create a slip stitch across the seam.
- Single Crochet Join (with Crochet Hook):
- Result: Creates a stronger, more pronounced ridge. This method is very sturdy, making it great for handbags.
- How: Line up two squares (wrong sides together). Insert your hook through corresponding loops of both squares, yarn over, pull up a loop, yarn over, and pull through both loops on your hook to create a single crochet across the seam.
- Join-As-You-Go (JAYG) (More Advanced):
- Result: Eliminates the need for extensive sewing, creating a very clean finish.
- How: Instead of completely finishing each square, you crochet the last round of a square and simultaneously join it to already completed squares using slip stitches or single crochets into the corresponding spaces/stitches of the adjacent square. This technique requires careful planning.
Joining Sequence for the Simple Tote Layout:
- Join the Main Body Squares: First, join the squares horizontally to form three strips (each 3 squares long). Then, join these three strips vertically to create your complete 3×3 grid.
- Join the Bottom Squares: Join your 4 bottom squares to form a 2×2 grid.
- Assemble the Bag:
- Take your finished 3×3 body grid. Fold it into a tube; the middle column forms the front and back, and the outer columns fold to become the sides. Join the two vertical side seams of this tube.
- Now, attach the 2×2 bottom panel to the bottom edges of the square tube you’ve formed. This is done by joining all around the perimeter of the base to the corresponding stitches on the bottom edge of the bag’s body.
Step 4: Finishing the Top Edge (Main Color – MC)
Adding a neat border to the top opening of your bag will give it a clean finish and provide a sturdy base for attaching handles.
- Join your main color yarn to any stitch on the top edge of your assembled bag.
- Round 1: Ch 1 (does not count as a stitch). Work 1 single crochet (sc) into each stitch around the entire top opening of the bag. When you reach a seam where squares are joined, work 1-2 sc over the seam to bridge the gap neatly and add stability. Join with a sl st to the first sc of the round.
- Round 2-3 (or more): Ch 1, sc in each stitch around. Join with a sl st.
- Continue adding as many rounds of single crochet as you like for your desired border width. You can also use half double crochet or double crochet for a wider border, or explore decorative stitches.

Step 5: Adding the Handbag Handle
The handle is essential for functionality. For crocheted handles, use your main color yarn for consistency and strength.
Option A: Crocheted Handles (Recommended for Beginners)
- Determine Length: Decide how long you want your handles to be (e.g., 12-16 inches / 30-40 cm for handheld, 20-24 inches / 50-60 cm for a shoulder bag).
- Crochet a Strip (Make 2 identical strips): Use a dense stitch like single crochet for durability.
- Ch a chain slightly longer than your desired handle length (e.g., Ch 80-100 for a 20-inch handle, adjusting for your gauge).
- Row 1: Sc in the 2nd ch from hook and in each ch across.
- Rows 2-5 (or more): Ch 1, turn. Sc in each sc across. Repeat until the strip is your desired width and sturdiness (e.g., 4-6 rows for a 1-inch wide handle).
- For extra sturdiness: You can fold this flat strip in half lengthwise and carefully sew the long edges together to create a sturdy, tubular handle.
- Fasten off, leaving a very long tail (at least 12-18 inches / 30-45 cm) for sewing the handle to your bag.
- Attach Handles:
- Lay your bag flat and mark where you want the handles (typically equidistant from the side seams, on the front and back panels).
- Thread the long tail onto your yarn needle.
- Position one end of a handle onto the inside of your bag’s top border.
- Sewing Strategy: Stitch through multiple layers of your bag’s top border and the handle. Use small, strong stitches, going back and forth several times (e.g., an “X” pattern or straight lines) to ensure the handle is firmly anchored. Reinforce the corners.
- Repeat for the other end of the first handle, and then for both ends of the second handle.
Option B: Using Pre-made Bag Hardware (Wooden, Metal, or Bamboo Handles)
- Purchase your chosen handbag hardware. These come in various styles, some with rings to attach to, others with holes for sewing.
- Attach to Bag: Follow the specific instructions provided with your hardware. You might need to crochet directly around a D-ring or create sturdy tabs of crocheted fabric (e.g., small rectangles of single crochet) to sew to your bag’s top edge, then attach the hardware to these tabs.

Step 6: Optional Handbag Lining (Highly Recommended for Durability and Finish)
Adding a fabric lining significantly increases your handbag’s durability, prevents stretching, keeps small items from slipping through stitches, and gives it a very professional, polished look.
- Measure Bag: Measure the finished dimensions of your crocheted handbag (height, flat width, and the depth of its bottom panel).
- Cut Fabric: Choose a sturdy fabric like cotton canvas, linen, or a heavy-weight quilting cotton. Cut fabric pieces to match your bag’s dimensions, adding about 1/2 inch (1.25 cm) seam allowance on all sides. For a simple tote, you’ll generally need:
- One large rectangular piece for the main body of the lining (length = bag’s circumference, width = bag’s height), plus seam allowances.
- One rectangular piece for the bottom of the lining (length = bag’s width, width = bag’s depth), plus seam allowances.
- (Alternatively, cut one larger piece of fabric that will fold up to form the bag’s body and bottom, then sew only the side seams).
- Sew Lining: Using a sewing machine or hand-sewing, stitch your fabric pieces together to create a fabric bag shape that precisely matches the inside of your crocheted bag. Hem the top edge of your fabric lining (fold it over twice and stitch down) for a neat finish.
- Insert and Sew: Carefully insert the finished fabric lining into your crocheted bag, aligning any side seams. Pin the top edge of the fabric lining just below the crocheted border of your bag (or you can fold the fabric over the crocheted border and stitch it down for a visible fabric edge). Using a matching sewing thread and a hand-sewing needle, carefully hand-stitch the lining securely to the inside of the crocheted bag using small, neat stitches (like a running stitch or whip stitch) all the way around the top opening.
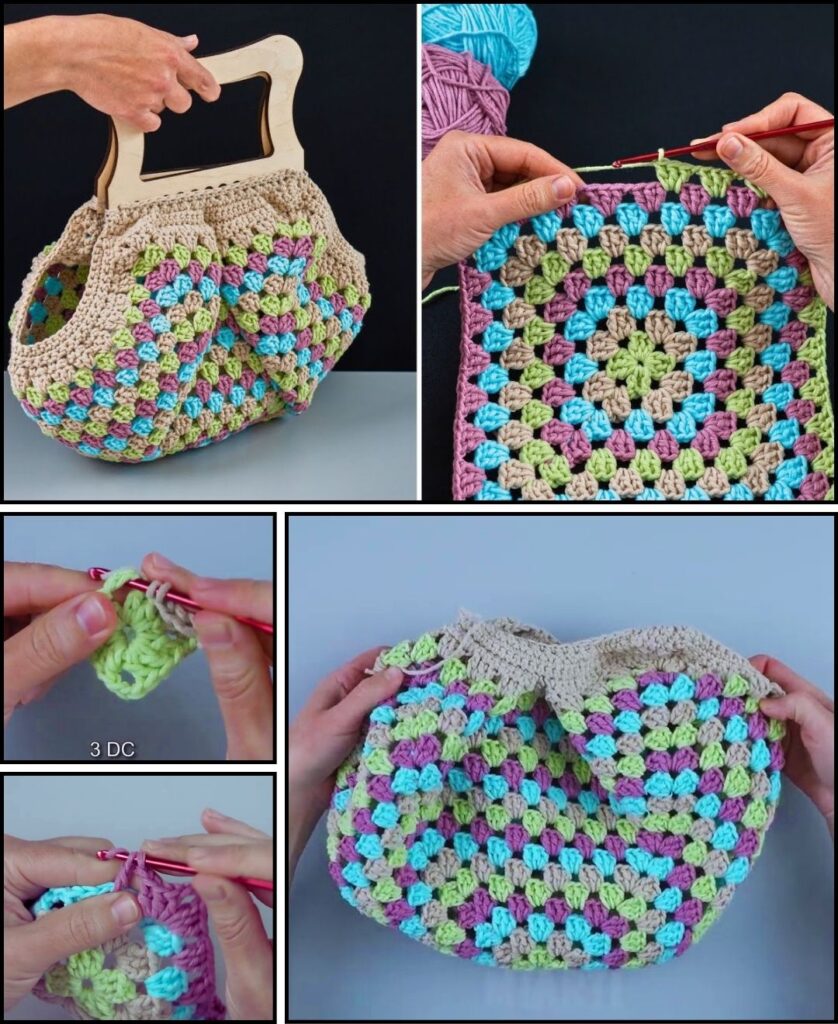
7. Finishing Your Crochet Handbag Bag
- Weave in All Remaining Ends: Before considering your bag complete, thoroughly check every part of your bag for any loose yarn tails. Weave them in securely into the stitches of the bag. This is crucial for both appearance and durability.
- Blocking (Optional but Recommended): For a more structured and professional-looking handbag, a gentle steam block or wet block can significantly help. Lay the bag flat (or lightly stuff it with towels if it’s a structured tote), gently shape it to its desired form, ensuring seams are straight and squares are flat, and then allow it to air dry completely. Blocking helps even out your stitches and gives the bag a more refined finish.
You’re now ready to create a beautiful and functional handbag using granny squares! What colors are you thinking of using for your first square?