 by
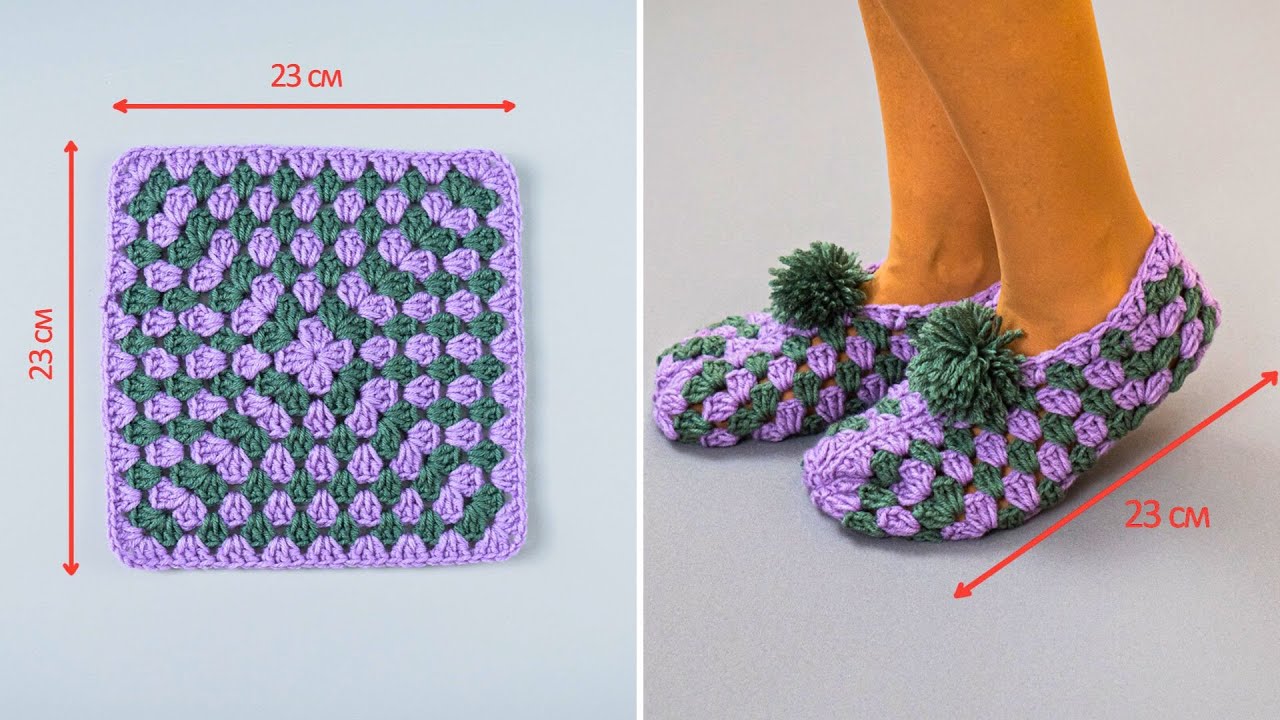
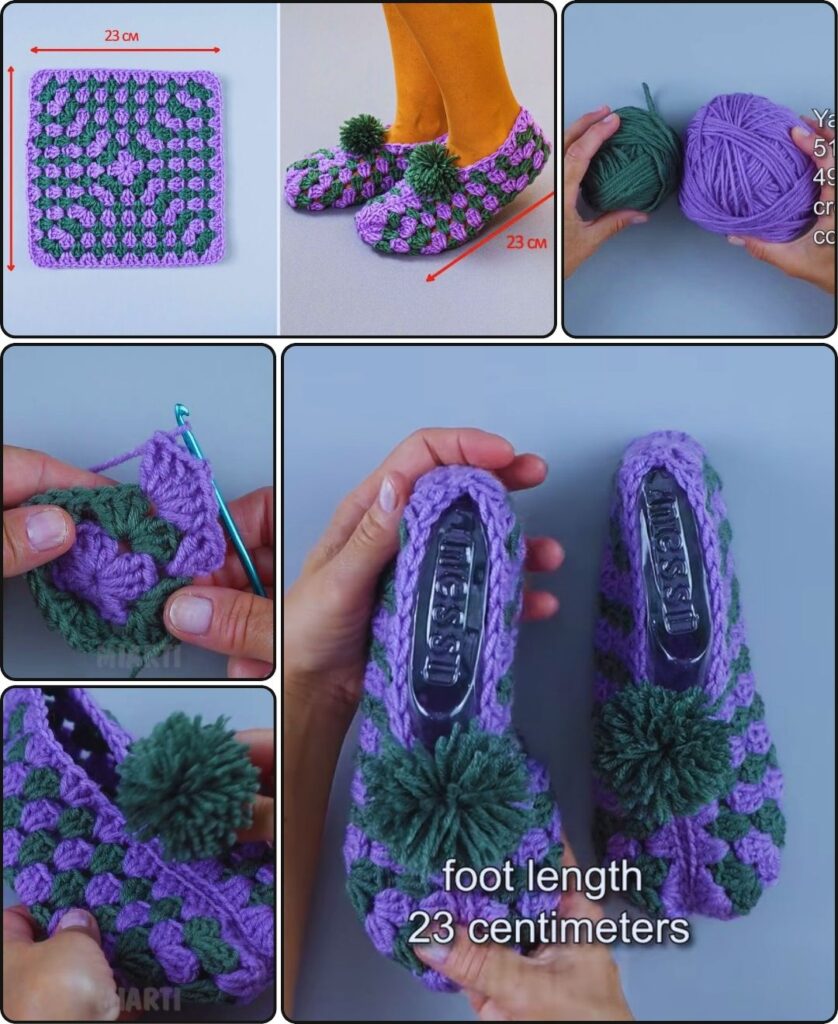
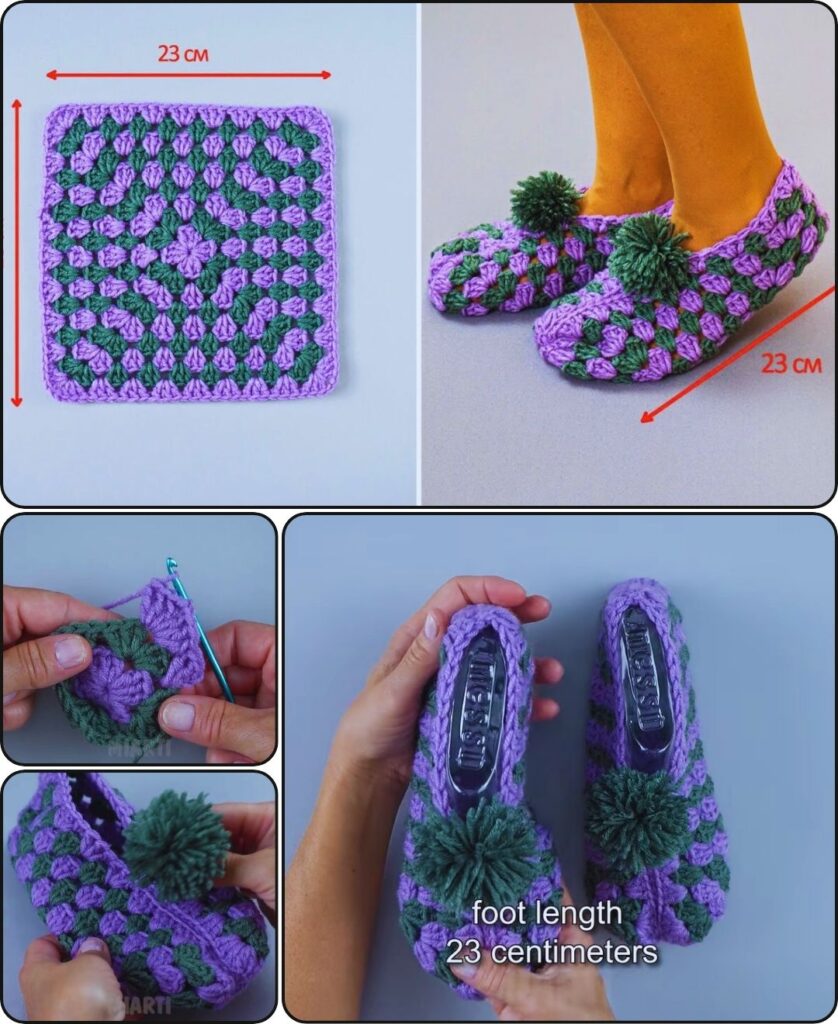
by Crocheting a pair of slippers from granny squares is a fun, creative, and customizable project! This tutorial will walk you through making a simple pair of cozy slippers using a classic granny square design. It’s a great project for using up yarn scraps and creating a unique, handmade gift or a comfortable pair of slippers for yourself.
Skill Level: Intermediate
This project is a great challenge if you’re comfortable with:
- Magic Ring (MR) / Adjustable Ring: For a neat, closed center.
- Chain (ch): The foundation of crochet.
- Slip Stitch (sl st): For joining rounds neatly.
- Double Crochet (dc): The main stitch for granny squares.
- Joining Motifs: Connecting your granny squares together.
- Single Crochet (sc): A dense stitch for a sturdy sole.
- Fastening Off: Securely ending your yarn.
- Weaving in Ends: The crucial final step for a polished and durable finish.
Finished Slipper Dimensions (Approximate):
The finished size will depend on the size of your granny squares. This pattern is for a medium adult size (U.S. Women’s 7-9). You can adjust the size by using larger or smaller squares, or by adding/subtracting rounds from the granny square pattern.
Materials You’ll Need:
- Yarn: Approximately 150-200 yards (135-180 meters) of Worsted Weight (Medium #4) Yarn.
- Note: The beauty of this project is using yarn scraps! You will need enough yarn to make 8 identical squares (4 for each slipper) and enough of one main color for joining and the sole. A wool or wool blend yarn is recommended for warmth and durability.
- Crochet Hook: Size H/5.0mm.
- Yarn Needle (Tapestry Needle): For weaving in ends and sewing the slippers together.
- Scissors: Any sharp pair for cutting your yarn.
- Stitch Markers (Optional): Helpful for marking corners and keeping your place.
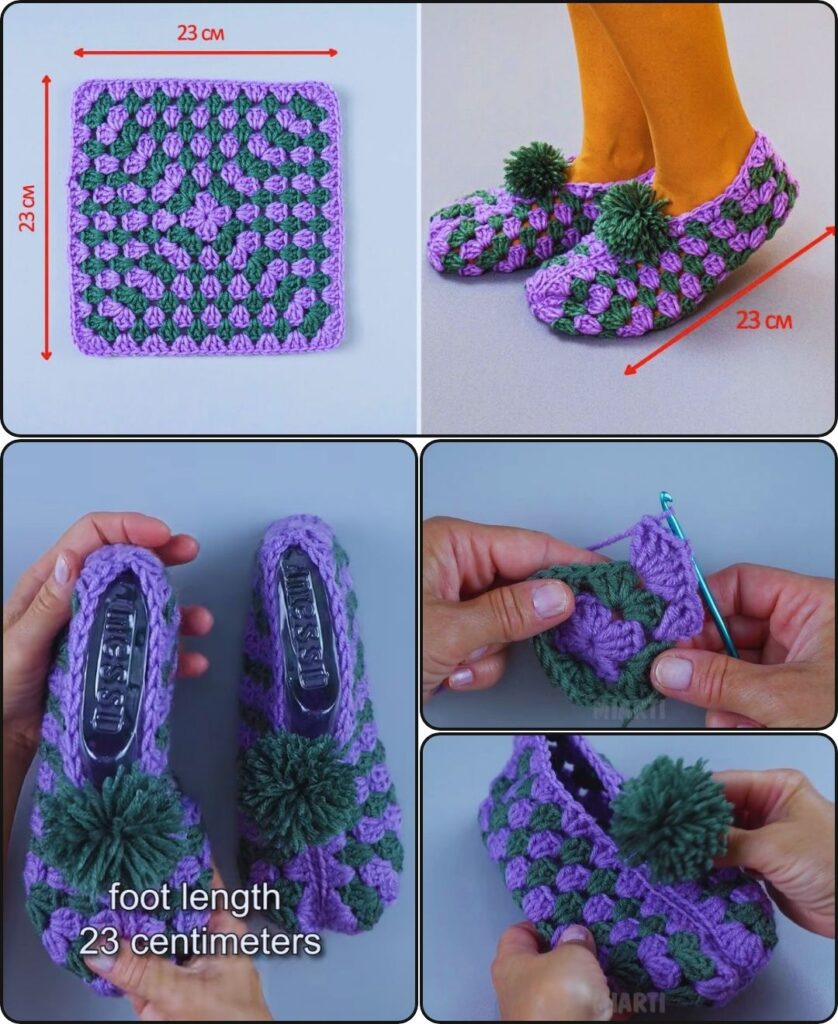
Part 1: Making the Granny Squares
You will need to make 8 identical squares, 4 for each slipper. The size of your squares is important as it will determine the size of your finished slippers. A good size is about 4-5 inches (10-12 cm) per side.
For each square, follow these steps:
- Round 1 (Magic Ring):
- Create a Magic Ring (MR).
- Chain 3 (ch 3) (counts as your first dc).
- Work 2 double crochet (dc) stitches into the ring.
- Chain 2 (ch 2) (this creates your first corner space).
- *Work 3 dc into the ring. Chain 2 (ch 2).*
- Repeat from * to * two more times.
- Join with a slip stitch (sl st) to the top of the beginning ch 3. (4 clusters of 3 dc, 4 corner spaces)
- Round 2:
- Chain 3 (ch 3) (counts as your first dc).
- Work 2 dc into the same corner space.
- Chain 1 (ch 1) (this creates a side space).
- In the next corner space, work (3 dc, ch 2, 3 dc).
- Chain 1 (ch 1).
- In the next corner space, work (3 dc, ch 2, 3 dc).
- Chain 1 (ch 1).
- In the next corner space, work (3 dc, ch 2, 3 dc).
- Chain 1 (ch 1).
- In the first corner space (where you started), work 3 dc.
- Join with a sl st to the top of the beginning ch 3.
- Round 3:
- Chain 3 (ch 3).
- Work 2 dc into the same corner space.
- Chain 1 (ch 1).
- Work 3 dc into the next side space.
- Chain 1 (ch 1).
- In the next corner space, work (3 dc, ch 2, 3 dc).
- Chain 1 (ch 1).
- Continue this pattern: 3 dc into each side space and (3 dc, ch 2, 3 dc) into each corner space.
- Join with a sl st to the top of the beginning ch 3.
- Repeat Round 3 until your squares measure about 4.5 inches on each side. You will need 8 squares total.
Part 2: Assembling the Slippers
Once you have your 8 squares, it’s time to join them to form the slippers. We’ll join them by sewing the squares together with a yarn needle and a simple whip stitch, which creates a clean, durable seam.
For each slipper, you will use 4 squares.
- Arrange the Squares:
- Lay your 4 squares out in a long row. This will form the top, sides, and heel of one slipper. The four squares will be connected along their short edges to form a single long strip.
- Join the Squares:
- Using a yarn needle and a sturdy yarn (this will be your main color), start sewing.
- Lay two squares next to each other, wrong sides facing.
- Insert your needle into the corner stitch of both squares and begin a whip stitch, sewing through both loops of each stitch.
- Continue sewing down the side until you reach the next corner.
- Repeat this process to join all four squares together in a long strip.
- Once all four squares are joined, fold the strip to form the slipper shape. The two end squares will be joined together at the heel.
Part 3: Crocheting the Sole
To give your slippers a sturdy and comfortable base, you will now crochet a single crochet sole and attach it to the bottom of the slipper.
- Measure and Start the Sole:
- With your main color, chain (ch) a length that matches the length of the bottom of your slipper.
- Row 1: Work 1 sc into the second chain from the hook and into each chain across. Turn.
- Rows Onwards: Chain 1 (ch 1) (does not count as a stitch), and work 1 sc into each stitch across. Turn.
- Repeat this row until your sole is wide enough to cover the bottom of your slipper. The sole should be about 4-5 inches wide and 9-10 inches long for a medium size.
- Shape the Sole (Optional but recommended):
- To create a more natural foot shape, you can add a few increases at the toe and heel.
- Toe: On the last few rows of your sole, work 2 sc into the first and last stitch to round out the toe.
- Heel: You can add a similar increase at the heel, but it can be less dramatic.
- Attach the Sole:
- Place the sole on the bottom of the slipper, aligning the edges.
- Using your yarn needle and your main color yarn, use a whip stitch to sew the sole to the bottom of the slipper.
- Sew all the way around the entire perimeter, making sure to go through a stitch on the sole and a stitch on the slipper with each pass. This will create a clean and durable seam.
Part 4: Final Finishing Touches
- Weave in All Ends:
- Use your yarn needle to meticulously weave in all the yarn tails from your squares, the joining, and the sole. This is the most crucial step for a professional and durable finish.
- Weave the tails along existing stitches on the inside of the slipper, changing direction to lock them in place.
- Blocking (Optional but Recommended):
- Gently mist the slippers with cool water until they are damp.
- Stuff the slippers with paper or a towel to help them hold their shape as they dry.
- Allow the slippers to air dry completely and thoroughly.
Congratulations! You’ve successfully crocheted a unique and cozy pair of Granny Square Slippers! This project is a fantastic way to use up your yarn and make a one-of-a-kind gift.
What other color combinations will you use for your next pair?