 by
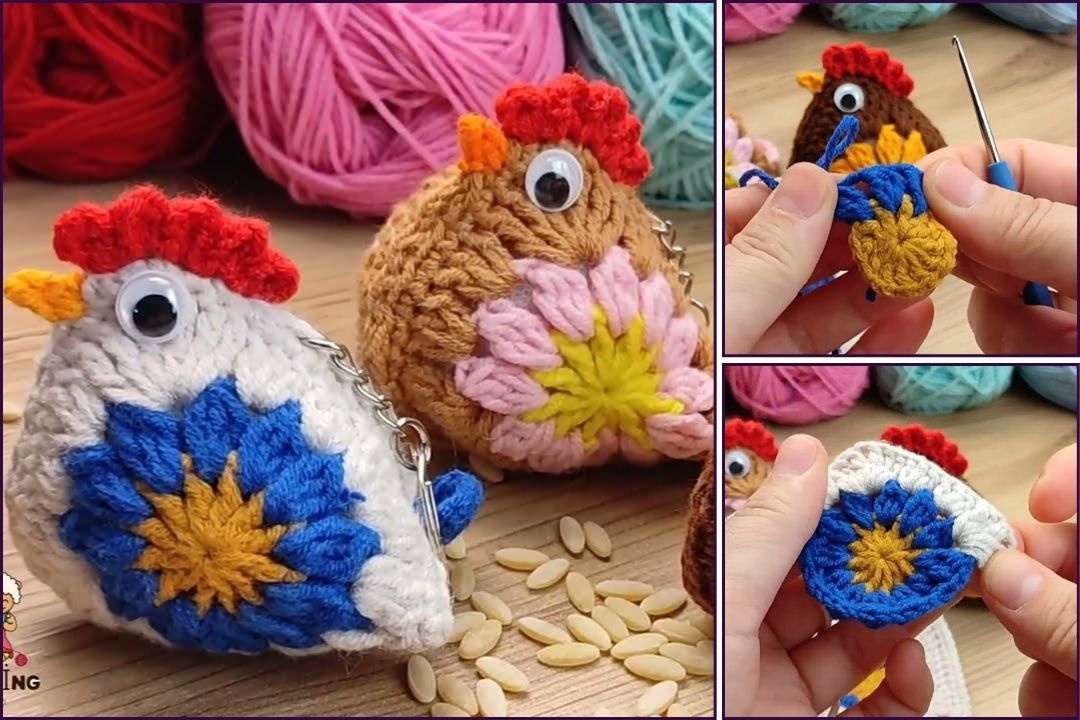
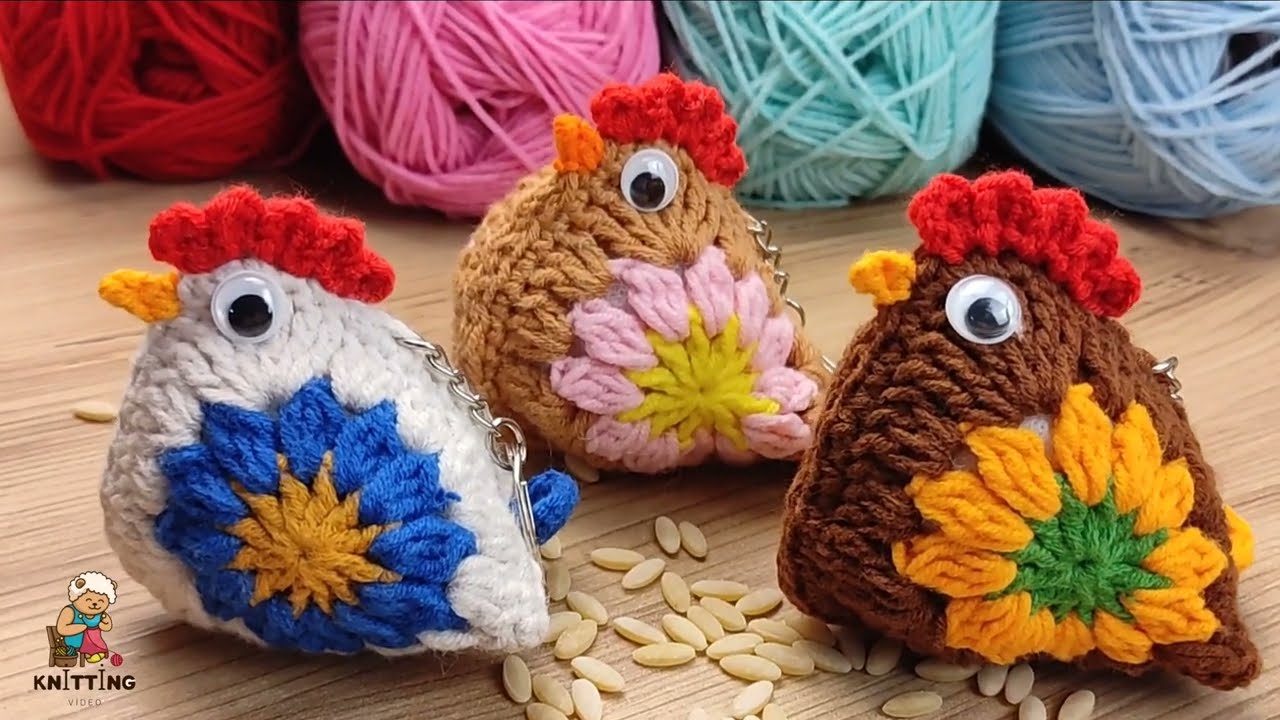
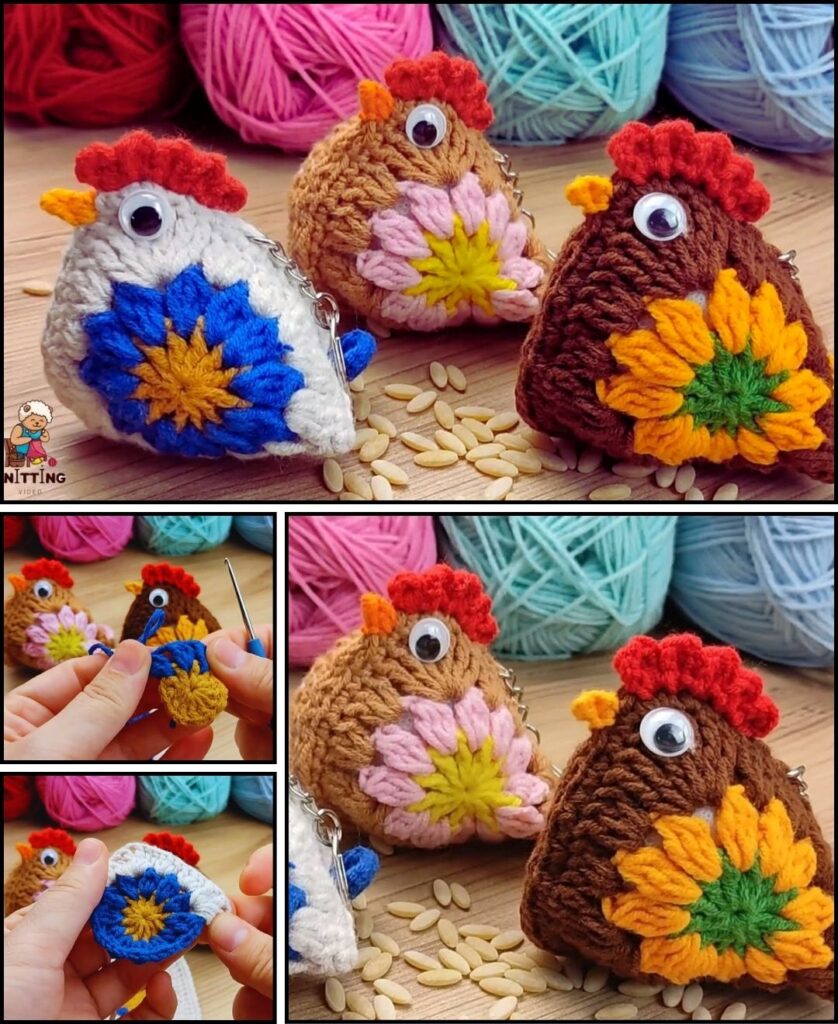
by Creating a crochet chicken keychain motif is a delightful project, perfect for adding a touch of rustic charm to your keys or bag, or as a sweet handmade gift! This tutorial focuses on crocheting a small, flat or slightly dimensional chicken motif that can be easily attached to a keychain.
Given that you’re in warm Phnom Penh, 100% cotton yarn is an excellent choice for a keychain. Cotton is durable, holds its shape well, and its clear stitch definition will make your chicken motif look neat and charming.

How to Crochet a Cute Chicken Keychain Motif
This tutorial will guide you through creating a small, charming chicken, complete with a comb, wattle, beak, and eye. We’ll make the chicken’s body first and then add the details.
1. Essential Materials You’ll Need
- Yarn:
- Main Color (MC): For the chicken’s body (e.g., white, cream, light brown, yellow). Worsted Weight (Aran / Medium / Category 4) 100% Cotton is highly recommended. You’ll only need a small amount, perfect for scraps!
- Red Yarn: For the comb and wattle (tiny scrap).
- Orange or Yellow Yarn: For the beak (tiny scrap).
- Black Yarn or Embroidery Floss: For the eyes (tiny scrap).
- Crochet Hook:
- A 3.0mm (US C/2) or 3.5mm (US E/4) hook. For small motifs and keychains, a slightly smaller hook than usual creates a tighter, more defined fabric, which is great for durability.
- Scissors: For cutting yarn.
- Yarn Needle (Tapestry Needle): Essential for weaving in ends and embroidering the facial features.
- Keychain Hardware: A split ring keychain or a small swivel clasp.
2. Basic Crochet Stitches & Techniques You’ll Use
This pattern primarily uses fundamental crochet stitches and working in rows:
- Chain (ch): Used for starting and for turning chains.
- Slip Stitch (sl st): For joining and neatening.
- Single Crochet (sc): Creates a dense, sturdy fabric.
- Half Double Crochet (hdc): A medium-height stitch.
- Double Crochet (dc): A taller stitch.
- Triple/Treble Crochet (tr): The tallest stitch used, for the tail feather.
- Fasten Off: Securely ending your work.
- Weaving in Ends: Hiding tails for a neat finish.

Crochet Chicken Keychain Motif Pattern
This pattern creates a small, flat chicken that’s perfect for a keychain.
Abbreviations (US Crochet Terms):
- MC: Main Color
- R/Row: Row
- ch: chain
- sl st: slip stitch
- sc: single crochet
- hdc: half double crochet
- dc: double crochet
- tr: triple crochet
- st(s): stitch(es)
Part 1: Chicken Body (Main Color – MC)
We’ll start with the chicken’s body and shape it as we go.
- Ch 10.
- Row 1 (Body Base): Sc in the 2nd ch from hook. Sc in the next 7 ch. In the last ch, work (3 sc). Now, working down the opposite side of the foundation chain: sc in the next 7 ch. (18 sc total)
- You should have an oval shape now.
- Row 2 (Head & Tail Shaping): Ch 1, turn.
- Sc in the first 7 sts.
- Head Section: (Sl st, sc, hdc, dc) all in the next st. (This creates the start of the head curve).
- Tail Section: (Hdc, dc, tr, dc, hdc) all in the next st. (This creates the main tail feather).
- Sc in the next 7 sts.
- Sl st into the last st.
- Fasten off MC, leaving a medium tail (approx. 6 inches / 15 cm) for weaving in.
Part 2: Chicken Details – Comb, Wattle, Beak, Eye
Now to add the features that make it a chicken!
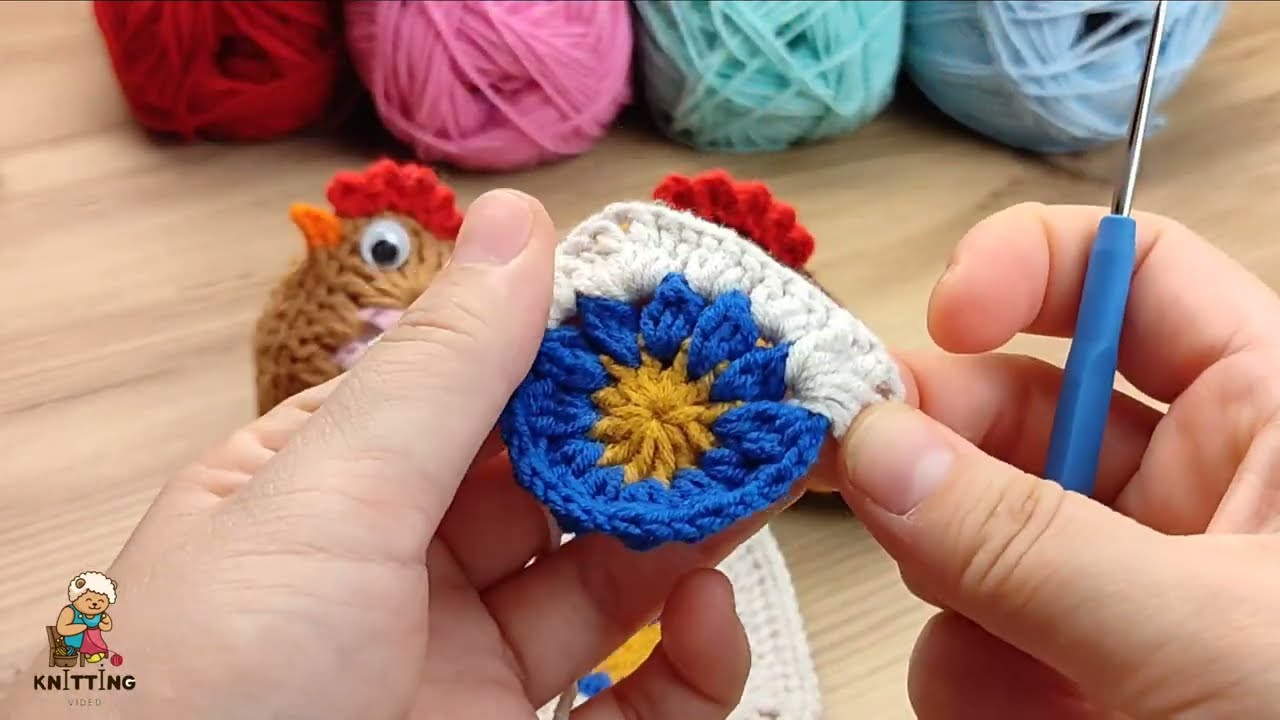
- Comb (Red Yarn):
- Ch 5.
- Sl st into the 2nd ch from hook. Sc into the next ch. Hdc into the next ch. Dc into the last ch.
- Fasten off, leaving a tail for sewing.
- Attach: Using your yarn needle, sew the comb securely onto the top curve of the chicken’s head (the part made with the dc/hdc stitches in Row 2 of the body).
- Wattle (Red Yarn):
- Ch 3.
- Dc into the 2nd ch from hook. Sl st into the same ch.
- Fasten off, leaving a tail for sewing.
- Attach: Sew the wattle just under where the beak will be, on the “chin” area of the head.
- Beak (Orange or Yellow Yarn):
- Ch 4.
- Sl st into the 2nd ch from hook. Sc into the next ch. Sl st into the last ch.
- Fasten off, leaving a tail for sewing.
- Attach: Sew the beak onto the front of the chicken’s head, positioned over the wattle.
- Eye (Black Yarn or Embroidery Floss):
- Thread a short piece of black yarn or embroidery floss onto your yarn needle.
- Make a small ‘V’ shape or a simple straight stitch on the side of the head, above the beak, where the eye would be.
- Secure the ends on the back of the motif.
Part 3: Finishing and Attaching to Keychain
- Weave in All Ends NEATLY: This is absolutely crucial for a polished, professional-looking keychain. Use your yarn needle to carefully weave in every single yarn tail securely into the stitches on the back of your chicken motif. Take your time to hide them well.
- Attach Keychain Hardware:
- Locate the top back of the chicken’s body, near the base of the tail or directly above the main body where you want it to hang.
- With a new piece of Main Color yarn (or the long tail from the body if you have enough), create a small loop of chains (e.g., ch 5-7, then sl st back into the same stitch to form a loop) and reinforce it by going over the stitches again with your yarn needle. This loop is where your keychain hardware will attach.
- Alternatively, simply use your yarn needle to make a very sturdy knot and a few secure stitches directly into the motif, then slide the split ring of the keychain through those stitches.
- Thread your keychain split ring or swivel clasp onto this loop or directly through the reinforced stitches. Make sure it’s very secure, as keychains get a lot of wear and tear.
- Blocking (Optional): For a flatter, more refined look, a gentle steam block or wet block can help your chicken motif lay perfectly flat.
4. Tips for a Charming & Durable Chicken Keychain
- Yarn & Hook: Using a slightly smaller hook than recommended for your yarn creates a denser fabric, which is perfect for keychains. It helps prevent stretching and makes the item more durable.
- Consistent Tension: Maintain even tension throughout to ensure a uniform and well-shaped chicken.
- Facial Expressions: The eyes, nose, and whiskers are where you can really give your chicken personality! Experiment with different styles.
- Color Play: Don’t limit yourself to white! A yellow chick, a speckled brown hen, or even a whimsical blue chicken would be adorable.
- Double Layer (for more firmness): For an even sturdier keychain, you can crochet a second identical chicken body (without the features) and then whip stitch the two pieces together around the edges, optionally stuffing it with a tiny amount of fiberfill before fully closing, for a slightly plump effect.
You now have a detailed tutorial on how to crochet an adorable and practical chicken keychain motif! Enjoy making these sweet little companions.