 by
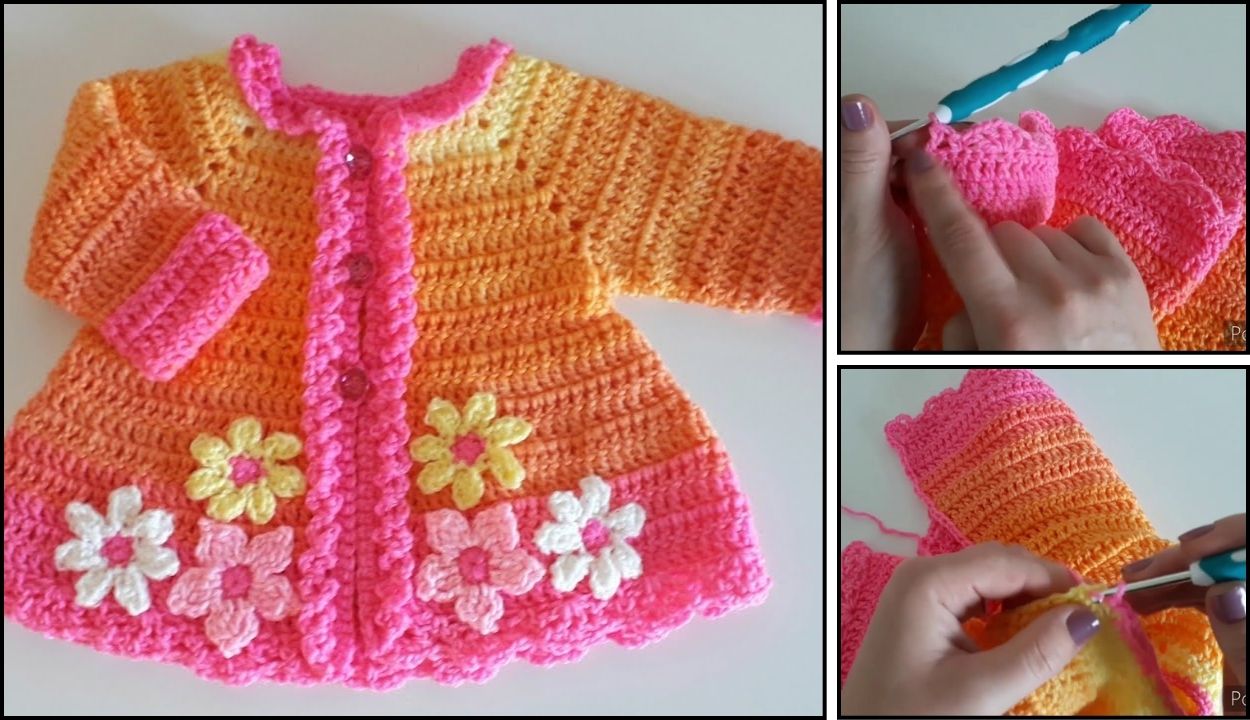
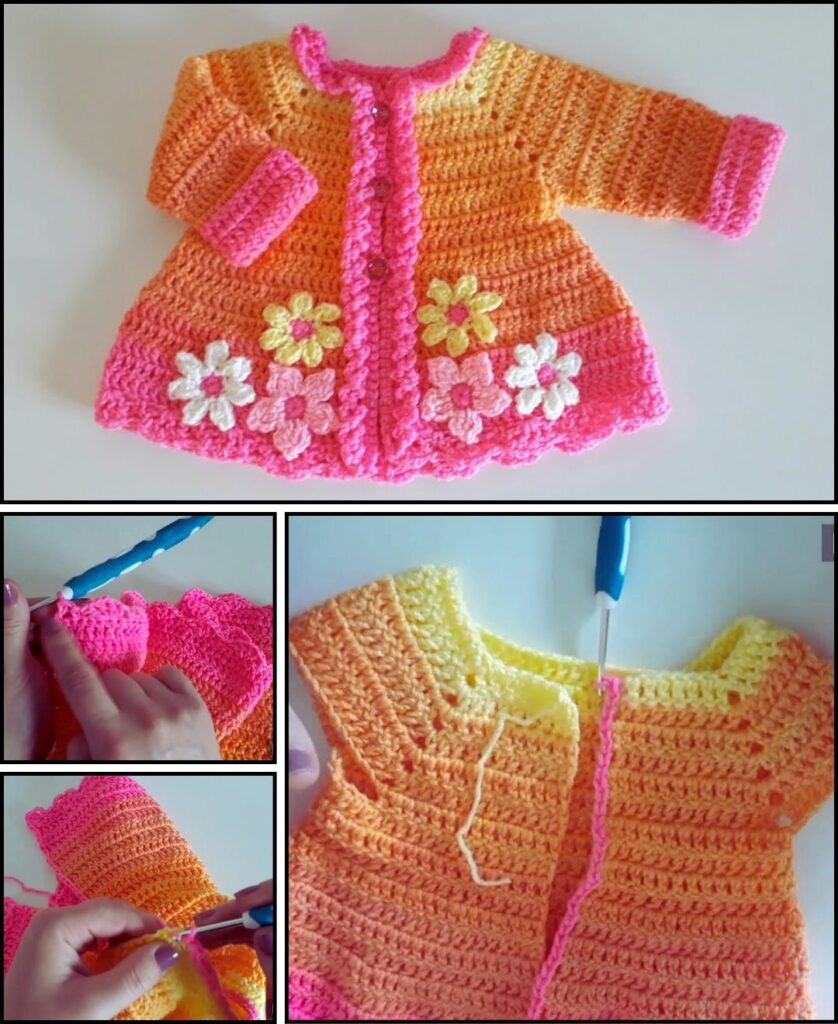
by Crocheting a simple cardigan for a baby girl is a lovely and practical project! It’s a fantastic garment for layering, providing just enough warmth without being too bulky, and it makes for a cherished handmade gift. The key to a “simple” cardigan for a beginner is often a top-down construction using basic stitches, which minimizes seaming and allows for easy adjustments.
Considering you’re in Phnom Penh, where the climate is warm, yarn choice is crucial to ensure the cardigan is breathable, soft, and comfortable for a baby.

Choosing the Right Yarn for a Simple Baby Cardigan
For a baby cardigan in a warm climate, you’ll want fibers that are light, soft, and easy to care for:
- 100% Cotton: This is highly recommended.
- Pros: Extremely breathable, absorbent, soft against delicate skin, durable, and machine washable (a must for baby items!). It also provides excellent stitch definition.
- Cons: Less stretchy than some blends, but its breathability makes it ideal for warmer weather.
- Cotton/Bamboo Blend:
- Pros: Combines the best qualities of cotton with the incredible softness, drape, and natural coolness of bamboo. Bamboo is also often hypoallergenic and has moisture-wicking properties.
- Cons: Can be a bit pricier.
- Lightweight Acrylic (Baby Acrylic):
- Pros: Very affordable, widely available in a huge range of colors, and extremely easy to care for (machine washable and dryable). Many baby-specific acrylics are designed to be incredibly soft.
- Cons: Less breathable than natural fibers, so it might feel warmer in very high humidity. If choosing acrylic, opt for a DK (Double Knitting / Light Worsted / Category 3) or Sport Weight (Category 2) yarn.
- Yarn Weight: DK (Double Knitting / Light Worsted / Category 3) is usually perfect for a baby cardigan, offering a good balance of fabric density and lightness. If you want something even more delicate, Sport Weight (Category 2) would also work well.
How to Crochet a Simple Baby Cardigan: Top-Down Construction
For a simple baby cardigan, the top-down (yoke first) method is often recommended for beginners. This means you start at the neckline and work downwards, increasing stitches to create the shoulders and body. The main advantages are minimal seaming (usually just the underarms) and the ability to try it on as you go (if you have the baby present, or a doll/teddy bear of similar size).
Important Note: While this guide provides a detailed outline, crocheting a garment that fits well benefits greatly from following a specific, tested pattern. There are many excellent free patterns available online (on Ravelry, designer blogs, yarn company websites) for top-down baby cardigans. This guide will give you the understanding to follow such a pattern.
1. Essential Materials You’ll Need
- Yarn: Your chosen yarn (e.g., 200-300 grams of DK weight cotton for 0-6 months size).
- Crochet Hook: The size recommended by your chosen pattern, suitable for your yarn weight (e.g., 3.5mm-4.0mm, US E/4 to G/6).
- Scissors: For cutting yarn.
- Yarn Needle (Tapestry Needle): Essential for weaving in ends and closing any small gaps.
- Stitch Markers: Highly recommended for marking the four increase points on the yoke. You’ll need at least 4.
- Buttons: 3-5 buttons (choose flat, child-safe buttons that are too large to be a choking hazard for the baby’s age).
- Measuring Tape: Crucial for checking your gauge swatch and the garment dimensions.
2. Basic Crochet Stitches You’ll Use
This pattern often utilizes just a few fundamental stitches:
- Chain (ch): For the foundation and turning.
- Slip Stitch (sl st): For joining rounds or moving across stitches.
- Half Double Crochet (hdc): A popular choice for simple cardigans as it’s quick to work, creates a nice fabric, and isn’t too open.
- Double Crochet (dc): Another option for a slightly looser, drapier fabric.
- Increase (inc): Working 2 stitches into one to expand the fabric.
- Fasten Off: To secure your work.
- Weaving in Ends: Hiding yarn tails neatly.

Top-Down Baby Cardigan Pattern Outline (HDC Stitch Example)
This example uses Half Double Crochet (HDC) as the main stitch, creating a sturdy yet flexible fabric.
Abbreviations (US Crochet Terms):
- ch: chain
- sl st: slip stitch
- hdc: half double crochet
- inc hdc: increase half double crochet (work 2 hdc in the same stitch)
- st(s): stitch(es)
- sp: space
- beg ch-2: beginning chain-2 (often used as the first hdc)
- FO: Fasten off
Step 1: Gauge Swatch (DO NOT SKIP THIS!)
- Importance: This is the most crucial step for ensuring your cardigan turns out the correct size.
- Instructions:
- Chain about 20-25 stitches.
- Work about 10-15 rows in
hdc. - Measure a 4×4 inch (10×10 cm) square within your swatch.
- Compare your stitch count and row count to what your chosen pattern states for a 4×4 inch square.
- Adjust your hook size if necessary:
- If you have more stitches/rows than the pattern, your tension is too tight; go up a hook size.
- If you have fewer stitches/rows than the pattern, your tension is too loose; go down a hook size.
- Repeat until your swatch matches the pattern’s gauge.

Step 2: Create the Yoke (The Starting Point)
The yoke is the top section of the cardigan, from the neckline down to the armpits. It’s usually worked in rows, increasing at four strategic points to create the front, sleeves, and back sections.
- Foundation Chain: Chain the number of stitches specified by your pattern for the neckline. This will be the starting width of the cardigan at the neck.
- (Example for a small baby size: ch 49)
- Row 1 (Setting Up Yoke):
- Hdc in the 3rd ch from hook. Hdc in the next [Number] stitches (Front Panel 1).
- Inc hdc in the next st (this is your first increase point). Place a stitch marker in the second hdc of this increase.
- Hdc in the next [Number] stitches (Sleeve 1).
- Inc hdc in the next st (second increase point). Place a stitch marker.
- Hdc in the next [Number] stitches (Back Panel).
- Inc hdc in the next st (third increase point). Place a stitch marker.
- Hdc in the next [Number] stitches (Sleeve 2).
- Inc hdc in the next st (fourth increase point). Place a stitch marker.
- Hdc in the remaining [Number] stitches (Front Panel 2).
- Ch 2, turn. (This counts as your first hdc for the next row).
- (The exact stitch counts for each section will come from your specific pattern).
- Subsequent Yoke Rows (Increasing):
- Work hdc in each hdc across the row until you reach the stitch before a stitch marker.
- Inc hdc in the stitch directly before the marker.
- Work hdc in the marked stitch.
- Inc hdc in the stitch directly after the marker.
- Move the stitch marker up to the middle hdc of the three hdc you just created around the previous marker.
- Repeat this increase process at each of the 4 stitch markers across the row.
- Continue to the end of the row. Ch 2, turn.
- Continue working these increase rows until the yoke reaches the desired armhole depth. This is crucial for fit. Your pattern will specify how many rows or a measurement (e.g., “yoke measures 4 inches from neckline”). The yoke should lie flat.
Step 3: Divide for Body and Sleeves
Once the yoke is complete, you’ll separate the stitches for the body of the cardigan from the sleeve stitches.
- Next Row (Dividing Row):
- Work hdc across the First Front Panel stitches (up to the first stitch marker).
- Chain 2-4 stitches (this creates the underarm space).
- Skip all the stitches of the First Sleeve (from the 1st to the 2nd stitch marker).
- Work hdc across all the Back Panel stitches (from the 2nd to the 3rd stitch marker).
- Chain 2-4 stitches (second underarm space).
- Skip all the stitches of the Second Sleeve (from the 3rd to the 4th stitch marker).
- Work hdc across the Second Front Panel stitches (from the 4th stitch marker to the end of the row).
- Ch 2, turn.

Step 4: Work the Body of the Cardigan
Now you’ll work only on the stitches that form the main body of the cardigan (the two fronts and the back combined, including the underarm chains).
- Continue Working in Rows: Hdc in each hdc across the row, working into the chain stitches of the underarm chains as well.
- Length: Continue working straight rows until the cardigan body reaches the desired length for the baby (measure from the armpit down).
- Bottom Hem (Optional): You can add a decorative border to the bottom edge, such as a few rows of single crochet, a simple shell stitch, or ribbed post stitches.
- Fasten Off.
Step 5: Work the Sleeves (Make Two)
Now you’ll go back and work the sleeves into the armhole openings you created. Sleeves are often worked in the round to avoid a seam, but can also be worked flat.
- Rejoin Yarn: With your hook, rejoin your yarn into the center of one of the underarm chain spaces.
- Work in Rounds:
- Round 1: Ch 2 (counts as first hdc). Hdc evenly around the armhole opening, including into the underarm chains and the skipped stitches of the sleeve. Join with a sl st to the top of the beg ch-2.
- Subsequent Rounds: Ch 2, hdc in each hdc around. Join with a sl st.
- Taper (Optional): For a slightly tapered sleeve, you might decrease a stitch or two evenly every few rounds.
- Length: Continue until the sleeve reaches the desired length from the armpit to the wrist.
- Cuff (Optional): Add a decorative or ribbed cuff at the end of the sleeve.
- Fasten Off.
- Repeat for the Second Sleeve.

Step 6: Finishing Touches (Button Band, Buttonholes, Buttons, Weaving in Ends, Blocking)
This is where your cardigan gets its polished look!
- Front Edging / Button Bands:
- Work an even border along the entire front opening of the cardigan (from the bottom hem, up one front panel, around the neckline, and down the other front panel to the bottom hem). This usually consists of 2-3 rows of single crochet (sc) or half double crochet (hdc). This provides stability for the buttons.
- Buttonholes: On one of the front bands (usually the right front for girls, left for boys, but always check your specific pattern!), you’ll create buttonholes on one of the rows. A common method is:
ch 1-2(depending on button size), skip 1-2 stitches, then continue your sc/hdc. In the next row, work into the chain space. Mark buttonhole positions evenly beforehand (e.g., one at the top, one at the bottom, and evenly spaced in between). - Button Band: The opposing front band will be a solid band where the buttons are sewn.
- Weave in All Ends: This is essential for a clean, professional, and safe finish. Use your yarn needle to securely weave in every single yarn tail.
- Attach Buttons: Carefully sew the buttons onto the solid button band, directly opposite the buttonholes. Choose flat, child-safe buttons and sew them on very securely to prevent any choking hazards.
- Blocking: This final step makes a significant difference in how your cardigan looks and fits.
- Method: Gently wet your finished cardigan (you can submerge it in cool water with a tiny bit of mild soap, then gently squeeze out excess water, or simply mist it thoroughly with a spray bottle).
- Lay it flat on a blocking mat or clean towel. Gently shape the cardigan to the correct dimensions (check chest, length, sleeve length, and ensure the front opening is even). Use rust-proof pins to hold it in place.
- Allow it to air dry completely. Do not use heat (like a hairdryer) as it can distort the yarn.
Tips for a Simple Baby Cardigan
- Read the Pattern Completely: Before you start, read through your chosen pattern from beginning to end. This helps you understand the construction and anticipate any tricky parts.
- Stitch Markers are Your Friends: Especially for the yoke increases, stitch markers will save you a lot of counting and frustration.
- Consistent Tension: Try to maintain even tension throughout your work. This is key for a fabric that lies flat and has an even drape.
- Child Safety: Always choose yarns that are soft, hypoallergenic, and won’t irritate baby skin. Ensure all buttons are securely attached and are too large to be a choking hazard.
- Enjoy the Process: Crocheting a garment for a baby is a labor of love and a wonderful gift. Take your time and enjoy creating something beautiful!
With these detailed steps and a good pattern, you’ll be well on your way to crocheting a beautiful and practical simple cardigan for a baby girl!