by
by Making a crochet heart keychain is a lovely way to add a handmade touch to your keys, bag, or to give as a small, thoughtful gift! It’s a quick and satisfying project, even for beginners. This tutorial will focus on how to crochet a simple yet charming heart keychain.
Since you’re in Phnom Penh, where it’s warm, 100% cotton yarn is an excellent choice for a keychain. Cotton is durable, holds its shape well, and its clear stitch definition will make your heart look neat and pretty.
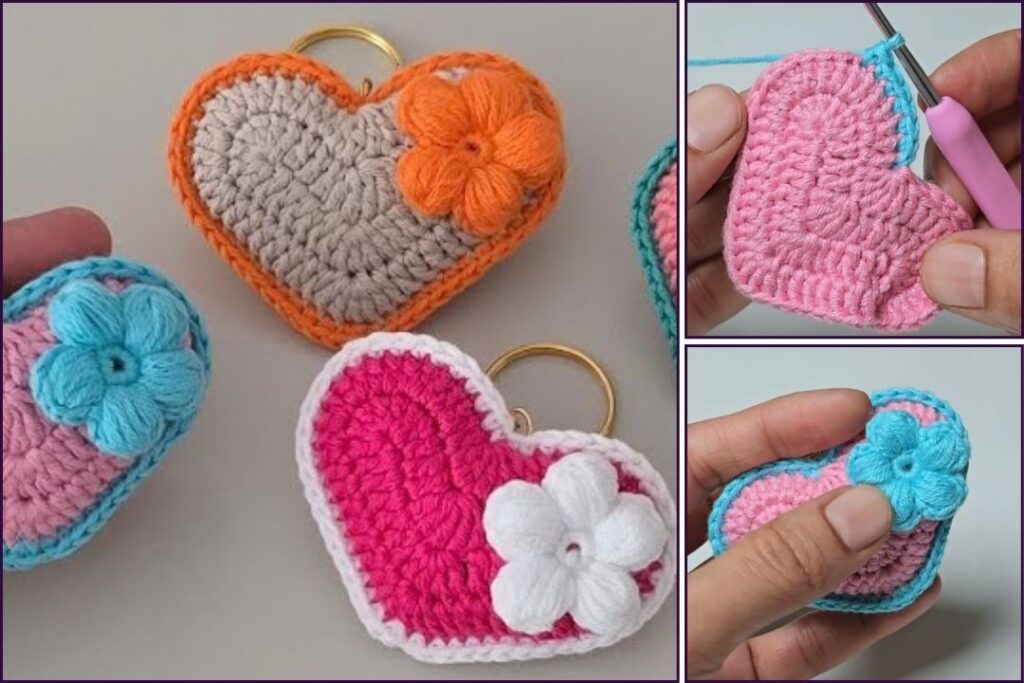
How to Crochet a Cute Heart Keychain
This tutorial will guide you through creating a small, slightly puffed heart, perfect for a keychain.
1. Essential Materials You’ll Need
- Yarn:
- Any color you like for the heart (e.g., red, pink, purple, or even a variegated yarn for a unique look). Worsted Weight (Aran / Medium / Category 4) 100% cotton or a soft acrylic is ideal. You’ll only need a small amount, perfect for using up scraps!
- Crochet Hook:
- A 3.5mm (US E/4) or 4.0mm (US G/6) hook. For keychains and amigurumi-style projects, a slightly smaller hook than recommended for your yarn helps create a tighter fabric, preventing stuffing from showing through and making the item more durable.
- Scissors: For cutting yarn.
- Yarn Needle (Tapestry Needle): Essential for weaving in ends and shaping the heart.
- Stuffing (Optional): A tiny bit of polyester fiberfill (Poly-fil) if you want a slightly plump heart.
- Keychain Hardware: A split ring keychain or a small swivel clasp.
2. Basic Crochet Stitches & Techniques You’ll Use
This pattern uses fundamental crochet stitches and basic shaping:
- Magic Ring (MR): (Also Magic Circle or Adjustable Ring). This creates a tight, hole-free start, which is great for the rounded tops of the heart. If you’re new to this, a quick video tutorial on “crochet magic ring” can be very helpful!
- Chain (ch): Used for starting and for turning chains.
- Slip Stitch (sl st): For joining and neatening edges.
- Single Crochet (sc): Creates a dense, sturdy fabric.
- Half Double Crochet (hdc): A medium-height stitch, useful for shaping curves.
- Double Crochet (dc): A taller stitch, also good for curves.
- Triple/Treble Crochet (tr): An even taller stitch, used for the highest point of the curves.
- Fasten Off: Securely ending your work.
- Weaving in Ends: Hiding tails for a neat finish.
Crochet Heart Keychain Pattern
This heart is worked starting from the top two lobes and then joining them to form the bottom point. You’ll make two identical pieces that are then joined and optionally stuffed.
Abbreviations (US Crochet Terms):
- ch: chain
- sl st: slip stitch
- sc: single crochet
- hdc: half double crochet
- dc: double crochet
- tr: triple crochet
- MR: magic ring
- st(s): stitch(es)
Part 1: First Heart Lobe (Make 1)
This will form one of the rounded top sections of the heart.
- Rnd 1: Start with a MR.
- Ch 2 (does not count as a stitch).
- Work 15 dc into the Magic Ring.
- Pull the tail to close the ring tightly.
- Join with a sl st to the top of the first dc. (15 dc)
- Fasten off, leaving a tail about 4-6 inches (10-15 cm) for weaving in later.
Part 2: Second Heart Lobe (Make 1, but do NOT fasten off)
This will be identical to the first lobe, but you’ll keep the yarn attached to join the two pieces.
- Rnd 1: Start with a MR.
- Ch 2 (does not count as a stitch).
- Work 15 dc into the Magic Ring.
- Pull the tail to close the ring tightly.
- Join with a sl st to the top of the first dc. (15 dc)
- DO NOT FASTEN OFF. Keep the loop on your hook.
Part 3: Joining Lobes and Shaping the Heart
Now we’ll connect the two lobes and form the classic heart shape.
- Joining the Lobes:
- With the loop still on your hook from the second lobe, ch 1.
- Insert your hook into any stitch on the first heart lobe you made (the one you fastened off). Make a sl st to join the two lobes.
- Now, you’ll be working around the joined perimeter of both lobes.
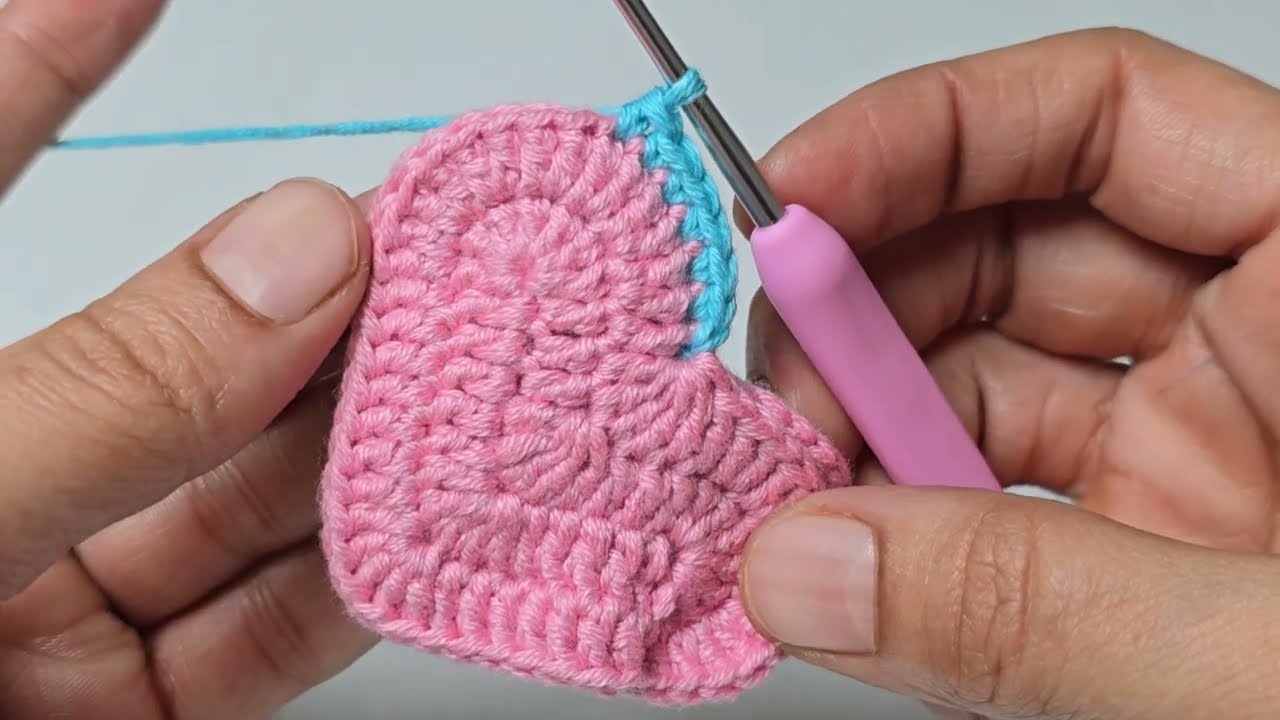
- Round 1 (Joining & First Half of Bottom Shaping):
- Ch 1 (does not count as st).
- Sc in each of the next 15 sts around the first lobe.
- Sc in the ch 1 space you made to join (this is the single chain between the lobes).
- Sc in each of the next 15 sts around the second lobe.
- Sc in the back loop of the ch 1 space you made to join (this is the other side of that single chain).
- You should now have 32 stitches total around the entire joined shape.
- Round 2 (Further Shaping):
- Ch 1, turn (or continue in rounds if you prefer, but turning helps make it flatter).
- Sc in the first 7 sts.
- Hdc in the next 2 sts.
- Dc in the next 2 sts.
- Tr in the next st (this is the very bottom point of the heart).
- Dc in the next 2 sts.
- Hdc in the next 2 sts.
- Sc in the next 7 sts.
- Sl st in the last st. (24 sts)
- Fasten off, leaving a very long tail (at least 15-20 inches / 40-50 cm). This tail will be used for sewing the heart closed and attaching the keychain.
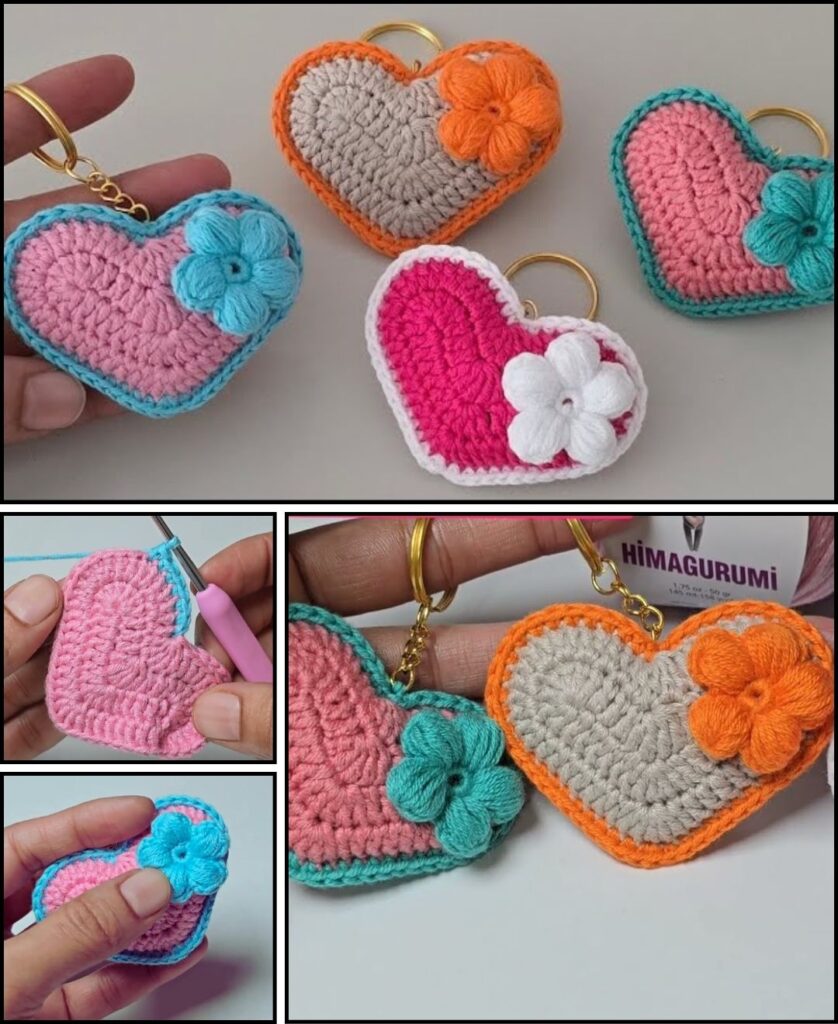
Part 4: Finishing and Assembling Your Heart Keychain
- Stuffing (Optional): If you want a plump heart, lightly stuff it with fiberfill. Use the blunt end of your crochet hook or a small stick to push the stuffing into the curves. Don’t overstuff, or it will distort the shape.
- Close the Heart:
- Thread the long tail onto your yarn needle.
- Fold the heart in half, bringing the raw edges of Round 2 together.
- Using the yarn needle, whip stitch or sl st through both layers of stitches around the edge of the heart to close it up. Stitch all the way around until you’ve closed the opening, maintaining the heart’s shape.
- Shape the Heart (If needed): Use your yarn needle to push down slightly into the center top of the heart (between the two lobes) to create a more defined indentation. You can even make a small stitch or two across that indentation to secure it.
- Attach Keychain Hardware:
- Locate the very top center of the heart, between the two lobes.
- Using the remaining yarn tail on your needle, make a sturdy loop of chain stitches (e.g., ch 5-7, sl st back into the same point) or simply stitch firmly through a few stitches at the very top.
- Thread your keychain split ring or clasp onto this loop or directly through the top stitches of the heart. Make sure it’s very secure, as keychains get a lot of wear and tear. You can go back and forth a few times with your needle and yarn to reinforce the attachment.
- Weave in All Remaining Ends NEATLY: This is crucial for a polished, professional-looking keychain. Take your time to hide all tails securely within the heart’s stitches.
5. Tips for a Stylish & Durable Heart Keychain
- Yarn & Hook: Using a slightly smaller hook than recommended for your yarn creates a denser fabric, which is perfect for amigurumi-style keychains. It helps prevent stuffing from showing and makes the item more durable.
- Stuffing: If stuffing, aim for just enough to make it plump, not rock hard. Too much stuffing can distort the heart shape.
- Consistent Tension: Maintain even tension throughout to ensure a uniform and well-shaped heart.
- Blocking (Optional): While not strictly necessary for such a small item, a light steam block can help your heart lay perfectly flat and smooth, especially if you didn’t stuff it.
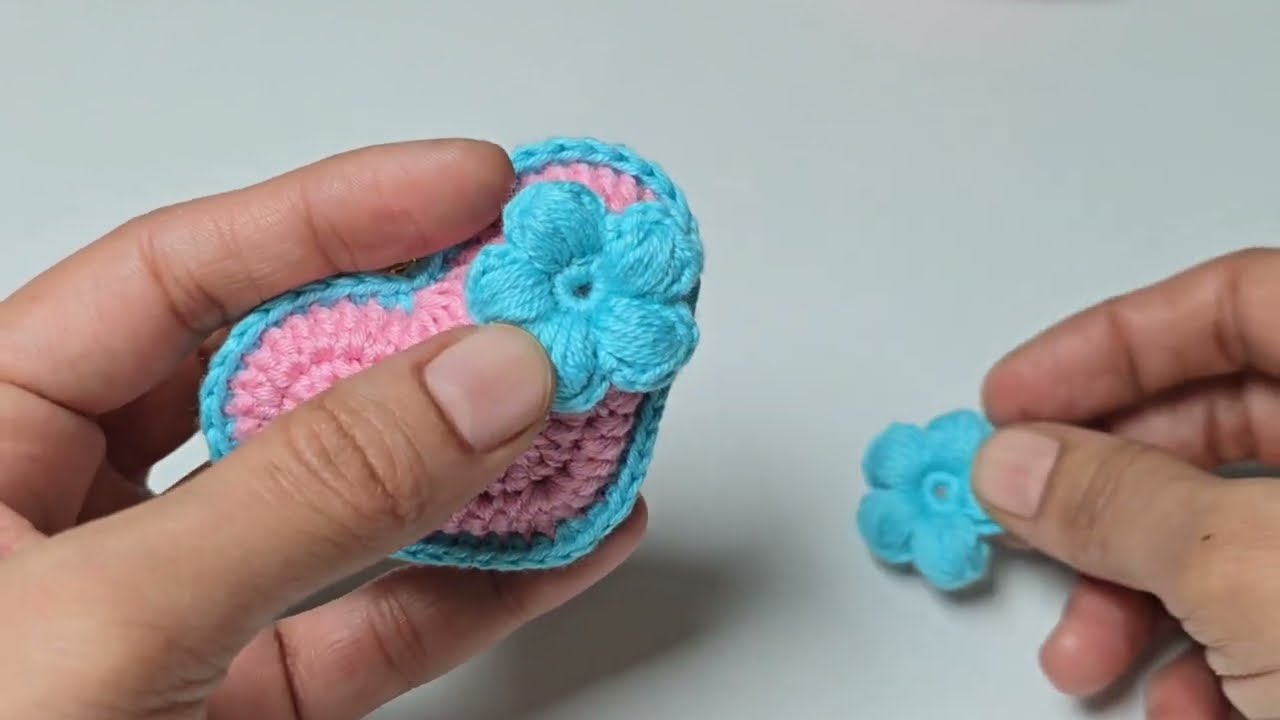
- Personalization:
- Colors: Make them in various colors! A gradient yarn can create a unique heart.
- Embellishments: You could embroider a tiny initial on one side, or sew a tiny button or bead to the center of one side.
- Edges: For a different look, you could add a round of single crochet or crab stitch (reverse single crochet) around the entire perimeter of the finished heart before closing it, for a more defined border.
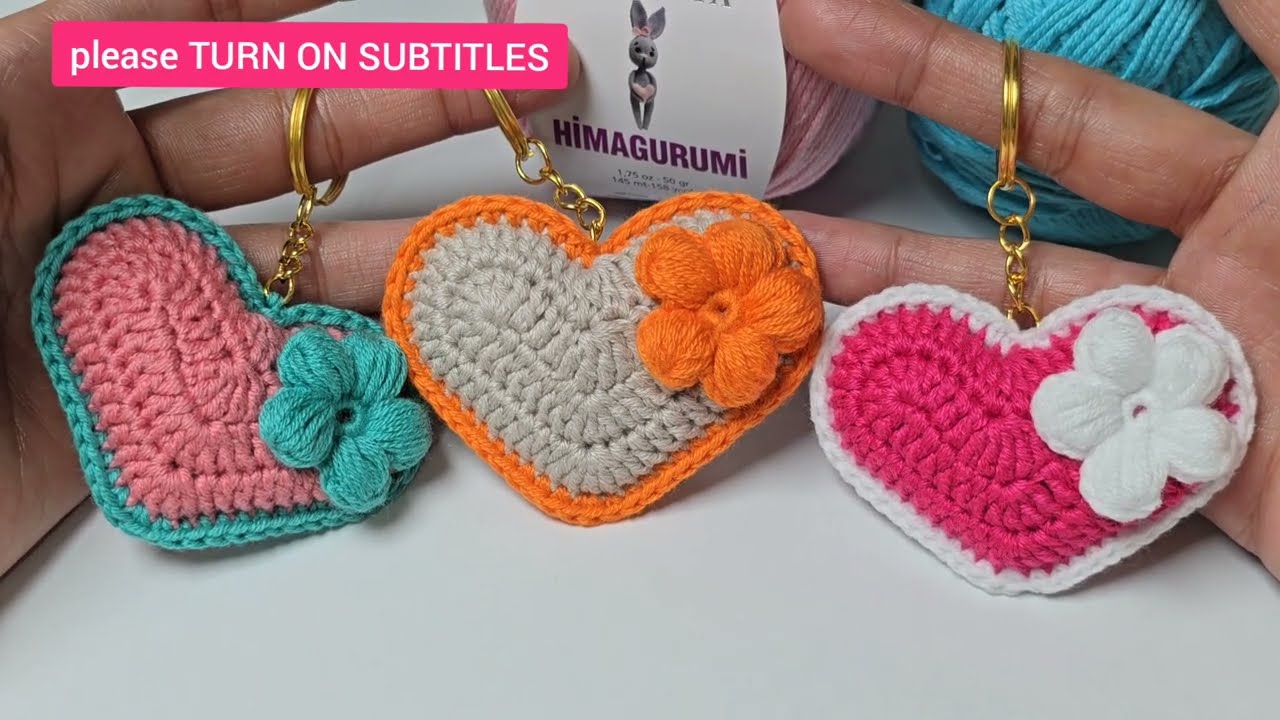
- Gift Idea: Attach your handmade heart keychain to a gift bag, a package, or pair it with a small handwritten note.
You now have a detailed tutorial on how to crochet an adorable and practical heart keychain! Enjoy making these sweet little tokens.