 by
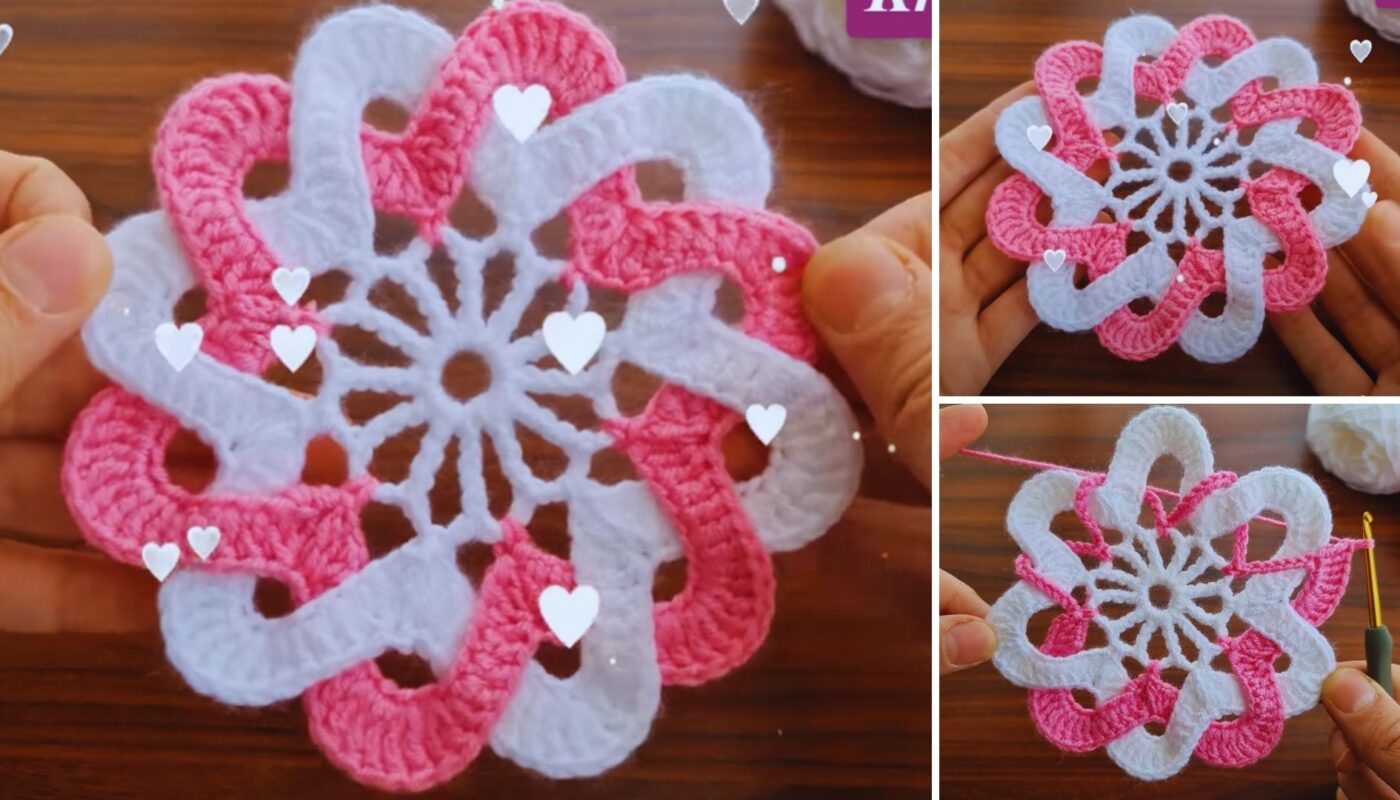
by Making a doily crochet flower combines the delicate beauty of a flower with the intricate artistry of a doily. This project results in a lovely lace-like piece that can serve as a coaster, a decorative accent on a table, or even be framed as art.
This tutorial will guide you through creating a charming, multi-petal flower doily with an openwork design.
How to Make a Beautiful Doily Crochet Flower
Project Overview: This pattern creates a delicate, flower-shaped doily with distinct petals radiating from a central core. It involves working in the round using a combination of basic and taller stitches, along with chain spaces, to achieve a beautiful, lacy effect.
Skill Level: Intermediate (Requires comfortable knowledge of chain, slip stitch, single crochet, double crochet, treble crochet, and precision in working into specific stitches and chain spaces.)
Finished Doily Dimensions (Approximate):
- Diameter: 6-8 inches (15-20 cm), depending on thread/yarn thickness and tension.
Materials You’ll Need:
- Crochet Thread / Yarn:
- Size 10 Crochet Thread: (Traditional doily look, very delicate). You’ll need about 50-70 yards (45-65 meters).
- Alternatively, Fine (#2 Sport) or DK (#3 Light Worsted) Weight Cotton Yarn: (For a slightly larger, less delicate flower with easier handling). You’ll need about 60-90 yards (55-80 meters).
- Why these? Cotton or cotton thread provides excellent stitch definition, holds shape well, and is traditional for doilies.
- Crochet Hook:
- For Size 10 Thread: Steel hook, size 1.75mm (US B/1) or 2.0mm (US B/1).
- For Fine/DK Cotton: Hook size 2.5mm (US C/2) to 3.5mm (US E/4), depending on yarn weight and desired fabric density.
- Yarn Needle (Tapestry Needle): Essential for weaving in ends.
- Scissors
- Stitch Markers (Optional): Can be helpful for marking the beginning of rounds or specific repeat sections.
- Blocking Supplies (Highly Recommended): Blocking mat, rust-proof pins, spray bottle with water (or fabric stiffener).
Gauge (Less Critical, but Impacts Size):
Gauge is not crucial for fit, but it will determine the final size of your doily. Your fabric should be firm enough to hold its shape but not overly stiff.
Abbreviations Used:
- ch: chain
- sl st: slip stitch
- sc: single crochet
- hdc: half double crochet
- dc: double crochet
- tr: treble crochet (yarn over twice, insert hook, yo and pull up loop, [yo and draw through 2 loops] 3 times)
- dtr: double treble crochet (yarn over three times, insert hook, yo and pull up loop, [yo and draw through 2 loops] 4 times)
- st(s): stitch(es)
- sp: space
- ch-sp: chain space
- sk: skip
- MR: Magic Ring (also known as Magic Circle or Adjustable Ring)
- picot: ch 3, sl st into the 3rd ch from hook
Understanding Doily Flower Construction:
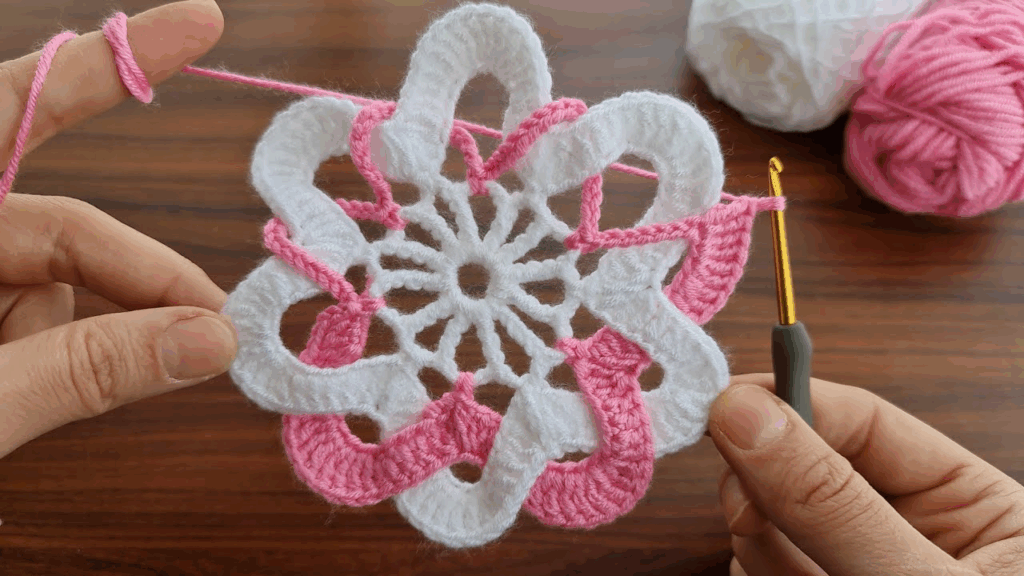
This doily will be built in rounds, starting from a central core. Petals will be formed in outer rounds using taller stitches and chain spaces to create the openwork. Precision in counting stitches and chains is key to keeping the doily flat and maintaining its symmetrical flower shape.
Let’s Start Crocheting Your Doily Flower!
Part 1: The Flower Center
We’ll start with a tightly closed center for the doily.
Option A: Starting with a Magic Ring (Recommended for a tight center)
- Start: With your chosen thread/yarn, make a Magic Ring (MR).
- Round 1: Ch 2 (does NOT count as a stitch). Work 12 dc into the MR. Pull the tail tight to close the ring. Sl st to the top of the first dc to join. (Total: 12 dc).
Option B: Starting with Chain 4 Method (Alternative)
- Start: Ch 4. Sl st into the first ch to form a ring.
- Round 1: Ch 2 (does NOT count as a stitch). Work 12 dc into the ring. Sl st to the top of the first dc to join. (Total: 12 dc).
Part 2: Petal Base and Shaping Rounds
Now we’ll establish the foundation for the petals and begin to define them.
Round 2:
- Ch 1 (does NOT count as a stitch). Sc in the same st where you joined.
- Ch 4. Sk 1 dc. (Sc in next dc, ch 4, sk 1 dc). Repeat from * to * 4 more times.
- Sl st to the first sc to join. (Total: 6 sc, 6 ch-4 sps). These ch-4 sps will be the base for your petals.
Round 3:
- Sl st into the first ch-4 sp.
- Ch 3 (counts as 1st dc). Work (2 dc, ch 3, 3 dc) into the same ch-4 sp. (This creates your first ‘shell’ that will be a petal).
- (Sl st into the next sc, (3 dc, ch 3, 3 dc) into the next ch-4 sp). Repeat from * to * 4 more times.
- Sl st into the first sc (from Round 2) to complete the round. (Total: 6 shells of (3dc, ch3, 3dc) separated by sl sts).
Round 4:
- Sl st into the first 3 dc of the current shell until you reach the ch-3 sp.
- Ch 3 (counts as 1st dc). Work (4 dc, ch 3, 5 dc) into the same ch-3 sp. (This expands the petal).
- (Sl st into the next sl st from previous round, sl st into the first 3 dc of next shell, sl st until you reach the ch-3 sp).
- Work (5 dc, ch 3, 5 dc) into the next ch-3 sp.
- Repeat steps 3 and 4 for the remaining petals.
- Sl st into the first dc to join the round. (Total: 6 expanded shells).
Part 3: Defining the Petals with Lace (Optional extra rounds for larger flower)
These rounds add more height and a lacy edge to your petals.
Round 5:
- Sl st into the first 5 dc of the current shell until you reach the ch-3 sp.
- Ch 4 (counts as 1st tr). Work (1 tr, ch 3, 2 tr) into the same ch-3 sp. (This creates the peak of your petal).
- Ch 3. Sc in the space between the current petal’s second 5-dc cluster and the first 5-dc cluster of the next petal (it’s essentially the sl st point from the previous round).
- Ch 3. (2 tr, ch 3, 2 tr) into the next ch-3 sp (the peak of the next petal).
- Repeat steps 3 and 4 around the doily.
- Sl st to the top of the initial ch-4 to join. (Total: 6 tr-clusters, 12 ch-3 sps, 6 sc).
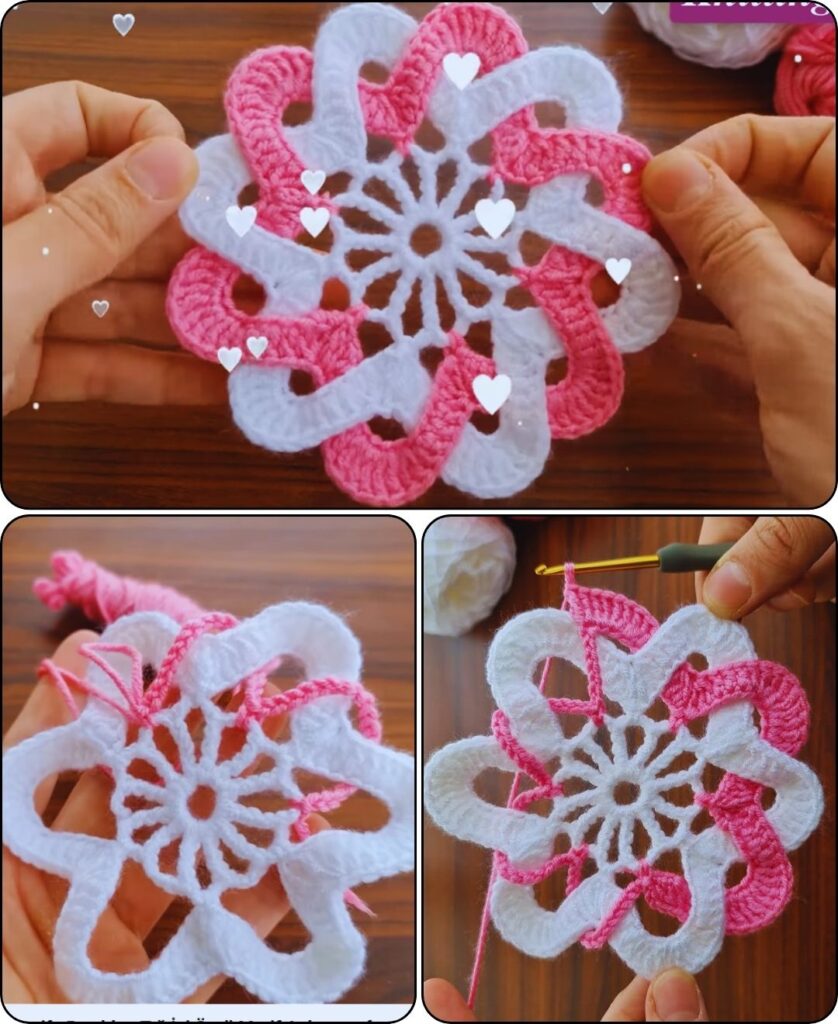
Round 6 (Pico-Edged Petal Tips):
- Sl st into the first tr.
- Ch 4 (counts as 1st tr). Work 1 tr into the next tr.
- Work (2 tr, picot, 2 tr) all into the ch-3 sp at the tip of the petal.
- Work 1 tr into each of the next 2 tr.
- Ch 5. Sc into the next sc (between the petals).
- Ch 5. (1 tr in each of the next 2 tr, (2 tr, picot, 2 tr) in the ch-3 sp, 1 tr in each of the next 2 tr).
- Repeat steps 5 and 6 around the doily.
- Sl st to the top of the initial ch-4 to join. (Total: 6 petal peaks with picots, 12 ch-5 sps).

Part 4: Finishing & Blocking (Crucial for Doilies!)
- Fasten Off: After completing the last stitch and making your final sl st, cut your thread/yarn, leaving a tail about 4-6 inches (10-15 cm) long.
- Weave in All Ends: Thread the tail onto your yarn needle. Carefully weave it through several stitches on the back of your doily, securing it invisibly. If you used a Magic Ring, ensure the starting tail is pulled very tight and also woven in securely.
- Blocking (Highly Recommended): This step is essential for doilies. It opens up the lace pattern, makes the doily lie perfectly flat, and defines the petal shapes.
- Method 1 (Wet Blocking): Gently submerge your doily in lukewarm water (or water with a mild soap if washing). Squeeze out excess water gently (do not wring). Lay the doily flat on a clean blocking mat or a thick towel. Pin out all the points of the petals and the edges, shaping the doily to its desired symmetrical flower form. Allow it to air dry completely, which can take 12-24 hours.
- Method 2 (Steam Blocking): Lay your doily flat on a heat-safe surface (like an ironing board or blocking mat). Hold a steam iron (or a clothes steamer) a few inches above the doily, allowing the steam to penetrate the fibers. Do NOT touch the iron directly to the crochet. While the doily is warm and damp, gently pin out the petals and shape it. Let it cool and dry completely.
- Method 3 (Stiffening – Optional): If you want a very rigid doily, you can use a commercial fabric stiffener. Follow the product instructions for application and drying while pinned.
Tips for Success & Customization:
- Yarn/Thread Choice: Thinner threads will result in more delicate, traditional doilies. Thicker yarns (like fine cotton) will create a larger, more casual “flower mat.”
- Consistent Tension: Maintaining even tension is vital for openwork patterns. Inconsistent tension can lead to wavy edges or an uneven shape.
- Counting Stitches: Carefully count your stitches and chain spaces in each round. This is crucial for the symmetry and flatness of your doily. It’s easy to miss a stitch or add an extra chain in lacy patterns.
- Reading Your Work: Learn to recognize your stitches (dc, tr, ch-sp) so you know where to place your hook for the next round.
- Customizing Petals:
- More or Fewer Petals: To change the number of petals, you would adjust the number of starting dc in Round 1, and then ensure your increases in subsequent rounds divide evenly into your desired number of petals.
- Different Petal Shapes: Experiment with different stitch combinations (e.g., all dc, or adding dtr for taller petals) or varying chain space sizes within the petal clusters to create unique effects.
- Adding Rounds: You can design additional rounds to make your doily larger by continuing to build outward with chains and shell stitches, always ensuring your stitch count allows for a flat circle and maintains the petal repeats.
- Color: While most doilies are made in a single color to highlight the lace, you could experiment with a different color for the very center or for a final edging round.
Enjoy the meditative process of creating your own beautiful crochet doily flower!