 by
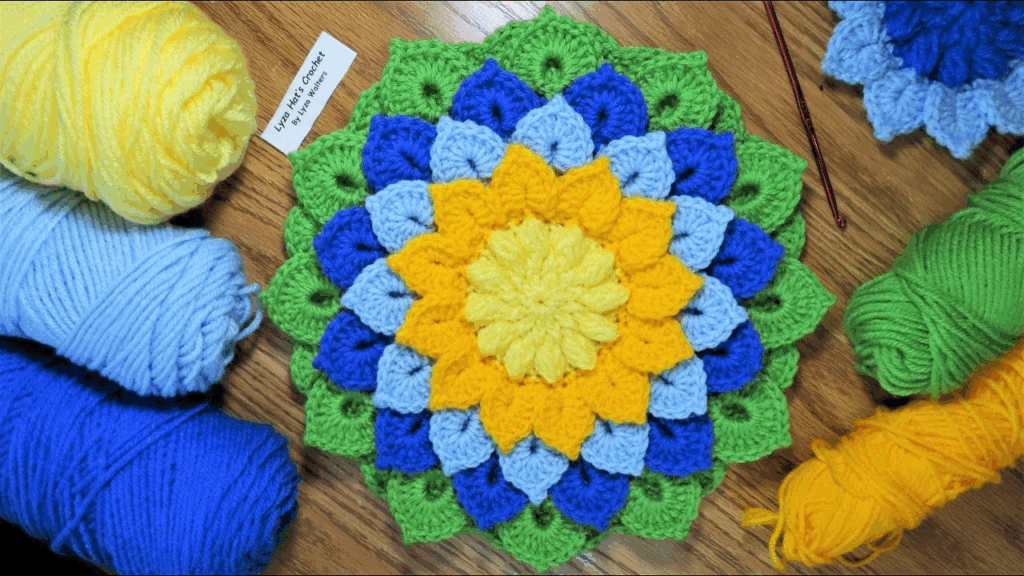
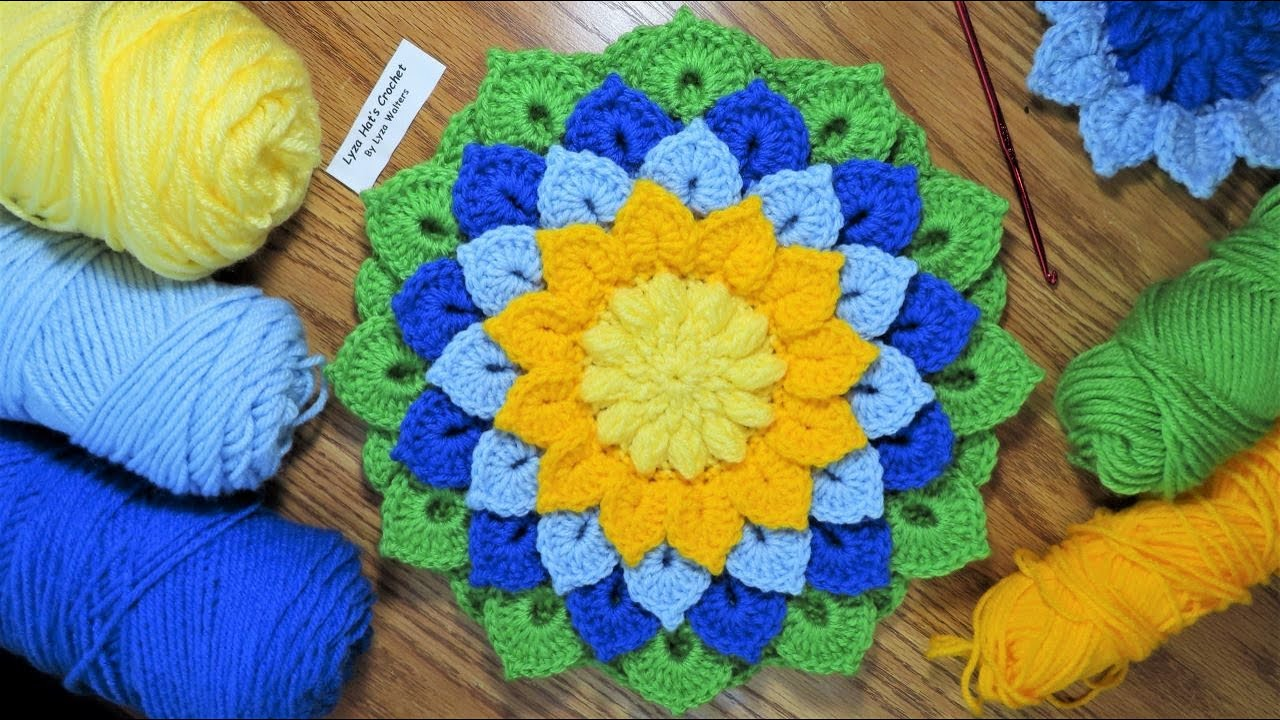
by Creating a large, decorative crochet sunflower is a wonderful project that brings a burst of sunshine into any space. These beautiful blossoms are perfect for home decor, wall hangings, afghan embellishments, or as standalone statement pieces.
Pattern: How to Make Crochet Decorative Large Sunflowers
Project Overview: This tutorial will guide you through crocheting a multi-layered, textured sunflower with a distinct seed center and vibrant petals. The “large” aspect implies a significant size, often achieved through multiple rounds and layered petals, making it truly decorative.
Skill Level: Intermediate (Requires comfortable knowledge of basic stitches, working in the round, increasing, creating texture, and assembling multiple pieces).
Finished Sunflower Diameter (Approximate):
- Using Worsted Weight yarn and H/5.0mm hook: 8-12 inches (20-30 cm) depending on your tension and desired fullness.
Materials You’ll Need:
- Yarn:
- Worsted Weight (Medium #4) Yarn:
- Dark Brown or Black: Approx. 50-70 yards (for the seed center).
- Bright Yellow (Color A): Approx. 100-150 yards (for inner petals).
- Deeper Yellow/Orange (Color B): Approx. 150-200 yards (for outer petals).
- Green: Approx. 50-70 yards (for sepals and leaves).
- Why Worsted Weight? It provides good structure and definition for a decorative piece. Cotton or acrylic blends work well.
- Worsted Weight (Medium #4) Yarn:
- Crochet Hook:
- Size H/5.0mm (or a size that creates a firm, dense fabric for your yarn).
- Yarn Needle (Tapestry Needle): For weaving in ends and assembly.
- Scissors
- Fiberfill/Stuffing: Small amount, for the center to give it a domed shape.
- Stitch Marker (Optional but Recommended): For marking the beginning of rounds.
- Optional: Florist wire (green, 18-20 gauge) for stiffening leaves or petals (if desired for shaping), wire cutters.
Gauge (Optional, but helps with consistent sizing):
With H/5.0mm hook and Worsted Weight yarn, working in sc: 5 sc = 1 inch (2.5 cm)
A snug gauge is preferred for a sturdy flower that holds its shape.
Abbreviations Used:
- ch: chain
- sl st: slip stitch
- sc: single crochet
- hdc: half double crochet
- dc: double crochet
- tr: treble crochet (triple crochet)
- st(s): stitch(es)
- inc: increase (work 2 stitches into the same stitch)
- BLO: back loop only
- FLO: front loop only
- MR: magic ring (or magic circle)
- FO: fasten off
- FPsc: Front Post single crochet (insert hook from front to back around post of stitch, then complete sc)
- BPsc: Back Post single crochet (insert hook from back to front around post of stitch, then complete sc)
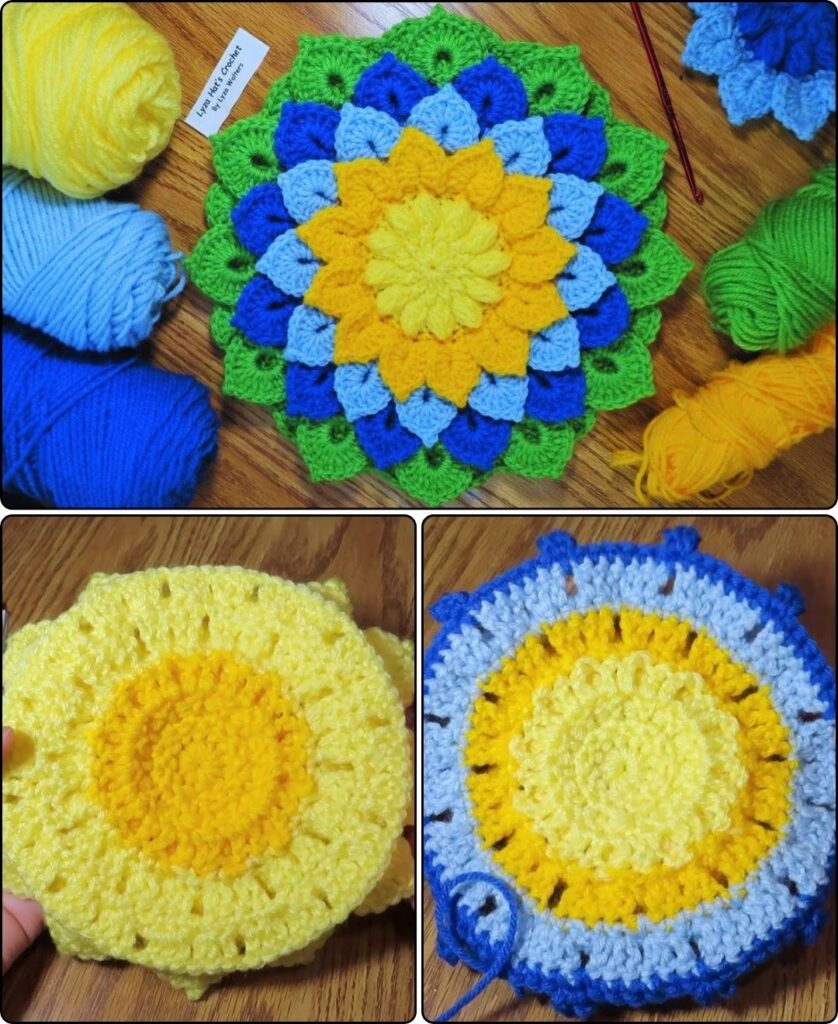
Understanding Sunflower Construction:
A large, decorative sunflower is typically made in several distinct parts that are then assembled:
- The Center: This forms the dark “seed” area and often has a textured appearance. It can be lightly stuffed for a domed effect.
- Inner Petals: The first layer of yellow petals, usually worked directly around the center.
- Outer Petals: A second, larger layer of yellow/orange petals worked behind or into the same base stitches as the inner petals, adding fullness and depth.
- Sepals (Back Green Layer): A green layer worked on the very back of the flower to finish it neatly and add a natural look.
- Leaves: Separate green pieces crocheted and then attached.
Let’s Start Crocheting Your Decorative Large Sunflower!
Part 1: The Center (Dark Brown or Black Yarn)
We’ll create a textured, domed center for the sunflower. Work in continuous rounds using a stitch marker.
- With Dark Brown/Black yarn and H/5.0mm hook, make a Magic Ring (MR).
- If you prefer not to use MR: Ch 2, then work stitches into the 2nd ch from hook.
- Round 1: Ch 1 (does NOT count as a st). Work 8 sc into the MR. Pull tail to close MR tightly. (8 sc).
- Place stitch marker in the first sc.
- Round 2: Work 2 sc in each st around. (16 sc).
- Round 3: 1 sc in the first st, 2 sc in the next st (inc). Repeat from * to * around. (24 sc).
- Round 4: 1 sc in the first 2 sts, 2 sc in the next st (inc). Repeat from * to * around. (32 sc).
- Round 5: 1 sc in the first 3 sts, 2 sc in the next st (inc). Repeat from * to * around. (40 sc).
- Round 6 (Texture Round):1 FPsc around the post of the first sc, 1 sc in the next st. Repeat from * to * around. (40 sts).
- This creates a raised ridge for texture. Adjust pattern if you prefer a different texture (e.g., bobble stitches).
- Round 7: 1 sc in the first 4 sts, 2 sc in the next st (inc). Repeat from * to * around. (48 sc).
- Round 8 (Texture Round): 1 BPsc around the post of the first sc, 1 sc in the next st. Repeat from * to * around. (48 sts).
- Round 9: Work 1 sc in each st around. (48 sc).
- Sl st to the first sc to join. FO, leaving a long tail for sewing if you intend to stuff.
- Lightly stuff the center with fiberfill to give it a domed, realistic shape. Use the tail to sew the opening closed or leave it open to work the petals into.
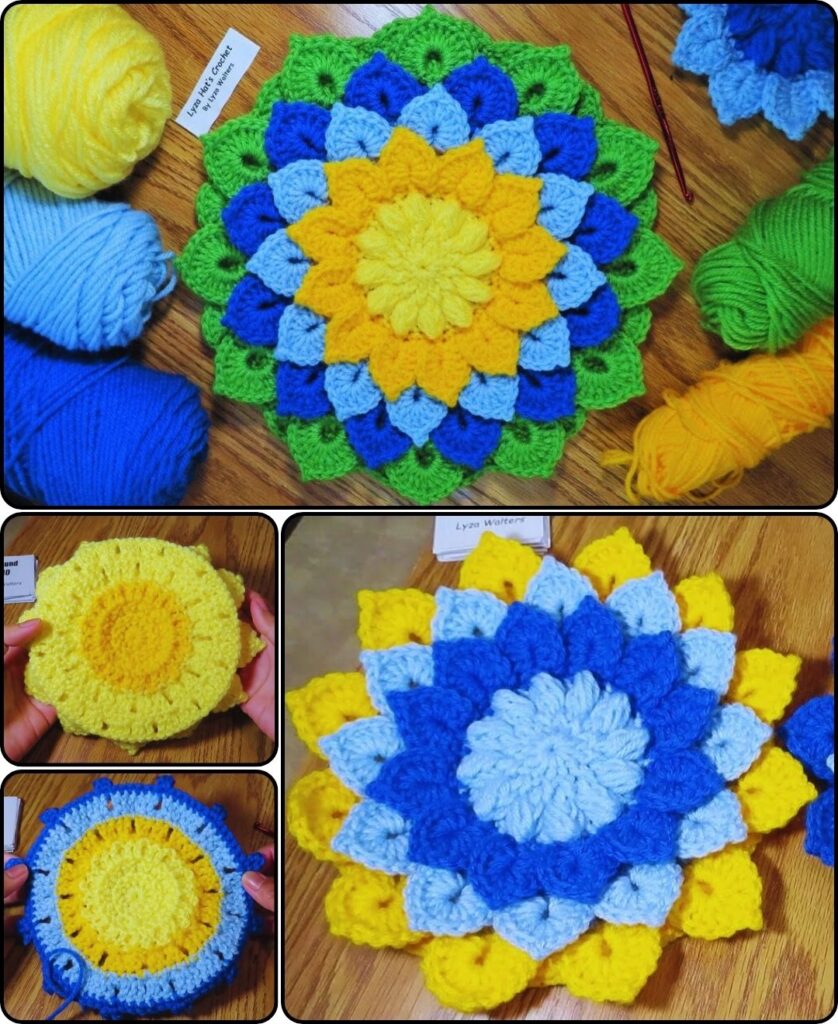
Part 2: Inner Petals (Bright Yellow – Color A)
We’ll work these petals directly into the stitches of the last round of the center.
- Join Bright Yellow (Color A) with a sl st to any stitch on the back side of the last sc round (Round 9) of the center.
- You will work your petals into the stitches of Round 9, making them sit slightly on top of the textured center.
- Petal Sequence:Ch 2, work 3 dc into the same st. Ch 2, sl st into the same st. (This completes one petal).
- Sl st into the next st. (This moves you to the base of the next petal).
- Repeat from * to * around, working one petal into each stitch of Round 9. You should have 48 petals.
- After the last petal, sl st to the initial join. FO, leaving a long tail to weave in.
- Gently push the petals outward to make them stand up from the center.
Part 3: Outer Petals (Deeper Yellow/Orange – Color B)
These petals will be larger and sit behind the inner petals, creating depth. We’ll work them into the stitches of a previous round of the center.
- Turn your center over. You’ll work these petals into the unchanged loops from Round 8 of the center (the front loops if you worked FPsc/BPsc, or the loops that were not worked into from a standard sc round).
- Join Deeper Yellow/Orange (Color B) with a sl st to a stitch in Round 8 of the center, ensuring it’s positioned behind an inner petal.
- Petal Sequence:Ch 3, work 4 dc into the same st. Ch 3, sl st into the same st. (This completes one larger petal).
- Sl st into the next st. (This moves you to the base of the next petal).
- Repeat from * to * around, working one petal into each stitch of Round 8. You should have 48 petals.
- After the last petal, sl st to the initial join. FO, leaving a long tail to weave in.
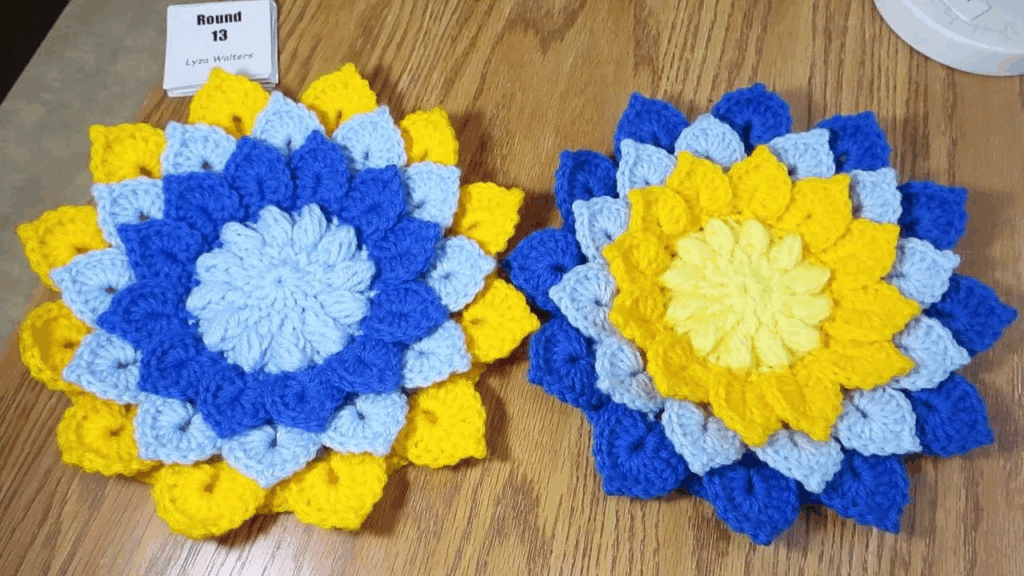
- Adjust petals so they layer nicely. You can add more petal rounds into earlier rounds of the center if you want an even fuller flower.
Part 4: Sepals (Back Green Layer)
This layer provides a neat finish to the back of the flower.
- Turn the flower over. Join Green yarn with a sl st into any unworked loop or stitch from Round 7 of the center. (If you stuffed the center, work into the remaining loop of the very last round before the stuffing closure, or just behind where the petals begin).
- Sepal Sequence:Ch 2, work 2 hdc into the same st. Ch 2, sl st into the same st.
- Sl st into the next 2-3 sts (adjust spacing to get a full but not overcrowded look, aiming for about 12-16 sepals total).
- Repeat from * to * around.
- After the last sepal, sl st to the initial join. FO, leaving a long tail for sewing the back of the flower.
Part 5: Leaves (Green Yarn – Make 2 or 3)
These are separate pieces that will be attached to the back of the sunflower.
- With Green yarn and H/5.0mm hook, ch 13.
- Row 1: Work 1 sc in the 2nd ch from hook. Work 1 hdc in the next ch. Work 1 dc in each of the next 7 ch. Work 1 hdc in the next ch. Work 1 sc in the next ch. Work 3 sc in the last ch (this forms the tip).
- Now, working down the other side of the foundation chain: Work 1 sc in the next ch. Work 1 hdc in the next ch. Work 1 dc in each of the next 7 ch. Work 1 hdc in the next ch. Work 1 sc in the last ch. Sl st to the first sc to join.
- FO, leaving a long tail for sewing.
- Repeat to make 2 or 3 leaves. For added stiffness, you can insert florist wire around the edge of the leaf before sewing it to the flower.
Part 6: Assembly & Finishing
- Weave in All Ends: Thoroughly weave in all remaining yarn tails from the center, petals, and sepals using your yarn needle. This is crucial for a neat and long-lasting decorative piece.
- Lightly Stuff the Center (if not already done): If you didn’t stuff the center in Part 1, do so now. Use the tail from the center to gently gather and close the opening, creating a domed shape.
- Attach Leaves: Position the leaves on the back of the sunflower, overlapping slightly at the stem base. Use the long tails from the leaves and your yarn needle to securely sew them to the back (sepal layer) of the flower.
- Shape & Block (Optional but Recommended):
- Gently reshape the petals and sepals with your fingers to make them stand out and layer nicely.
- For a more defined shape, you can lightly mist the flower with water and then carefully pin the petals and leaves into place on a blocking mat or a flat surface. Allow to air dry completely. This will help the sunflower maintain its large, decorative shape.
- Optional: Add a Stem or Hanging Loop:
- For a stiff stem: Wrap florist wire (or a few strands twisted together) with green yarn or floral tape. Insert one end firmly into the center of the sunflower’s back, possibly securing it with a bit of hot glue (optional).
- For a hanging loop: Simply crochet a small chain (e.g., ch 15) and sl st it into a loop on the back of the sepal layer, to hang your decorative sunflower on a wall.
Your beautiful, large crochet sunflower is now complete! It’s ready to brighten up any room.
Video Tutorial