by
by You’re looking to combine the beloved baby blanket with a beautiful flower pattern for beginners! That’s a wonderful idea. A blanket with integrated or appliqued flowers adds a delightful touch of whimsy and charm. For a baby blanket, especially in Phnom Penh’s climate, 100% cotton yarn or a soft cotton blend is definitely the best choice. It’s gentle on delicate skin, breathable, durable, and most importantly, easy to wash and dry – which is a must for baby items!
This tutorial will give you two main options for creating a baby blanket with a flower pattern, suitable for beginners:
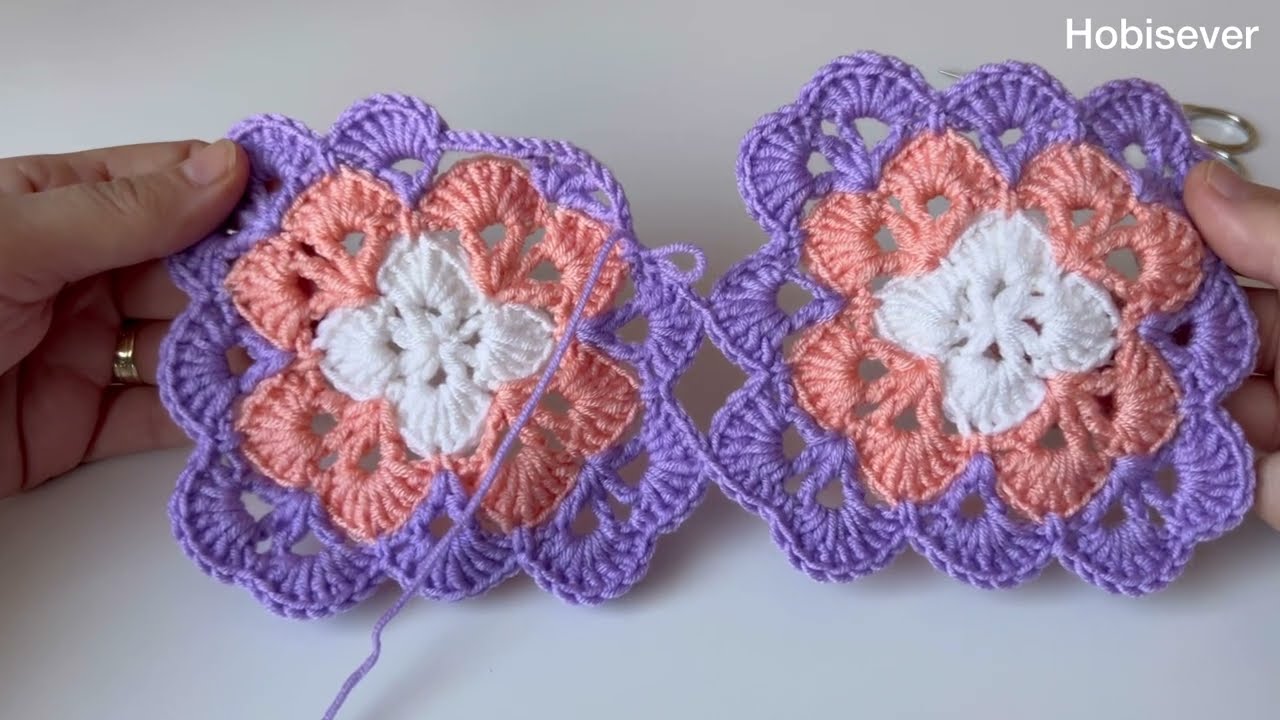
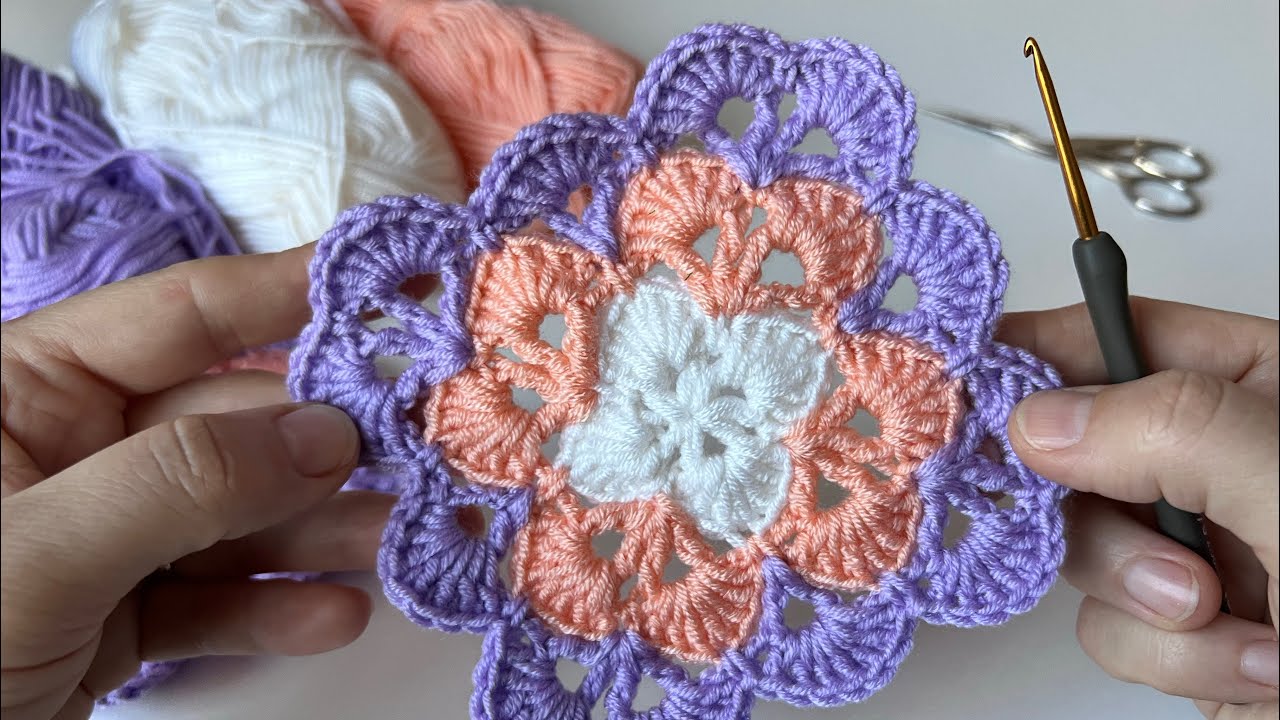
- Option 1: Blanket with Appliqued Flowers (Easiest for beginners as you make the blanket and flowers separately and sew them on).
- Option 2: Granny Square Blanket with Flower Motif (A bit more involved, as each square has a flower built-in, then squares are joined).
Let’s detail Option 1: Blanket with Appliqued Flowers, as it’s generally more beginner-friendly for a full blanket.
How to Crochet a Baby Blanket with Appliqued Flowers for Beginners
This method involves crocheting a simple, soft baby blanket first, and then creating individual flower motifs to sew onto it. This allows you to practice basic stitches for the blanket and then learn a new, small motif without the pressure of integrating it perfectly into a large piece.
1. Essential Materials You’ll Need
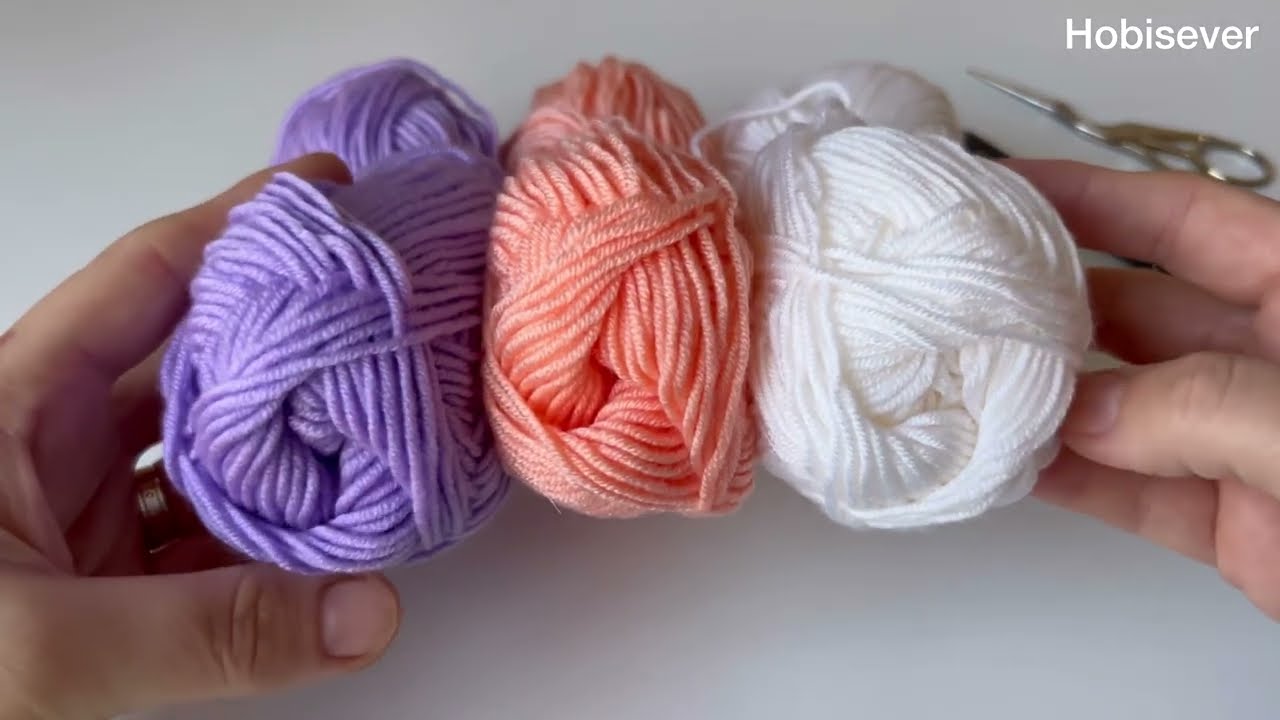
- Yarn:
- For the Blanket: Choose 100% Cotton, a Cotton Blend, or a soft Acrylic Yarn. Look for yarn labeled “baby yarn” or that feels very soft. Worsted Weight (Aran / Medium / 4) is ideal, as it works up quickly and provides a good drape.
- Colors for Blanket: 1-3 colors (e.g., a main color like white/cream, and 1-2 accent colors for stripes if desired).
- For the Flowers: Small amounts of 100% Cotton Yarn in various bright or pastel colors (yellow for centers, pinks, blues, purples for petals, green for leaves if desired). Worsted Weight is fine, or even DK weight for smaller flowers.
- Quantity: For a standard baby blanket (approx. 30×35 inches / 75×90 cm), you’ll need roughly 800-1200 yards (730-1100 meters) for the blanket base. For the flowers, only small amounts of each color are needed.
- Crochet Hook:
- For the blanket (Worsted Weight yarn): A 5.0mm (US H/8) or 5.5mm (US I/9) hook.
- For the flowers (Worsted or DK weight yarn): A 4.0mm (US G/6) or 4.5mm (US 7) hook. (A slightly smaller hook helps flowers hold shape).
- Always check your yarn label for recommended hook size and adjust for comfortable tension.
- Scissors: For cutting yarn.
- Yarn Needle (Tapestry Needle): Absolutely essential for weaving in all yarn ends and for sewing the flowers onto the blanket.
- Optional: Stitch markers (helpful for marking rows/stitches), pins (for positioning flowers before sewing).
2. Basic Crochet Stitches You’ll Use
This project focuses on fundamental stitches:
- Chain (ch): To begin your work and create turning chains.
- Double Crochet (dc): The main stitch for the blanket fabric.
- Slip Stitch (sl st): For joining rounds, neatening, and securing.
- Single Crochet (sc): Used in flower centers and borders.
- Half Double Crochet (hdc): Used in flower petals.
Part 1: Crocheting the Baby Blanket Base (Simple Double Crochet Blanket)
This creates the main fabric onto which you’ll attach your flowers.
Abbreviations (US Crochet Terms):
- ch: chain
- dc: double crochet
- st(s): stitch(es)
- ea: each
Instructions (Using your chosen blanket color(s)):
- Determine Blanket Width & Foundation Chain:
- For a blanket around 30 inches (75 cm) wide, using Worsted Weight yarn and a 5.0mm hook, Ch 112. (This will result in 110 dc stitches across).
- You can adjust this chain count to make your blanket wider or narrower. Just remember your stitch count will be 2 less than your starting chain.
- Row 1: Work 1 dc into the 4th chain from your hook. (The skipped 3 chains count as your first dc for this row).
- Work 1 dc into each remaining chain across the entire foundation chain.
- You will have 110 dc stitches (or your adjusted count).
- Ch 3 (counts as first dc of next row) and turn your work.
- If planning stripes, you can change colors here. To do so, cut current yarn (leaving a 6-inch tail). With new color, join with a sl st to the top of the last dc, then ch 3 and turn.
- Row 2 (and all subsequent rows):
- Work 1 dc into the first dc of the previous row (the stitch directly below your turning chain).
- Work 1 dc into each dc stitch across the row.
- Make sure to work your last dc into the top of the turning chain-3 from the previous row. This is key for straight edges.
- You will maintain 110 dc stitches per row.
- Ch 3 and turn your work to begin the next row.
- If making stripes, change colors after every 2-4 rows (or as desired) by fastening off, joining new color with a sl st, ch 3, and turning.
- Repeat Row 2: Continue repeating Row 2 until your blanket reaches your desired length (e.g., 35-40 inches / 90-100 cm), or until you run out of yarn.
- Fasten Off: After completing your last row, cut your yarn, leaving a tail of about 6-8 inches (15-20 cm). Pull the tail completely through the loop on your hook and pull tight to secure.
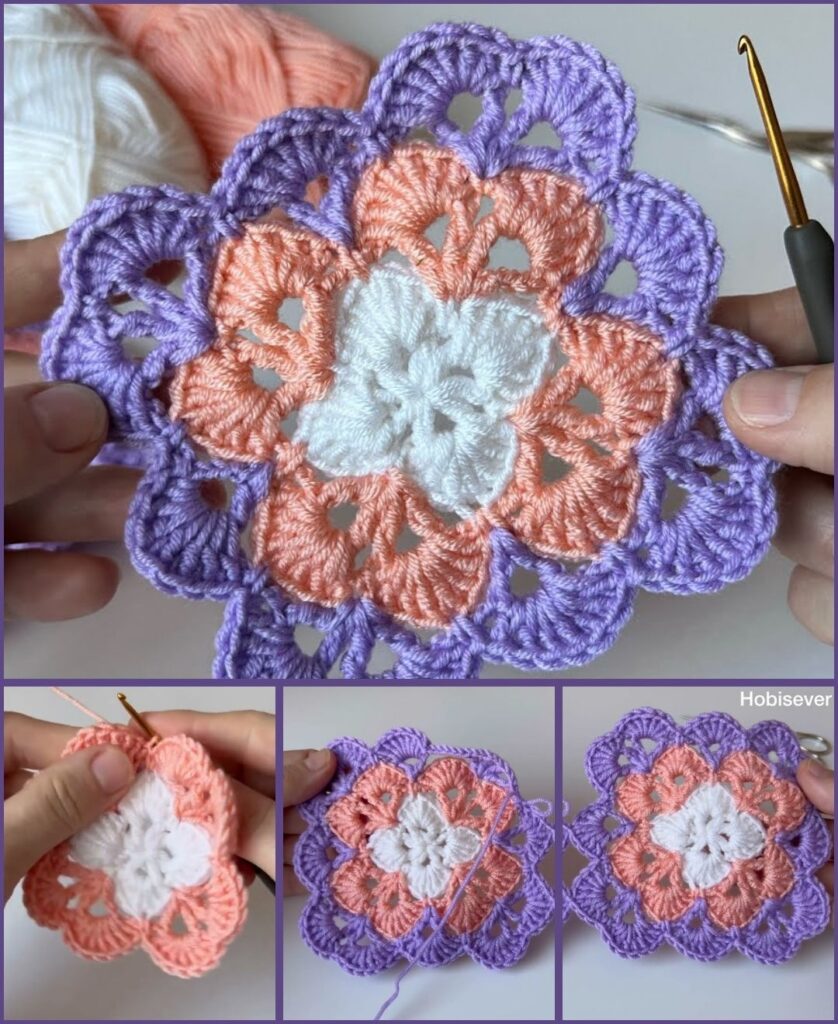
Part 2: Crocheting the Flower Appliqués
You’ll make several individual flower motifs to sew onto the blanket. Start with about 10-15 flowers, then make more if needed.
Abbreviations (US Crochet Terms):
- ch: chain
- sl st: slip stitch
- sc: single crochet
- hdc: half double crochet
- dc: double crochet
- MR: magic ring
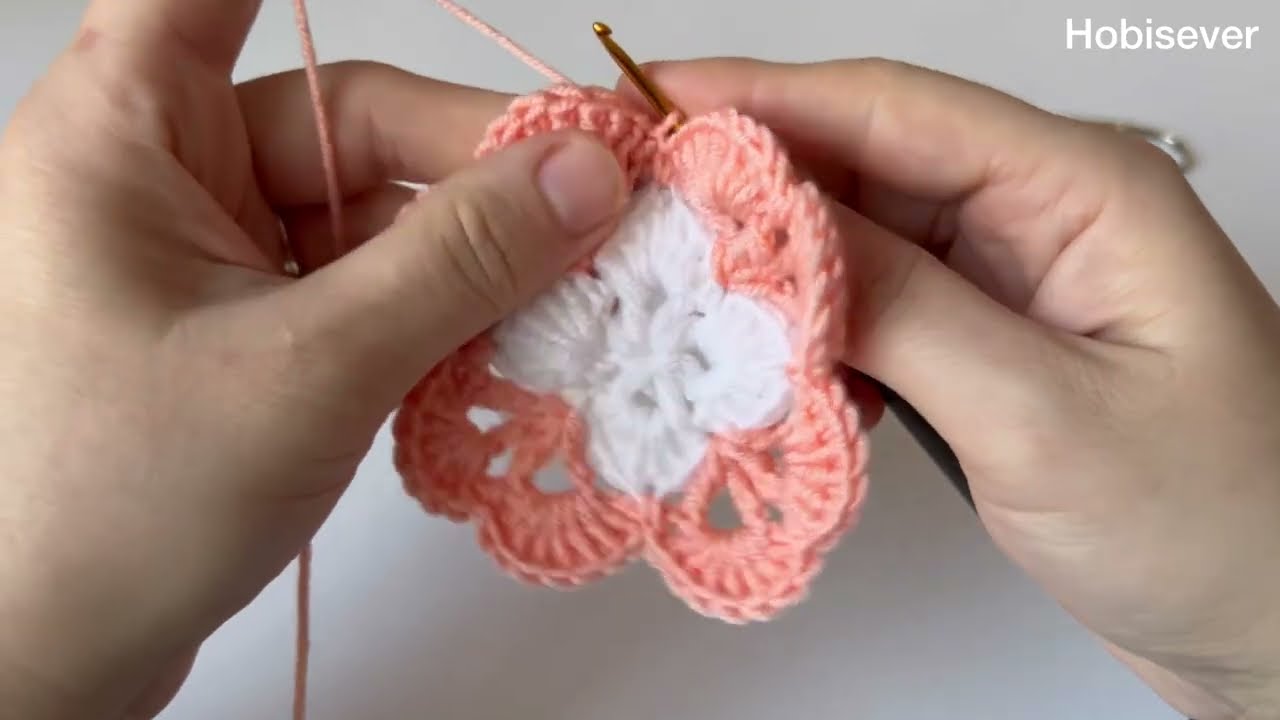
Instructions for One Flower Appliqué:
- Flower Center (Color A – e.g., Yellow):
- Method A: Magic Ring (Recommended for a tight center)
- Create a Magic Ring (MR).
- Ch 1 (does NOT count as a stitch). Work 8 sc into the MR.
- Pull the yarn tail to close the ring tightly. Join with a sl st to the top of the first sc. (8 sc)
- Method B: Chain Method (Easier for Beginners)
- Ch 2. Work 8 sc into the second chain from your hook. Join with a sl st to the top of the first sc. (8 sc)
- Fasten off Color A, leaving a short tail.
- Method A: Magic Ring (Recommended for a tight center)
- Petals (Color B – e.g., Pink/Blue/Purple):
- Join Color B with a sl st into any sc stitch from the previous round (your center).
- Round 2: *Ch 2 (does NOT count as st), work (1 hdc, 1 dc, 1 hdc) all into the same stitch where you just joined Color B. Then, sl st into the next sc stitch from Round 1.* Repeat this sequence from * to * 7 more times.
- (You will have created 8 small petals, each made of hdc-dc-hdc, with a slip stitch in between them connecting to the next base stitch.)
- Fasten off Color B, leaving a long tail (about 12-15 inches / 30-38 cm) for sewing the flower onto the blanket.
- Make Multiple Flowers: Repeat the above steps to create as many flowers as you desire for your blanket. Mix and match colors for a vibrant “flower garden” effect!
Part 3: Finishing the Blanket Base & Attaching Flowers
Now to bring it all together!
- Weave in All Blanket Ends: Before attaching flowers, use your yarn needle to carefully weave in all the yarn tails from your blanket’s starting chain, ending point, and any color changes within the blanket itself. This creates a neat base.
- Optional: Blanket Border (Recommended):
- A simple border gives the blanket a very polished and finished look.
- Join yarn (main blanket color or an accent color) with a sl st into any corner stitch of your blanket.
- Round 1 (Border):Ch 1 (does not count as st).
- Work single crochet stitches evenly around the entire blanket.
- When you reach a corner, work (2 sc, ch 2, 2 sc) into that corner to help it turn neatly and stay flat.
- Along the sides of the blanket (where you see the ends of your dc rows), work approximately 2 sc into the side of each dc stitch to create an even edge.
- After working all the way around, join with a sl st to the top of the first sc you made in this border round.
- Optional Round 2 (For a Thicker Border): If desired, add another round. Ch 1. Work 1 sc in each sc stitch around, remembering to work (2 sc, ch 2, 2 sc) in each corner’s ch-2 space. Join with a sl st.
- Fasten off and weave in any remaining ends from your border.
- Position the Flowers: Lay your completed blanket flat. Arrange your crocheted flowers on the blanket in the pattern you like. You can scatter them randomly, create a border of flowers, or form a specific design. Use pins to hold them in place once you’re happy with the arrangement.
- Sew the Flowers On:
- Using the long tail from each flower (from Step 2.2), thread it onto your yarn needle.
- Carefully sew each flower onto the blanket. Stitch through the back loops or very base of the petals and into the blanket fabric. Make sure your stitches are secure but not so tight that they pull or distort the blanket.
- Once a flower is securely sewn, weave in any remaining tail from that flower into the back of the flower or blanket.
- Blocking (Recommended for a polished look):
- Once all flowers are attached, gently wet your entire blanket.
- Carefully squeeze out excess water (do not wring!).
- Lay the blanket flat on a clean towel or a foam blocking mat. Gently stretch and shape it to the correct dimensions, making sure all edges are straight and the corners are square. You can use rust-proof pins to hold it in place. Ensure the flowers also lay nicely.
- Allow it to air dry completely. Blocking helps to even out your stitches, relax the yarn, and gives your blanket a beautifully polished drape and shape.
Tips for Beginner Baby Blanket Crocheters
- Practice Your Tension: Try to keep your stitches consistent throughout the blanket. This ensures your fabric is uniform and doesn’t get wider or narrower.
- Count Your Stitches: Especially in the early rows of the blanket, count your stitches at the end of each row to maintain the correct width.
- Straight Edges: Always working your last double crochet stitch into the top of the turning chain-3 from the previous row is key to maintaining straight, neat edges.
- Weave in Ends as You Go: For the blanket, if you’re changing colors frequently, try to weave in ends after every few rows. For the flowers, weaving in the center tail before you start petals can be easier.
- Washing Instructions: If this is a gift, always include washing instructions for the yarn you used (e.g., “Machine wash cold, tumble dry low”).
You’ve now got a detailed guide to crochet a beautiful and unique baby blanket with charming crocheted flowers! This will be a truly cherished handmade item.