 by
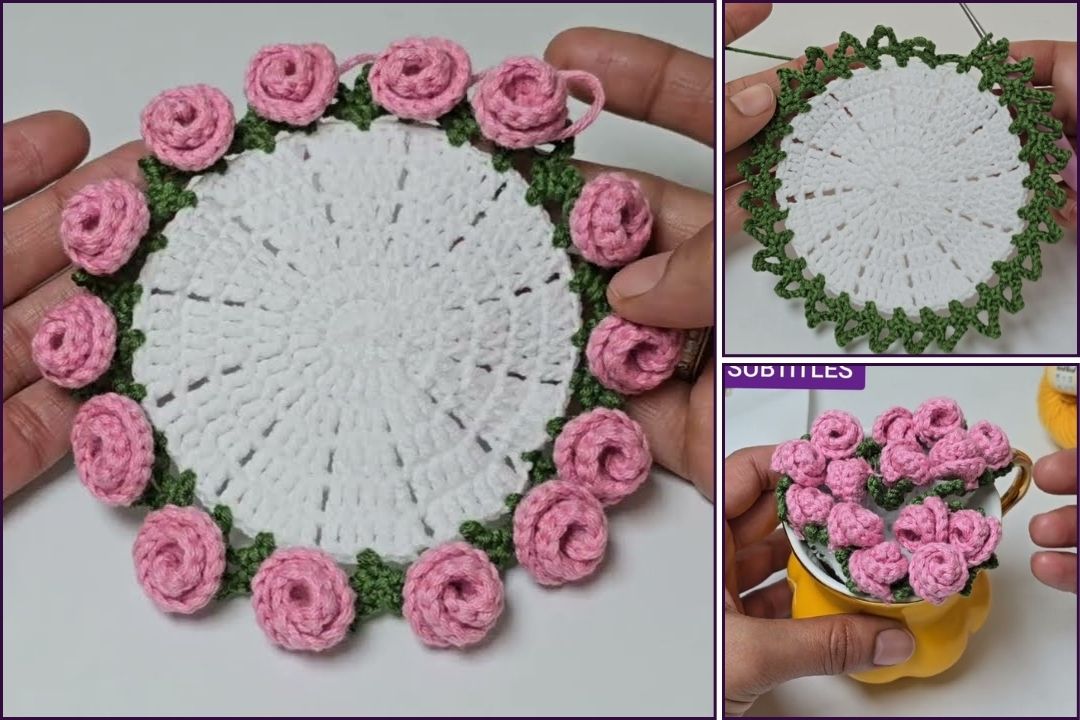
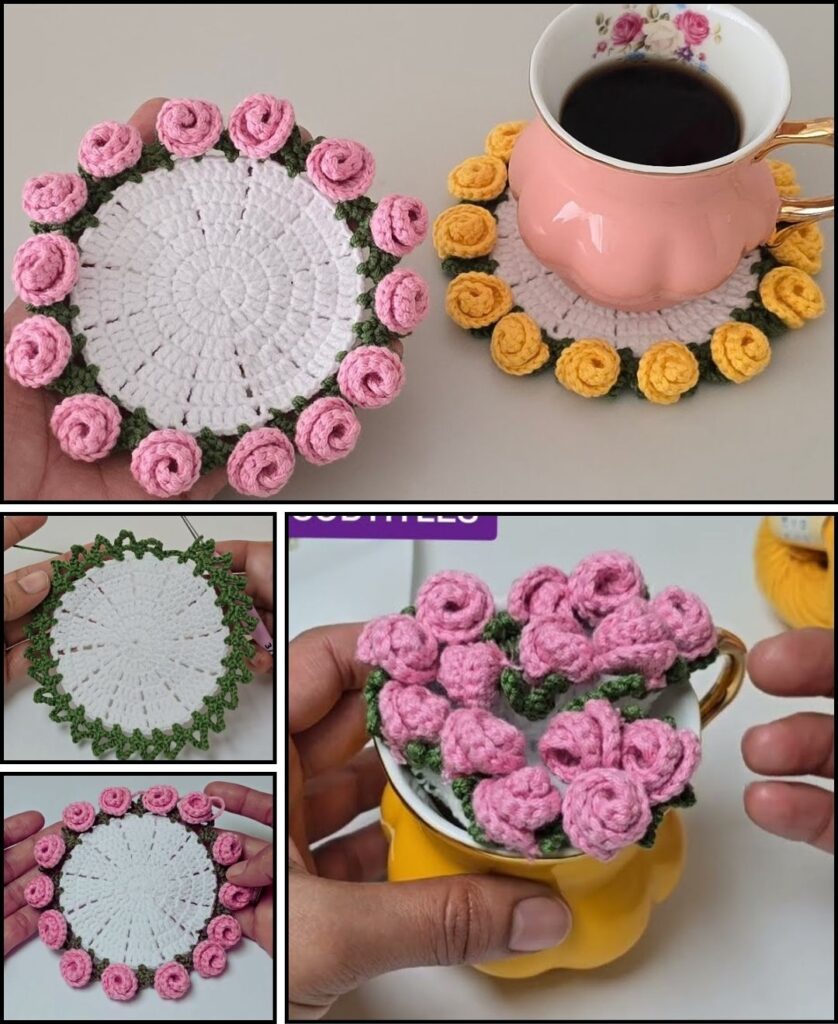
by That’s a beautiful idea! A crochet pink rose bouquet coaster would be a truly elegant and charming addition to your home, perfect for adding a touch of romance or as a thoughtful handmade gift. Just to clarify the terminology, crochet uses a single hook, while knitting uses two needles. This guide will focus entirely on how to crochet a rose bouquet-themed coaster.
Given that you’re in Phnom Penh, where it’s warm, 100% cotton yarn is an excellent choice for coasters. Cotton is naturally absorbent, durable, holds its shape well, and its clear stitch definition will make your detailed rose design look crisp and beautiful.

How to Crochet a Pink Rose Bouquet Coaster
This tutorial will guide you through creating a flat, circular coaster that features small, dimensional roses and leaves, giving the impression of a delicate bouquet. This project involves making separate elements (roses, leaves) and then assembling them onto a crocheted base.
1. Essential Materials You’ll Need
- Yarn:
- Coaster Base Color (BC): For the main coaster circle (e.g., cream, light grey, white, or a very pale green). Worsted Weight (Aran / Medium / Category 4) 100% Cotton is highly recommended. You’ll need about 25-35g per coaster.
- Rose Pink (RP): For the roses (various shades of pink like light pink, medium pink, or fuchsia would be lovely). Small scraps of each color for multiple roses.
- Green Yarn (GC): For the leaves and optional small sprigs (various shades of green for realism). Small scraps.
- Crochet Hook:
- A 4.0mm (US G/6) or 4.5mm (US 7) hook for the coaster base.
- A 3.0mm (US C/2) or 3.5mm (US E/4) hook for the roses and leaves (using a smaller hook for these smaller elements helps them be more defined).
- Scissors: For cutting yarn.
- Yarn Needle (Tapestry Needle): Absolutely essential for weaving in ends and crucially for assembling all the elements onto the coaster base.
- Stitch Marker (Optional but helpful): To mark the beginning of rounds for the coaster base.

2. Basic Crochet Stitches & Techniques You’ll Use
This project combines working in the round for the base with working rows for the rose and leaf motifs.
- Magic Ring (MR): (Also Magic Circle or Adjustable Ring). Excellent for a tight, hole-free center.
- Chain (ch): Used for starting, turning chains, and creating spaces.
- Slip Stitch (sl st): For joining rounds and neatening.
- Single Crochet (sc): Creates a dense, sturdy fabric.
- Half Double Crochet (hdc): A medium-height stitch.
- Double Crochet (dc): A taller stitch, frequently used for rose petals and the coaster base.
- Triple/Treble Crochet (tr): An even taller stitch, used for larger rose petals.
- Fasten Off: Securely ending your work.
- Weaving in Ends: Hiding tails for a neat finish.
Crochet Pink Rose Bouquet Coaster Pattern
We’ll break this down into three main parts: the coaster base, the individual roses, and the leaves. Then, we’ll assemble them.
Abbreviations (US Crochet Terms):
- BC: Base Color
- RP: Rose Pink Color
- GC: Green Color
- Rnd: Round
- Row: Row
- ch: chain
- sl st: slip stitch
- sc: single crochet
- hdc: half double crochet
- dc: double crochet
- tr: triple crochet
- inc: increase (work 2 stitches into the same stitch)
- MR: magic ring
- st(s): stitch(es)
(...): work stitches into the same stitch/space[...]: repeat instructions in brackets

Part 1: Coaster Base (Base Color – BC)
This will be a simple, solid circle. Use your larger hook (4.0mm or 4.5mm).
- Rnd 1: Start with a MR. Ch 2 (does not count as st here). Work 10 hdc into MR. Pull tail to close. Join with sl st to the top of the first hdc. (10 hdc)
- Alternative Start: Ch 3, join with sl st to first ch to form a ring. Ch 2. Work 10 hdc into the ring. Join with sl st to top of first hdc.
- Rnd 2: Ch 2. [Inc (2 hdc in next st)] in each st around. Join with sl st to the top of the first hdc. (20 hdc)
- Rnd 3: Ch 2. [Hdc 1, inc] 10 times. Join with sl st to the top of the first hdc. (30 hdc)
- Rnd 4: Ch 2. [Hdc 2, inc] 10 times. Join with sl st to the top of the first hdc. (40 hdc)
- Rnd 5: Ch 2. [Hdc 3, inc] 10 times. Join with sl st to the top of the first hdc. (50 hdc)
- Rnd 6: Ch 2. [Hdc 4, inc] 10 times. Join with sl st to the top of the first hdc. (60 hdc)
- Your circle should be fairly flat. If it’s ruffling, you might have too many increases or your tension is too loose. If it’s cupping, your tension might be too tight. Adjust hook size or try fewer increases in a round if needed.
- Fasten off BC, leaving a tail for weaving in. Weave in this tail.
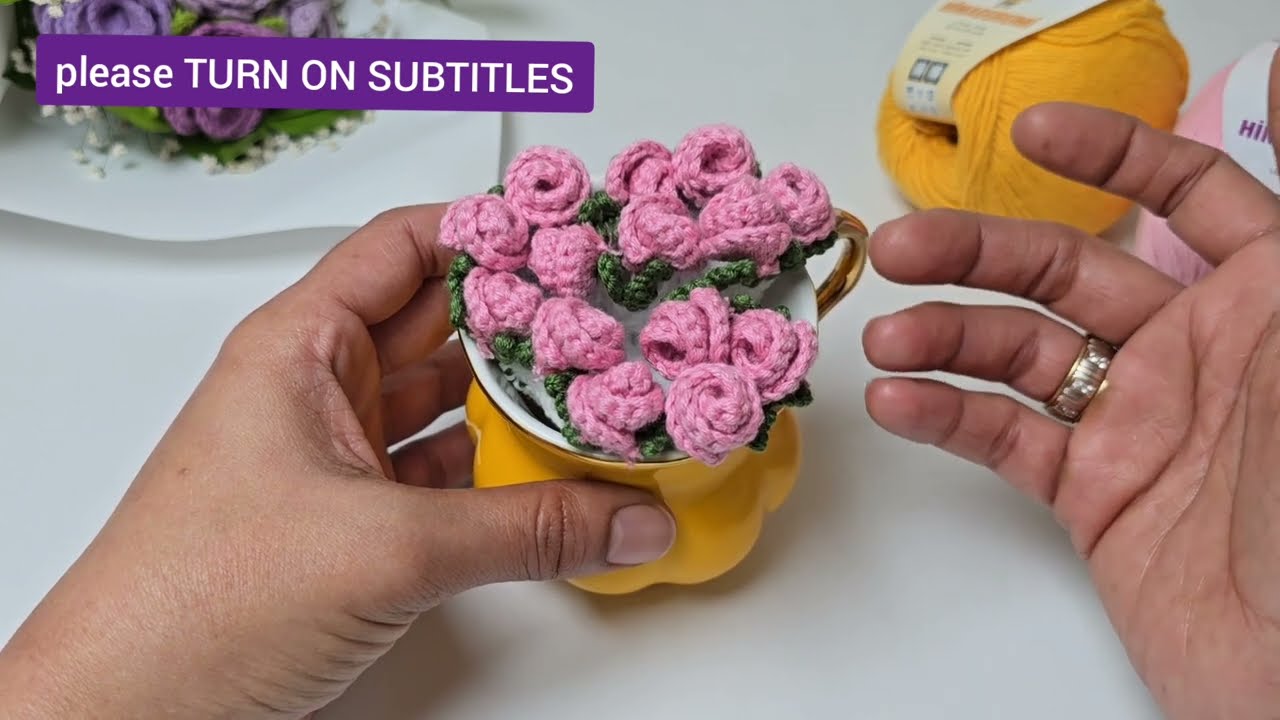
Part 2: Small Rolled Roses (Rose Pink – RP, Make 3-5 in various pinks)
These are quick to make and give lovely dimension. Use your smaller hook (3.0mm or 3.5mm).
- With RP, Ch 20.
- Row 1: In the 4th ch from hook, work (dc, ch 1, dc). Skip 1 ch, sc in next ch.
*Skip 1 ch, in next ch work (dc, ch 1, dc). Skip 1 ch, sc in next ch.*Repeat from*to*until you reach the end of the chain. - Fasten off, leaving a long tail (about 8-10 inches / 20-25 cm) for sewing the rose into shape.
- Shape the Rose: Starting from the first (shortest) end of the crocheted strip, begin to tightly roll the strip, forming the center of the rose. As you roll, the taller stitches (dc) will naturally flare out, creating the petals. Keep rolling until you’ve used the entire strip.
- Secure the Rose: With the long tail threaded onto your yarn needle, carefully stitch through all the layers at the base of the rolled rose to secure its shape. Make several stitches back and forth to ensure it won’t unravel. Weave in any remaining tail.
- Repeat for 2-4 more roses in various shades of pink for a bouquet effect.
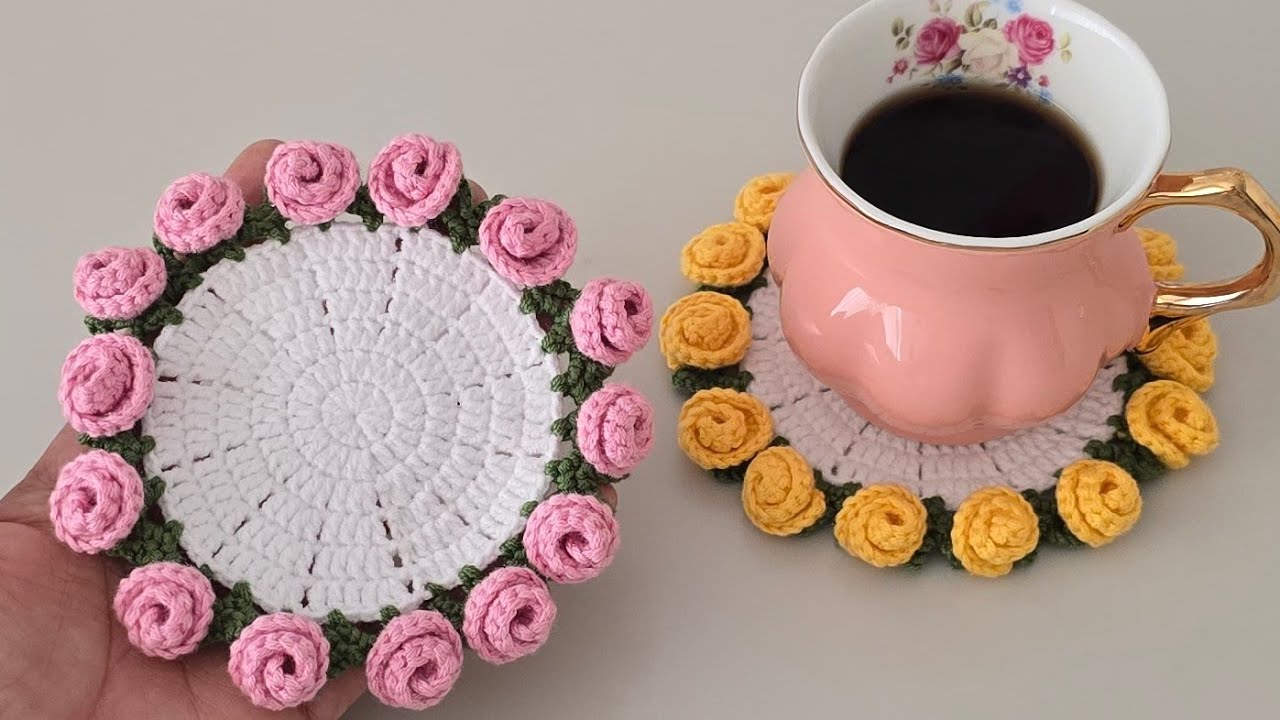
Part 3: Leaves (Green Color – GC, Make 2-3)
These simple leaves add to the bouquet aesthetic. Use your smaller hook (3.0mm or 3.5mm).
- With GC, Ch 8.
- Row 1: Sc in the 2nd ch from hook. Hdc in the next ch. Dc in the next 3 ch. Hdc in the next ch. Sc in the last ch. (7 sts)
- Fasten off GC, leaving a long tail for sewing.
- Repeat for 1-2 more leaves.
4. Assembling Your Crochet Pink Rose Bouquet Coaster
Now to arrange and attach your “bouquet” onto the coaster base!
- Weave in all initial yarn ends from the roses and leaves. (Ensure the long sewing tails remain).
- Arrange Elements: Lay out your finished coaster base. Arrange your roses and leaves on the base, playing with their positions until you have a pleasing “bouquet” arrangement.
- Typically, you’d place 2-3 roses in the center or slightly off-center, with the leaves peeking out from underneath or around them.
- Attach Roses: Using the long tail from each rose and your yarn needle, carefully sew each rose onto the coaster base. Stitch through the base of the rose and securely into the stitches of the coaster. Make sure they are firmly attached.
- Attach Leaves: Similarly, use the long tail from each leaf to sew them onto the coaster base, positioning them to look like they are part of the rose bouquet.
- Optional Sprigs/Stems: With a new piece of green yarn and your yarn needle, you can embroider small straight lines or “V” shapes extending from the base of the roses or leaves to mimic tiny stems or sprigs.
- Weave in All Remaining Ends NEATLY: This is absolutely crucial for a polished, professional-looking coaster. Take your time to hide all tails securely within the stitches on the back of the coaster.
5. Finishing Your Crochet Pink Rose Bouquet Coaster (Crucial Step!)
Proper finishing makes your coaster durable and look its best.
- Blocking (Highly Recommended!): For a flat, well-shaped coaster that handles hot mugs, blocking is key.
- Gently wet your finished coaster.
- Carefully squeeze out any excess water (do NOT wring!).
- Lay the coaster flat on a clean, dry towel or a foam blocking mat. Carefully shape the circular base, and gently adjust the roses and leaves to their desired position. You can use rust-proof pins to hold them in place while drying if needed.
- Allow it to air dry completely. This will help it lie flat and maintain its beautiful shape.
6. Tips for a Stylish & Durable Rose Bouquet Coaster
- Yarn Choice: Cotton is paramount for coasters due to its absorbency and heat resistance. Avoid acrylic if you plan to put very hot mugs on it, as acrylic can melt.
- Tension: Aim for consistent, firm tension on the coaster base to create a dense fabric that won’t stretch out easily with use. For the roses and leaves, a slightly tighter tension helps them hold their shape.
- Color Variation: Use different shades of pink for your roses (light pink, rose pink, fuchsia) and perhaps two shades of green for the leaves to add depth and realism to your “bouquet.”
- Rose Size: You can make slightly larger or smaller roses by adjusting the starting chain length for the strip (longer chain = more petals/larger rose).
- Quantity of Roses/Leaves: Adjust the number of roses and leaves to fit your coaster size and desired “fullness” of the bouquet.
- Make a Set: Crochet a set of 2, 4, or 6 rose bouquet coasters for a truly exquisite gift set or to adorn your own home.
- Care: Hand wash or machine wash on a delicate cycle with cool water, and lay flat to dry.
You now have a detailed tutorial on how to crochet an elegant and practical pink rose bouquet coaster! Enjoy bringing this beautiful floral design to life with your hook and yarn.