 by
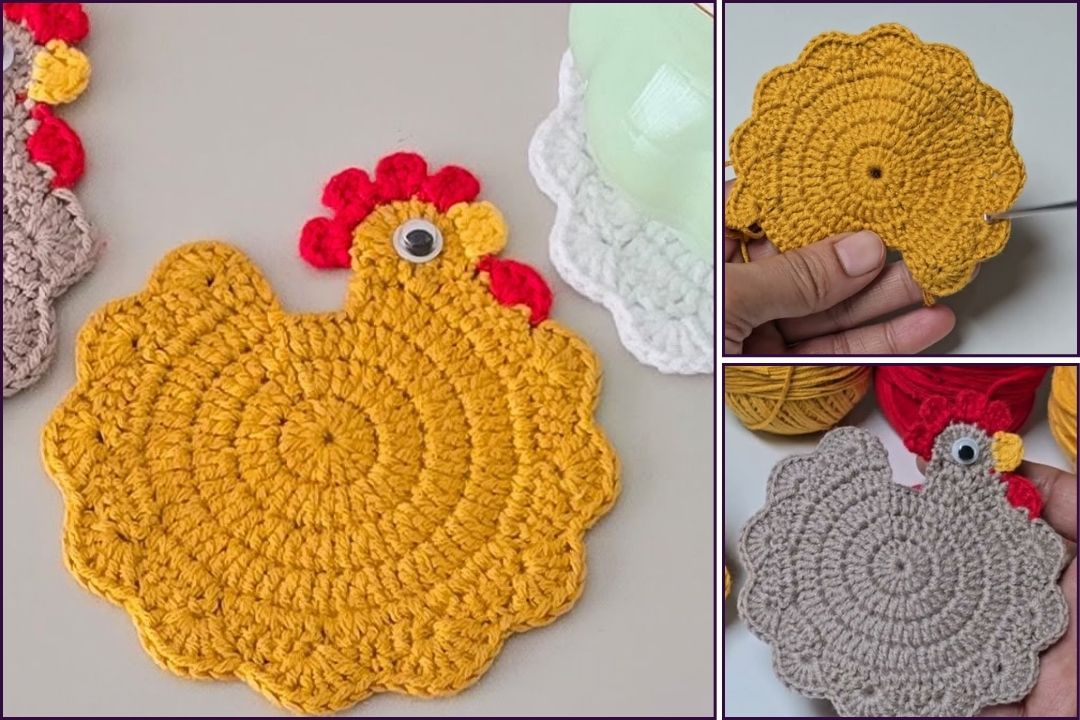
by That’s a super cute idea! A crochet chicken coaster is a charming and practical item, perfect for adding a touch of farmhouse charm to your home, or as a thoughtful handmade gift. Just to clarify, crochet uses a single hook, while knitting uses two needles. This guide will focus entirely on how to crochet a chicken coaster.
For the warm climate of Phnom Penh, 100% cotton yarn is an excellent choice for coasters. Cotton is absorbent, durable, holds its shape well when wet (and dries quickly), and its clear stitch definition will make your chicken coaster look fantastic.

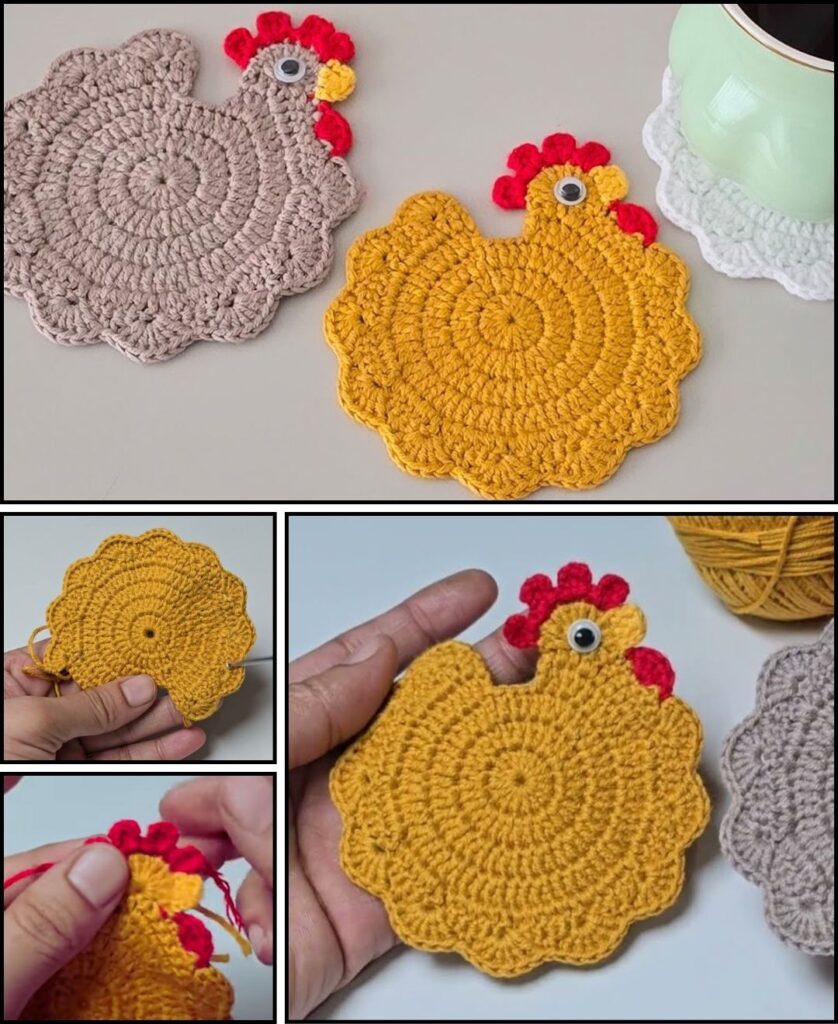
How to Crochet a Cute Chicken Coaster
This tutorial will guide you through creating a flat, circular coaster that has a little chicken head and tail peeking out, giving it that adorable chicken shape!
1. Essential Materials You’ll Need
- Yarn:
- Main Color (MC): For the chicken’s body/coaster base (e.g., white, cream, light brown, yellow). Worsted Weight (Aran / Medium / Category 4) 100% Cotton is highly recommended. You’ll need about 20-30g per coaster.
- Red Yarn: For the comb and wattle (small scrap).
- Orange or Yellow Yarn: For the beak (small scrap).
- Black Yarn or Embroidery Floss: For the eyes (tiny scrap).
- Crochet Hook:
- A 4.0mm (US G/6) or 4.5mm (US 7) hook. Choose a hook size that makes your stitches fairly dense so the coaster lies flat and holds its shape well.
- Scissors: For cutting yarn.
- Yarn Needle (Tapestry Needle): Essential for weaving in ends and sewing on the chicken’s features.
- Stitch Marker (Optional but helpful): To mark the beginning of rounds.
2. Basic Crochet Stitches & Techniques You’ll Use
This pattern uses fundamental crochet stitches and working in the round:
- Magic Ring (MR): (Also Magic Circle or Adjustable Ring). Excellent for a tight, hole-free center. If you’re new to this, a quick video tutorial on “crochet magic ring” can be very helpful!
- Chain (ch): Used for starting and for turning chains.
- Slip Stitch (sl st): For joining rounds and neatening.
- Single Crochet (sc): Creates a dense, sturdy fabric.
- Half Double Crochet (hdc): A medium-height stitch.
- Double Crochet (dc): A taller stitch.
- Triple/Treble Crochet (tr): The tallest stitch used, for the tail feathers.
- Fasten Off: Securely ending your work.
- Weaving in Ends: Hiding tails for a neat finish.
Crochet Chicken Coaster Pattern
Let’s make this adorable and functional chicken coaster! The main body of the coaster will be a flat circle, with the head and tail crocheted directly onto it.
Abbreviations (US Crochet Terms):
- MC: Main Color
- Rnd: Round
- ch: chain
- sl st: slip stitch
- sc: single crochet
- hdc: half double crochet
- dc: double crochet
- tr: triple crochet (or treble crochet)
- inc: increase (work 2 stitches into the same stitch)
- MR: magic ring
- st(s): stitch(es)
(...): work stitches into the same stitch/space[...]: repeat instructions in brackets
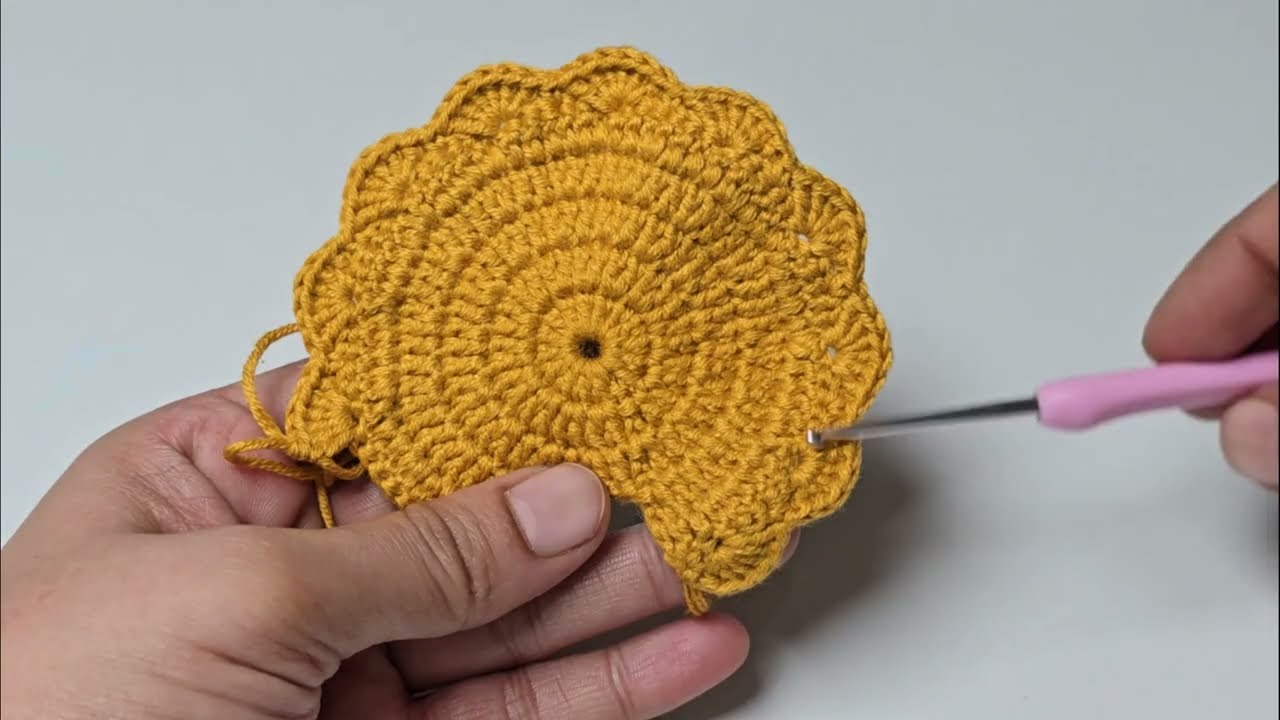
Part 1: Coaster Base (Main Color – e.g., White)
We’ll create a flat circle for the body of the chicken.
- Rnd 1: Start with a MR. Ch 2 (does not count as st here). Work 10 hdc into MR. Pull tail to close. Join with sl st to the top of the first hdc. (10 hdc)
- Alternative Start (if MR is tricky): Ch 3, join with sl st to first ch to form a ring. Ch 2. Work 10 hdc into the ring. Join with sl st to top of first hdc.
- Rnd 2: Ch 2. [Inc (2 hdc in next st)] in each st around. Join with sl st to top of first hdc. (20 hdc)
- Rnd 3: Ch 2. [Hdc 1, inc] 10 times. Join with sl st to top of first hdc. (30 hdc)
- Rnd 4: Ch 2. [Hdc 2, inc] 10 times. Join with sl st to top of first hdc. (40 hdc)
- Rnd 5: Ch 2. [Hdc 3, inc] 10 times. Join with sl st to top of first hdc. (50 hdc)
- Your circle should be fairly flat. If it’s ruffling, you might have too many stitches or your tension is too loose. If it’s cupping, your tension might be too tight. Adjust hook size or try fewer increases in a round.
- Fasten off MC, leaving a medium tail to weave in.
Part 2: Chicken Head (Main Color, continued from coaster base)
The head is integrated into the coaster’s edge.
- Rejoin MC with a sl st into any hdc from Rnd 5.
- Round for Head:
- Ch 1 (does not count as st).
- Work 1 sc in the same st you joined into.
- Work 1 hdc in the next st.
- Work (2 dc, 1 tr) all into the next st (this forms the back of the head).
- Work (1 tr, 2 dc) all into the next st (this forms the front of the head).
- Work 1 hdc in the next st.
- Work 1 sc in the next st.
- Sl st into the next st (this anchors the head shape to the coaster).
- Fasten off MC, leaving a tail for weaving in.
Part 3: Chicken Tail (Main Color, continued)
The tail feathers also emerge directly from the coaster’s edge.
- Count 10 stitches away from where you just finished the head (in either direction around the coaster edge, it doesn’t matter which side for now, you’ll place the features accordingly). Rejoin MC with a sl st into the 10th hdc.
- Tail Feathers:
- Ch 1 (does not count as st).
- Work 1 sc in the same st you joined into.
- Work (1 hdc, 1 dc) all into the next st.
- Work (2 tr) all into the next st (tallest feather).
- Work (1 dc, 1 hdc) all into the next st.
- Work 1 sc in the next st.
- Sl st into the next st.
- Fasten off MC, leaving a tail for weaving in.

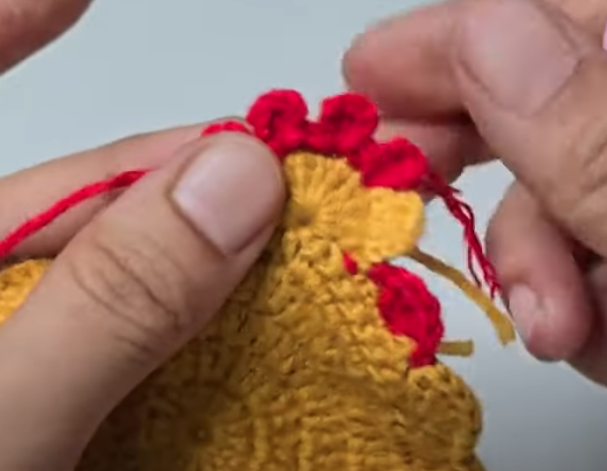
Part 4: Chicken Features – Comb, Wattle, Beak, Eyes
Now to add the details that make it a chicken!
- Comb (Red Yarn):
- Ch 5.
- Sl st into the 2nd ch from hook. Sc into the next ch. Hdc into the next ch. Dc into the last ch.
- Fasten off, leaving a tail for sewing.
- Attach: Sew the comb securely onto the top curve of the chicken’s head (the part made with the
trstitches).
- Wattle (Red Yarn):
- Ch 3.
- Dc into the 2nd ch from hook. Sl st into the same ch.
- Fasten off, leaving a tail for sewing.
- Attach: Sew the wattle just under where the beak will be, on the “chin” area of the head.
- Beak (Orange or Yellow Yarn):
- Ch 4.
- Sl st into the 2nd ch from hook. Sc into the next ch. Sl st into the last ch.
- Fasten off, leaving a tail for sewing.
- Attach: Sew the beak onto the front of the chicken’s head, between the wattle and the comb.
- Eyes (Black Yarn or Embroidery Floss):
- Thread a short piece of black yarn or embroidery floss onto your yarn needle.
- Make a small ‘V’ shape or a simple straight stitch on either side of the beak, where the eyes would be.
- Secure the ends on the back of the coaster.
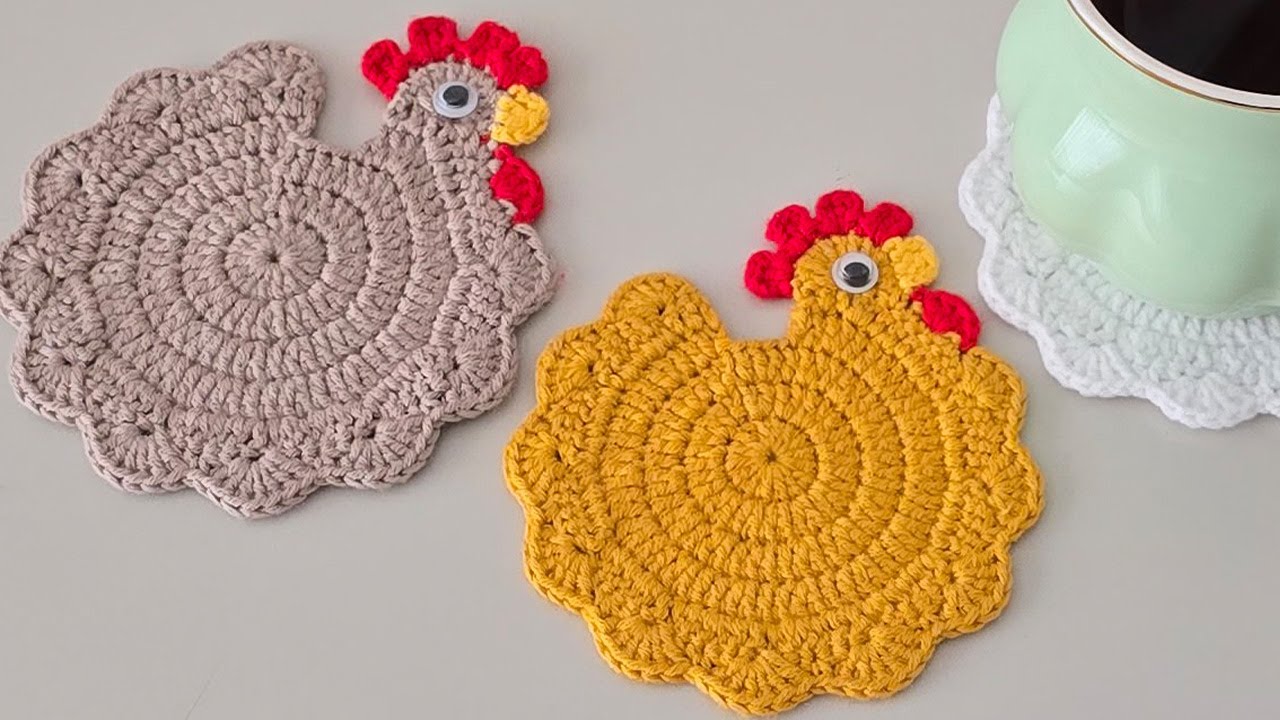
5. Finishing Your Crochet Chicken Coaster (Crucial Step!)
Proper finishing makes your coaster durable and look its best.
- Weave in All Ends NEATLY: This is absolutely crucial for a polished, professional-looking coaster. Use your yarn needle to carefully weave in every single yarn tail securely into the stitches on the back of your coaster. Take your time to hide them well. Do not just snip them short, or they may unravel, especially with use.
- Blocking (Recommended for a flat coaster):
- Gently wet your finished coaster.
- Carefully squeeze out any excess water (do NOT wring!).
- Lay the coaster flat on a clean, dry towel or a foam blocking mat. Gently shape it into a perfect circle, making sure the head and tail are positioned nicely.
- Allow it to air dry completely. This will help it lie flat and maintain its shape beautifully.
6. Tips for a Stylish & Durable Chicken Coaster
- Yarn Choice: Cotton is best for absorbency and heat resistance. Avoid acrylic if you plan to put very hot mugs on it, as acrylic can melt.
- Tension: Aim for consistent, firm tension to create a dense fabric that won’t stretch out easily with use. This is vital for a coaster.
- Color Play: Experiment with different body colors (yellow, black, speckled brown for a hen!).
- Embellishments: You could add tiny embroidered “feet” underneath the coaster base, or even make small separate crochet feet and sew them on.
- Make a Set: Crochet a set of 2, 4, or 6 chicken coasters for a lovely gift set!
- Care: Hand wash or machine wash on a delicate cycle with cool water, and lay flat to dry.
You now have a detailed tutorial on how to crochet an adorable and practical chicken coaster! Enjoy bringing these little feathered friends to life with your hook and yarn.