 by
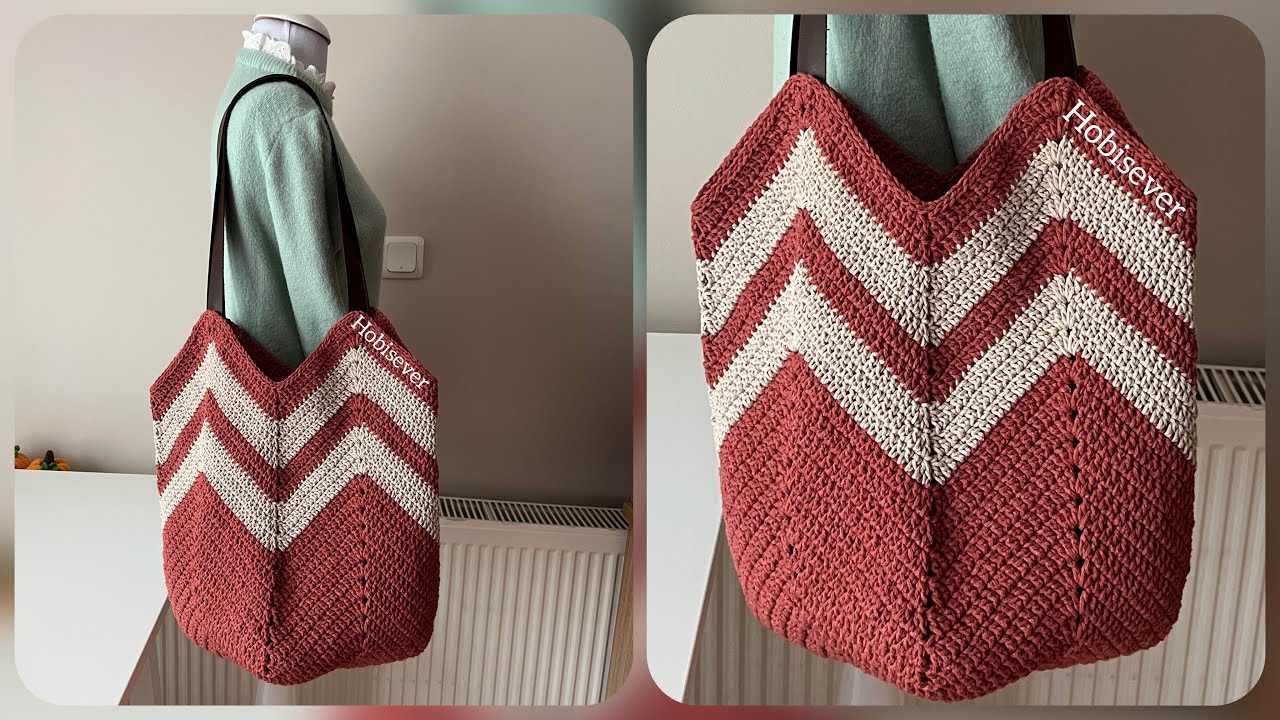
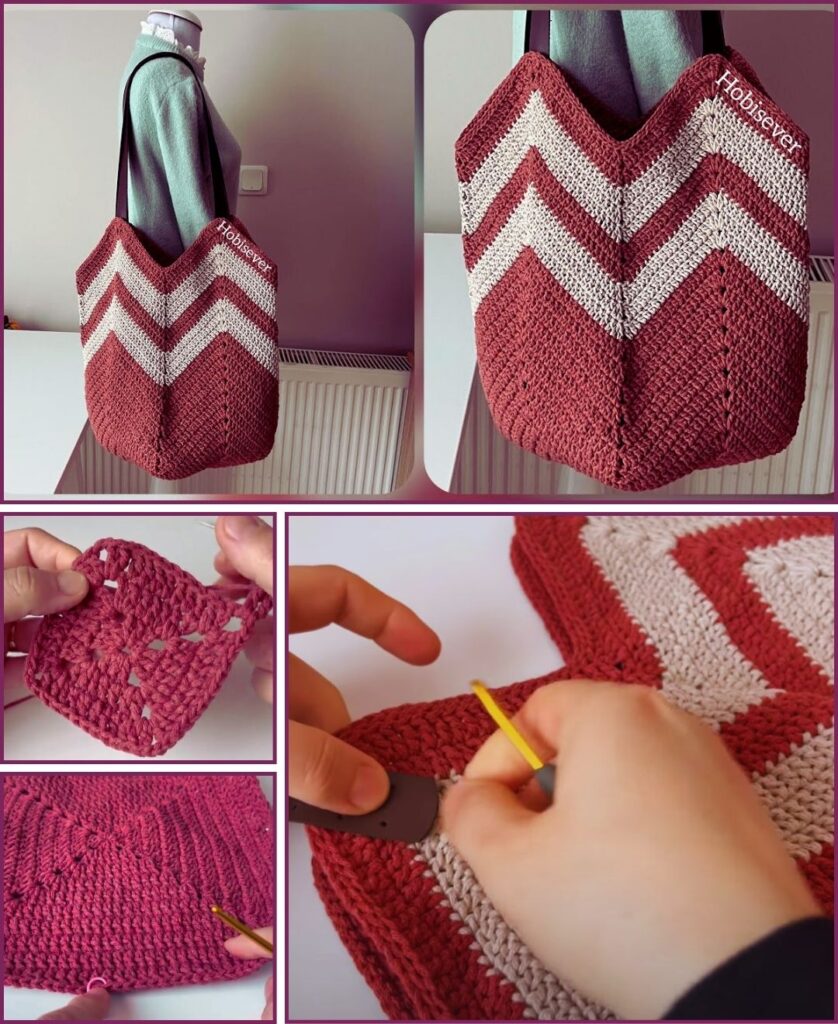
by A crochet granny square handbag is a truly timeless and versatile project, perfect for adding a handmade touch to your style or creating a thoughtful gift! It’s also an excellent way to use up those colorful yarn scraps you might have.
Given that you’re in Phnom Penh, where the climate can be warm, using 100% cotton yarn or a cotton blend is a superb choice for your bag. Cotton is breathable, durable, holds its shape beautifully, and is easy to care for, making it ideal for a practical handbag.

How to Crochet a Granny Square Handbag
This detailed tutorial will guide you through creating a charming and sturdy handbag by crocheting individual granny squares and then seaming them together.
1. Essential Materials You’ll Need
- Yarn:
- Fiber: Opt for 100% Cotton or a Cotton Blend (e.g., 80% Cotton / 20% Acrylic). These materials are durable, won’t stretch excessively, and beautifully showcase the classic granny stitch. While acrylic can work, cotton blends tend to hold shape better for bags.
- Weight: Worsted Weight (Aran / Medium / 4) is perfect. It works up at a good pace and creates a robust fabric.
- Colors: Get creative! You’ll need at least two colors per square (e.g., one for the center and one for the outer rounds). You can use many more for a truly vibrant, “scrapghan” style bag.
- Quantity: For a medium-sized handbag (approx. 10-12 inches tall, 12-14 inches wide), plan for about 500-700 yards (450-640 meters) total. This amount will be distributed among your chosen colors.
- Crochet Hook: A 4.0mm (US G/6) or 4.5mm (US 7) hook. The key is to achieve consistent, firm tension. This ensures your stitches are tight enough to give the bag structure without making it overly stiff. If your stitches look loose, try a smaller hook.
- Scissors: For cutting yarn.
- Yarn Needle (Tapestry Needle): Absolutely essential for weaving in all those yarn ends (and there will be a few!) and for neatly seaming your granny squares together.
- Stitch Markers (Optional but Recommended): Very helpful for marking corners or the beginning of rounds, especially when you’re starting out.
- Optional: A fabric lining (for extra durability, to prevent small items from slipping through stitches, and for a more polished interior), a magnetic snap closure or a button, and D-rings if you’re planning to attach a separate, non-crocheted strap.

2. Basic Crochet Stitches You’ll Use
This project relies on just a few fundamental crochet stitches, making it quite accessible for those familiar with the basics:
- Chain (ch): To begin your work and create chain spaces.
- Slip Stitch (sl st): Used for joining rounds.
- Double Crochet (dc): The main stitch that forms the “granny” clusters.
- Magic Ring (MR): (Also known as Magic Circle). This is the best way to start the center of your granny square for a tight, hole-free beginning. As an alternative, you can use
ch 4, sl st to first ch to form a ring.
Part 1: Crocheting the Granny Squares
The heart of your handbag lies in these classic granny squares. You’ll make several, depending on the size and shape of the bag you envision.
Abbreviations (US Crochet Terms):
- ch: chain
- sl st: slip stitch
- dc: double crochet
- st(s): stitch(es)
- sp: space
- MR: magic ring
Instructions for One Granny Square:
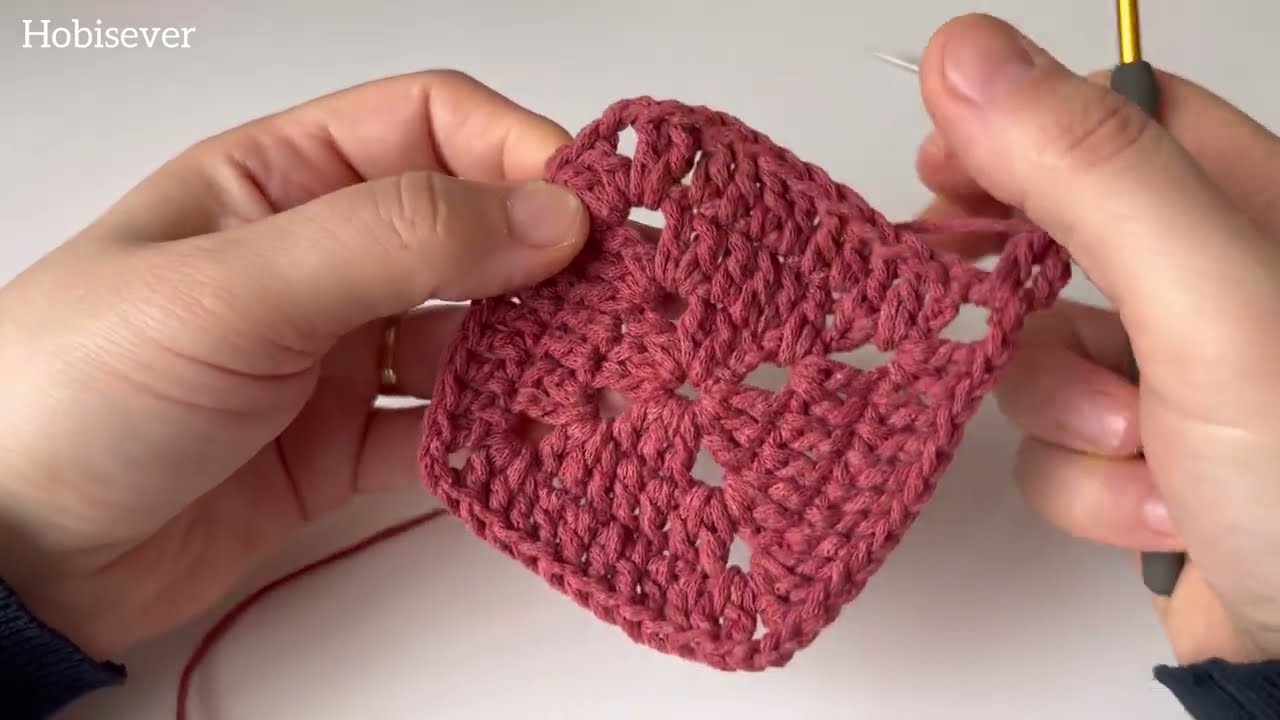
- Start (Color A): Create a Magic Ring (MR).
- Round 1: Ch 3 (counts as 1 dc). Work 2 dc into the MR. *Ch 3, 3 dc into the MR*. Repeat from * to * 2 more times. Ch 3. Join with a sl st to the top of the starting Ch 3. (You’ll have 4 clusters of 3 dc and 4 ch-3 spaces, forming your initial square corners.)
- To change colors cleanly (if desired): On the very last sl st of the round, don’t yarn over with Color A to pull through. Instead, pick up your new color (e.g., Color B), yarn over with the new color, and pull it through to complete the sl st.
- Round 2 (Color B or same color): Sl st into the first ch-3 sp. Ch 3 (counts as 1 dc). Work (2 dc, ch 3, 3 dc) into the same ch-3 sp (this is your first corner).
- *Ch 1, skip 3 dc. Work (3 dc, ch 3, 3 dc) into the next ch-3 sp (this is your next corner).*
- Repeat from * to * 2 more times. Ch 1, skip 3 dc. Join with a sl st to the top of the starting Ch 3. (You’ll now have 8 clusters of 3 dc, 4 ch-3 corner spaces, and 4 ch-1 side spaces.)
- Change colors on the last sl st if desired.
- Round 3 (Color C or new color): Sl st into the first ch-3 sp. Ch 3 (counts as 1 dc). Work (2 dc, ch 3, 3 dc) into the same ch-3 sp.
- *Ch 1, 3 dc into the next ch-1 sp. Ch 1, skip 3 dc. Work (3 dc, ch 3, 3 dc) into the next ch-3 sp.*
- Repeat from * to * 2 more times. Ch 1, 3 dc into the next ch-1 sp. Ch 1. Join with a sl st to the top of the starting Ch 3. (You’ll have 12 clusters of 3 dc, 4 ch-3 corner spaces, and 8 ch-1 side spaces.)
- Change colors on the last sl st if desired.
- Round 4 and onwards: Continue the pattern, always working (3 dc, ch 3, 3 dc) into each corner ch-3 sp, and (3 dc) into each side ch-1 sp, separated by Ch 1.
- The size of your granny square will directly impact the size of your bag. For a medium handbag, squares that are about 6-8 inches (15-20 cm) across (typically 4-6 rounds) work very well.
Fasten Off: Once your square reaches the desired size, cut your yarn, leaving a tail of about 6-8 inches (15-20 cm).
Part 2: Planning Your Bag Layout & Making Enough Squares
For a classic rectangular granny square handbag, you’ll generally need 6 squares:
- Front: 1 square
- Back: 1 square
- Sides: 2 squares (one for each side)
- Bottom: 2 squares (seamed together to form a rectangle, or you can make one larger rectangular piece if you prefer a seamless bottom)
So, plan to crochet at least 6 identical granny squares following the pattern above.
Part 3: Assembling Your Granny Squares
This is where your individual squares transform into a bag!
- Weave in All Initial Ends: Before you begin seaming, take the time to weave in all starting tails from your Magic Rings and any tails from color changes within each square. Use your yarn needle to hide them securely. This step is crucial for a neat finish and prevents your bag from unraveling later.
- Seaming Technique: For joining granny squares, you have a few good options:
- Whip Stitch (Yarn Needle): This creates a flat, almost invisible seam. Lay two squares flat with their wrong sides facing each other. Thread your yarn needle with a long tail of yarn (matching or contrasting color). Pass the needle through both loops of the corresponding stitches on each square, from one edge to the other, creating a tight seam.
- Slip Stitch Join (Crochet Hook): This creates a slightly raised, decorative ridge. Hold the two squares with wrong sides together. Insert your hook through both loops of a corresponding stitch on each square, yarn over, and pull through all loops on your hook (sl st). Repeat along the edge.
- Single Crochet Join (Crochet Hook): Similar to the slip stitch join but creates a more pronounced, sturdy ridge. Hold squares wrong sides together. Insert hook through both loops of both squares, yarn over, pull up a loop, yarn over, pull through both loops (sc). Repeat along the edge.
- For a handbag, the whip stitch is often preferred for its clean look and strong seam, but a single crochet join also offers excellent durability.
- Layout and Seam:
- Form the Body Tube: Lay out four squares in a row. Seam them together along their long edges to create a strip (Square 1 to Square 2, Square 2 to Square 3, Square 3 to Square 4). This strip will form the front, side, back, and other side of your bag. Then, seam the short ends of this strip together to form a tube.
- Attach the Bottom: Take your two remaining squares. Seam them together along one edge to form a rectangular bottom piece. Now, align this bottom piece with the open bottom edge of your bag tube. Seam the entire perimeter of the bottom piece to the tube, securely closing the bag.
Part 4: Shaping the Top Edge & Adding the Handles
Once your bag body is fully assembled, you’ll finish the top opening and add the handles. You have two main options for handles:
Option A: Integrated Handles (Seamless look, highly secure)
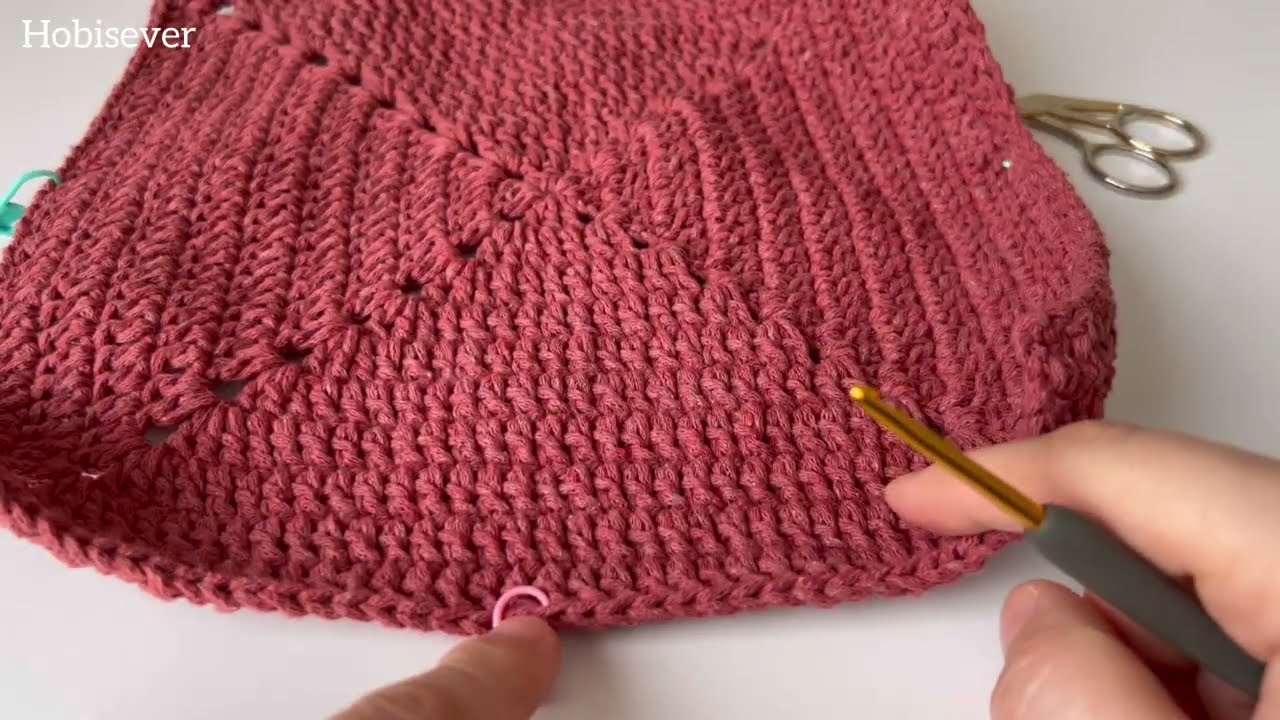
- Top Edge Finishing (Using a main color or accent color): Join yarn with a sl st to any stitch at the top opening of your bag.
- Round 1 (Top Edge Prep): Ch 1 (does not count as st). Work 1 sc in each dc and 1 sc in each ch-1 space around the entire top opening of the bag. When you reach a corner ch-3 space, work 3 sc into it. Join with a sl st to the first sc. (This round solidifies the top edge and standardizes the stitch count, which is helpful for even handle placement).
- Round 2 (Handle Creation): Ch 1. Sc in the first several stitches (e.g., 8-12 stitches, adjust this count to center your handle on the front panel).
- Ch 40-50 (This forms your first handle loop. Adjust this chain length for your desired handle drop; hold it up and test what feels comfortable!).
- Skip the next 15-20 stitches on the bag top (this creates your handle opening).
- Sc across the next section of stitches (this is the top middle of the bag, between the handles).
- Ch 40-50 (your second handle, matching the length of the first).
- Skip the next 15-20 stitches.
- Sc in the remaining stitches. Join with a sl st.
- Round 3 (Handle Reinforcement): Ch 1. Work 1 sc in each sc around the bag opening. When you reach a chain-loop handle, work sc stitches evenly into the chain loop (e.g., 1 sc per chain, or slightly more if needed to keep it flat). Continue working sc stitches on the bag body and the second handle. Join with a sl st.
- Repeat Round 3 one or two more times for extra thick, sturdy, and comfortable handles that hold their shape well.
- Fasten Off and weave in all ends securely.
Option B: Separate Strap Handles (Allows for hardware or different materials, flexible)
- Top Edge Finishing: Work 2-3 rounds of single crochet stitches (Ch 1, 1 sc in each st around, join with sl st) around the entire top opening of your bag. Fasten off and weave in ends. This creates a neat, sturdy top edge.
- Crochet Separate Straps:
- Strap Pattern: Ch 6 (adjust for desired strap width).
- Row 1: Sc in the 2nd ch from hook and in each chain across. (You’ll have 5 sc)
- Rows 2-X: Ch 1, turn. Sc in each stitch across. Repeat until the strap reaches your desired length (e.g., 20-30 inches / 50-75 cm).
- Make two identical straps. Fasten off, leaving long tails for sewing.
- Attach Straps: Using your yarn needle, securely sew the ends of the straps to the inside of the bag’s top opening. Position them symmetrically on the front and back of the bag. Stitch multiple times through both the strap and the bag fabric to ensure extreme durability, especially since handbags endure a lot of stress on their handles.
5. Finishing Your Bag
- Weave in ALL Remaining Ends: This is perhaps the most crucial step for a professional-looking and durable bag. Take your time to weave in all yarn tails from color changes and seams. Hide them securely within the fabric, preferably on the inside of your bag. Loose ends will quickly unravel, especially with a bag that gets daily use!
- Blocking (Recommended): While cotton bags hold their shape reasonably well, blocking can truly elevate your finished product.
- Gently wet your entire bag.
- Carefully squeeze out excess water (do not wring!).
- Stuff the bag with towels or newspaper to help it hold its intended shape. Lay it flat or stand it upright (if it can).
- Allow it to air dry completely. Blocking helps to even out your stitches, flatten your squares, and ensures your bag looks perfectly shaped and polished.
- Optional Lining: For added durability, structure, and to prevent small items from slipping through the slightly open granny stitches, consider sewing a fabric lining into your crochet bag. This is highly recommended for any functional handbag. You can hand-sew it in using a regular needle and thread.
- Optional Closure: For added security, you can sew a magnetic snap closure, a button with a crocheted loop, or even a zipper to the inside of the bag’s top opening.
You’ve now got a detailed guide to create a fantastic, unique, and functional granny square handbag! Enjoy the creative process and showing off your beautiful handmade creation.