 by
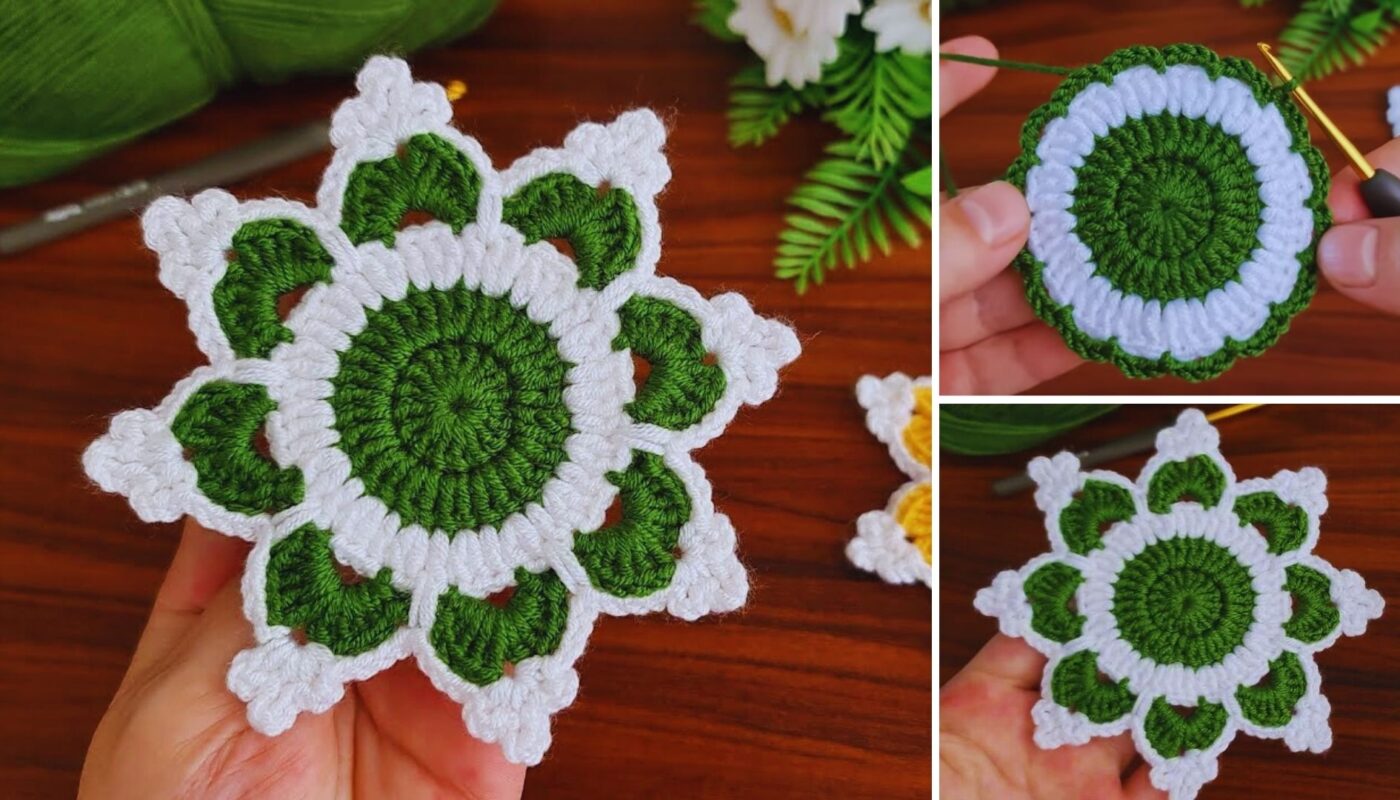
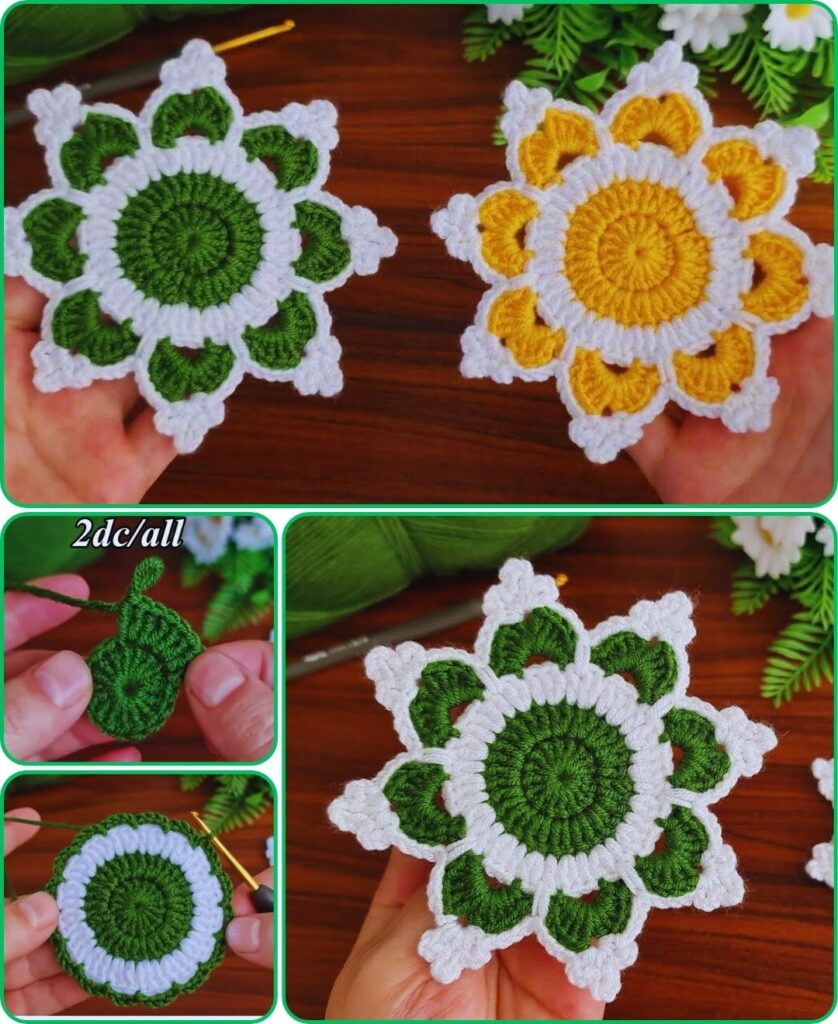
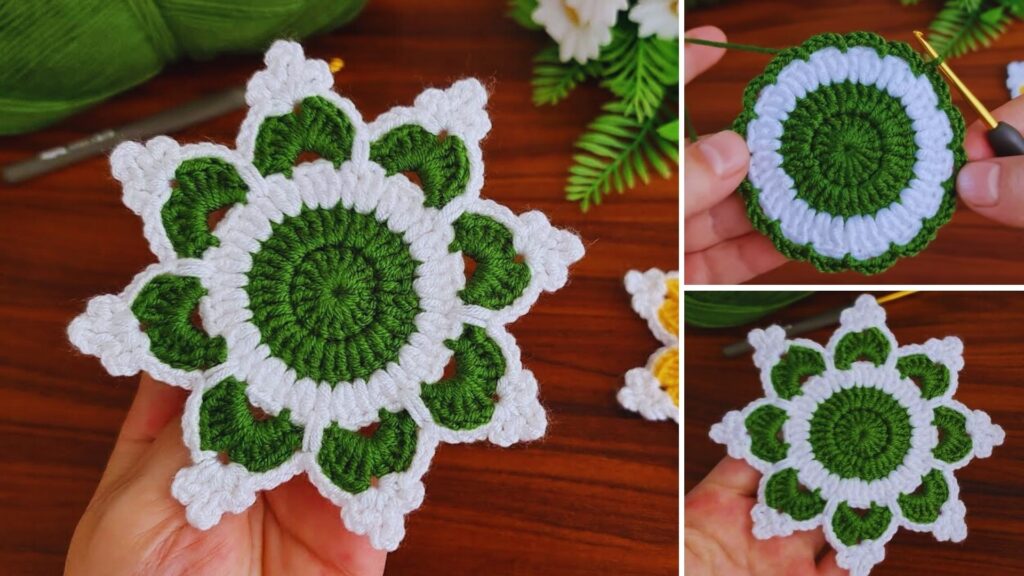
by Let’s create a beautiful and unique 3D Snowflake Flower Coaster! This project combines the delicate charm of a snowflake with the lovely dimension of a layered flower, resulting in an elegant and functional piece for your home. It’s a wonderful way to add a touch of winter wonderland magic to your decor, even if it’s sunny outside.

How to Crochet a Beautiful 3D Snowflake Flower Coaster
This pattern involves creating a central base, then layering petals and points to achieve a dimensional, snowflake-like flower that also functions as a sturdy coaster.
Skill Level: Intermediate
You’ll need to be comfortable with:
- Basic crochet stitches: Chain (ch), slip stitch (sl st), single crochet (sc), half double crochet (hdc), double crochet (dc), treble crochet (tr).
- Working in rounds.
- Creating a Magic Ring (MR) (highly recommended for a tight center).
- Working into back loops only (BLO) and front loops only (FLO).
- Working into stitches from previous rounds or behind current stitches to create layers.
Finished Coaster Dimensions (Approximate):
- 5.5-6.5 inches (14-16.5 cm) in diameter, depending on your yarn, tension, and how full your snowflake points are.
Materials You’ll Need:
- Yarn: Approximately 50-70 yards (45-65 meters) of Worsted Weight (Medium #4) Cotton Yarn. Cotton is ideal for coasters due to its absorbency and heat resistance.
- Color A (Center/Base/Snowflake Points): White, off-white, or light blue (approx. 40-50 yards).
- Color B (Optional – Inner Petals): A contrasting or complementary color like light grey, silver, or a pastel blue (approx. 10-20 yards).
- Crochet Hook: Size H/5.0mm. Or the hook size that gives you a firm but flexible fabric.
- Yarn Needle (Tapestry Needle): Essential for weaving in ends.
- Scissors
- Stitch Marker (Optional): Can be helpful for marking the start of rounds.
Gauge:
Gauge isn’t critical for a coaster, but a consistent tension will ensure your snowflake flower looks even and beautiful.
Abbreviations Used:
- ch: chain
- sl st: slip stitch
- sc: single crochet
- hdc: half double crochet
- dc: double crochet
- tr: treble crochet (yarn over twice, insert hook, yarn over, pull through 2 loops 3 times)
- st(s): stitch(es)
- MR: Magic Ring (or Magic Circle/Adjustable Ring)
- BLO: back loop only
- FLO: front loop only
- sp: space
- ch-sp: chain space
- FO: fasten off
- (): repeat instructions within parentheses a specified number of times.
- []: indicates the total number of stitches at the end of a round.
Let’s Crochet Your 3D Snowflake Flower Coaster!
This pattern builds the snowflake flower in layers, starting with a central disk, then adding dimensional petals/points, and finally the stabilizing coaster base.
Part 1: Central Disk (Color A)
- Start: Make a Magic Ring (MR).
- Alternative Start: Ch 4, then sl st into the first chain to form a ring.
- Round 1: Ch 1 (does NOT count as a stitch). Work 12 double crochet (dc) stitches into the MR. Pull the tail tightly to close the center hole. Sl st into the first dc to join. [12 dc]
- Round 2: Ch 1. Sc into the back loop only (BLO) of each stitch around. Sl st into the first sc to join. [12 sc]
- This BLO round creates a ridge of front loops (FLO) from Round 1. We’ll use these FLO later to create the first layer of dimensional points.
- Round 3: Ch 1. Work 2 sc into each stitch around. Sl st into the first sc to join. [24 sc]
- Fasten off (FO) Color A, leaving a 4-inch tail.
Part 2: First Layer of Snowflake Points/Petals (Color B – Optional, or Color A)
These points will create the initial dimensional layer around the center.
- Join Color B (or continue with Color A) with a sl st into any unworked front loop (FLO) from Round 1.
- Round 4 (Snowflake Points):
- Ch 1. In the same unworked FLO stitch where you joined, work: (sl st, ch 4, dc, ch 2, dc, ch 4, sl st). This forms your first point.
- (Skip next unworked FLO stitch from Round 1, in the next unworked FLO stitch from Round 1: sl st, ch 4, dc, ch 2, dc, ch 4, sl st). Repeat from * to * 4 more times around.
- You should have 6 points in total.
- Sl st to the first sl st you made at the beginning of the round to join.
- Fasten off (FO) Color B, leaving a 4-inch tail.
- Note: These points will naturally stand up a bit, creating the 3D effect. The (dc, ch 2, dc) creates a small peak.
Part 3: Second Layer of Snowflake Points / Flower Petals (Color A)
This layer will appear behind the first layer, adding more fullness and complexity. We’ll work into the unworked front loops (FLO) from Round 2.
- Turn your work to the back. You’ll see the unworked loops from Round 2 (the FLO left when you worked into BLO in Round 2).
- Join Color A with a sl st into any of these unworked FLO stitches from Round 2.
- Round 5 (Back Petals/Points):
- Ch 1. In the same unworked FLO stitch where you joined, work: (sl st, ch 5, tr, ch 2, tr, ch 5, sl st). This forms your first larger back point.
- (Skip next unworked FLO stitch from Round 2, in the next unworked FLO stitch from Round 2: sl st, ch 5, tr, ch 2, tr, ch 5, sl st). Repeat from * to * 4 more times around.
- You should have 6 larger points.
- Sl st to the first sl st you made at the beginning of the round to join.
- Fasten off (FO) Color A, leaving a 4-inch tail.
- Note: These longer points will sit behind the first layer, enhancing the 3D effect.
Part 4: The Coaster Base (Color A)
This section creates the solid, flat base for your coaster, adding stability and functionality.
- Turn your work to the back again. You’ll now need to work into the stitches from Round 3.
- Join Color A with a sl st into any sc stitch from Round 3. You’ll essentially be working into the back of Round 3, hiding previous ends.
- Round 6 (Coaster Base):
- Ch 2 (does NOT count as a stitch). Hdc in the same stitch.
- Work 1 hdc into each of the 24 sc stitches from Round 3 around the entire coaster, trying to keep your hook behind the existing layers of points.
- Sl st to the top of the beginning ch-2 to join. [24 hdc]
- Round 7: Ch 2. (Hdc in next st, 2 hdc in next st) around. Sl st to the top of the beginning ch-2 to join. [36 hdc]
- Round 8: Ch 2. (Hdc in next 2 sts, 2 hdc in next st) around. Sl st to the top of the beginning ch-2 to join. [48 hdc]
- This should give you a good, solid coaster base. If you want a larger coaster, add another increase round (e.g., Round 9: Ch 2, (hdc in next 3 sts, 2 hdc in next st) around).
- Final Round (Optional – Edging for firmness): Ch 1. Sc in each hdc around. Sl st to the first sc to join. This creates a neat, firm edge.
Part 5: Finishing Your 3D Snowflake Flower Coaster
- Fasten Off: After completing your final round, cut your yarn, leaving a 6-inch tail. Yarn over and pull the tail completely through the loop on your hook to secure the last stitch.
- Weave in All Ends: This is the most crucial step for a beautiful and durable coaster, especially with all those layers and color changes. Thread each yarn tail onto your yarn needle. Carefully weave them through several stitches of the same color on the back side of your coaster, making them secure and invisible. Take your time to ensure all tails are tucked away neatly.
- Shape and Admire: Gently lay your coaster flat. Using your fingers, gently manipulate and arrange the snowflake points/petals to create the desired 3D effect. The layers should naturally pop forward, showcasing the beautiful dimension of your snowflake flower.
You’ve now created a truly beautiful and dimensional 3D Snowflake Flower Coaster! This intricate-looking piece is sure to impress and add a special handmade touch to your home, perfect for winter or any time you want a unique accent. Enjoy your new creation!