 by
by That’s a wonderful request! Crocheting round placemats and doilies uses the same basic principles: working in the round and consistently increasing stitches to keep the item flat. The main difference lies in the material and the number of increase rounds.
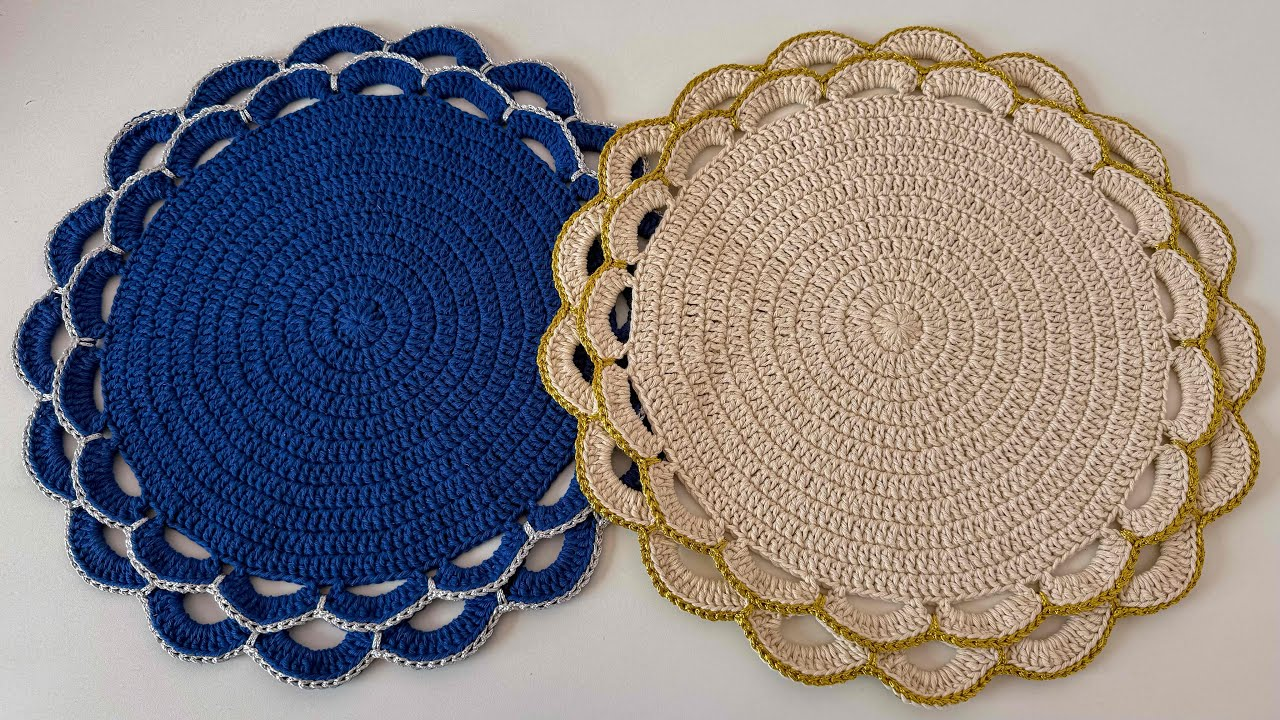
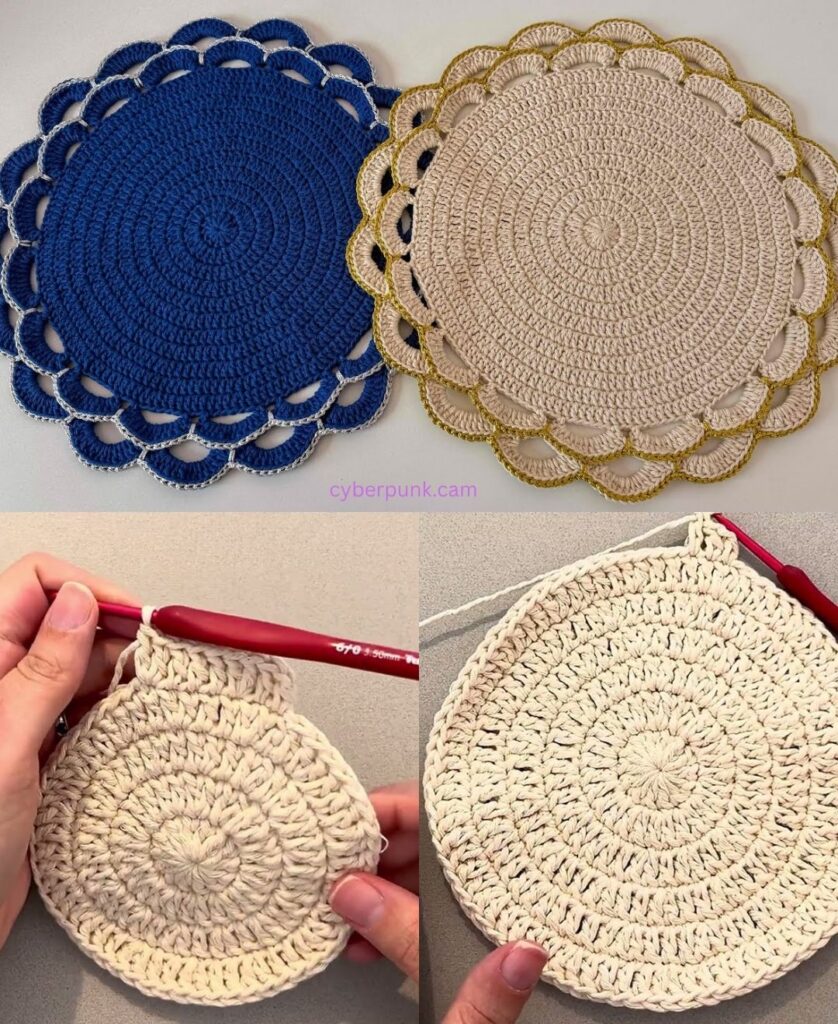
Here is a detailed tutorial for a Simple Textured Round Placemat/Doily that is easy for beginners, using the Half Double Crochet (HDC) stitch for a dense, sturdy fabric.

🍽️ Textured Round Placemat / Doily Tutorial
This pattern uses the Half Double Crochet (HDC) stitch worked in the Back Loop Only (BLO) to create subtle, concentric texture rings.
Materials Needed
| Item | Recommended Material | Hook Size (Example) | Key Feature |
| Doily | Size 10 or 20 Cotton Thread | 1.5 mm – 2.0 mm | Delicate, Stiffened |
| Placemat | Worsted (Size 4) or Bulky (Size 5) Cotton Yarn | 5.5 mm – 8.0 mm | Sturdy, Washable |
Key Crochet Terms
| Abbreviation | Stitch Name |
| ch | Chain |
| sl st | Slip Stitch |
| hdc | Half Double Crochet |
| inc | Increase (2 hdc in one stitch) |
| st(s) | Stitch(es) |
| BLO | Back Loop Only (creates texture) |
Part 1: The HDC Flat Circle Formula
To maintain a flat circle, you must increase the total number of stitches by the number you started with in every round. HDC typically starts with 8 to 10 stitches. We will use 10 for a smooth circle.
| Round (R) | Increase Rule | Total Stitches |
| R1 | Hdc 10 in magic ring | 10 |
| R2 | Inc in every st | 20 |
| R3 | Hdc 1, Inc | 30 |
| R4 | Hdc 2, Inc | 40 |
| R5 | Hdc 3, Inc | 50 |
| R(N) | Hdc (N-2), Inc | N x 10 |
Part 2: Working the Pattern (HDC BLO)
The instructions below should be worked using the BLO (Back Loop Only) for all HDC stitches to achieve the textured ridge lines.
Round 1: Establishing the Center
- Start the Ring: Make a Magic Ring.
- Base Stitches: ch 2 (does not count as st). Work 10 hdc into the center ring.
- Finish: Pull the yarn tail tight. Join with a sl st to the first hdc. (10 sts)

Round 2: Doubling the Stitches
- ch 2 (does not count as st). Work 2 hdc BLO (inc) in every stitch around the circle.
- Join with a sl st to the first hdc. (20 sts)
Round 3: Hdc 1, Increase
- ch 2 (does not count as st).
- Work 1 hdc BLO in the first stitch. Work inc (2 hdc BLO) in the next stitch.
- Repeat Pattern: [1 hdc BLO, inc] around the circle.
- Join with a sl st to the first hdc. (30 sts)
Round 4: Hdc 2, Increase
- ch 2 (does not count as st).
- Work 1 hdc BLO in the next 2 stitches. Work inc (2 hdc BLO) in the next stitch.
- Repeat Pattern: [Hdc BLO in next 2 sts, inc] around the circle.
- Join with a sl st to the first hdc. (40 sts)
Continuing to Grow
- Round 5: Hdc BLO in next 3 sts, inc. Repeat around. (50 sts)
- Round 6: Hdc BLO in next 4 sts, inc. Repeat around. (60 sts)
Continue repeating this sequence, adding one extra hdc between increases in each subsequent round, until the desired diameter is reached.

Part 3: Sizing and Finishing
Sizing Guidelines
- Doily: Stop when the diameter reaches 6–12 inches (depending on thread weight).
- Placemat: Stop when the diameter reaches 12–14 inches (standard size).
Edging and Clean Finish
When you reach the desired size, complete the item with a neat border:
- Final Round (Reverse SC/Crab Stitch): Instead of a plain slip stitch join, work a round of Reverse Single Crochet (Crab Stitch) around the edge. This creates a neat, rope-like border that is perfect for placemats. Join with a sl st to the first stitch.
- Fasten Off: Cut the yarn, weave the tail into the back of the work, and trim.
Stiffening (For Doilies)
For doilies to look delicate and hold their shape:
- Soak: Soak the doily in a mixture of water and liquid starch or fabric stiffener.
- Pin: Lay the wet doily on a mat or thick towel and pin the edge all around, stretching it slightly to form a perfect circle.
- Dry: Allow the doily to dry completely before removing the pins.
Your crocheted placemat or doily is now ready for use!
Video tutorial: