 by
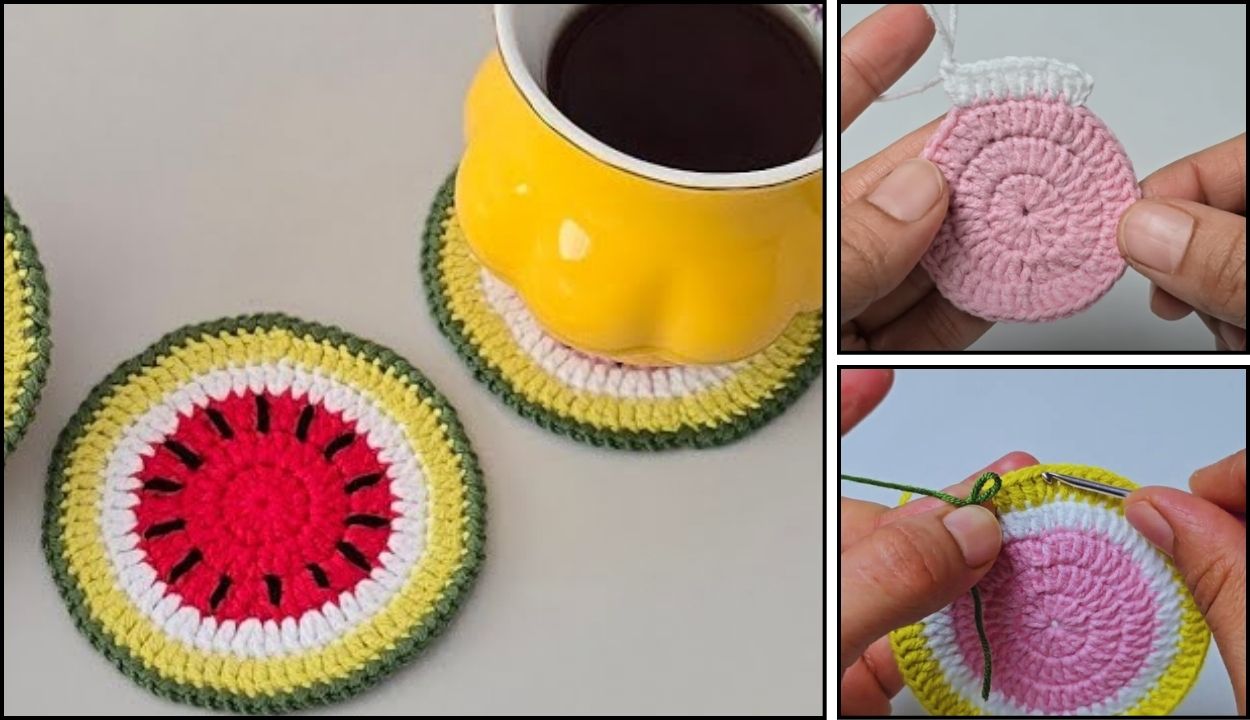
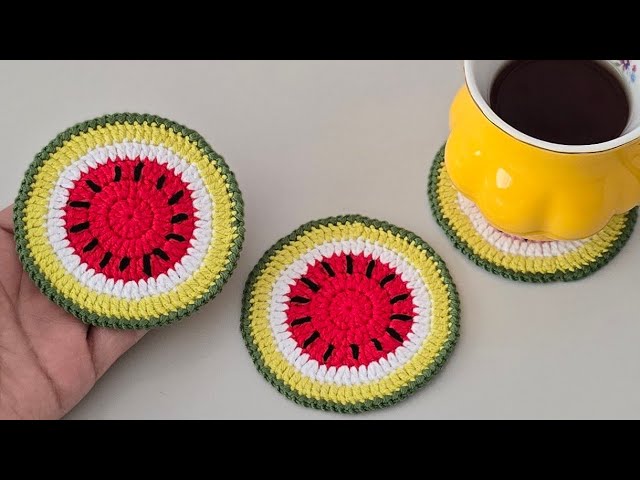
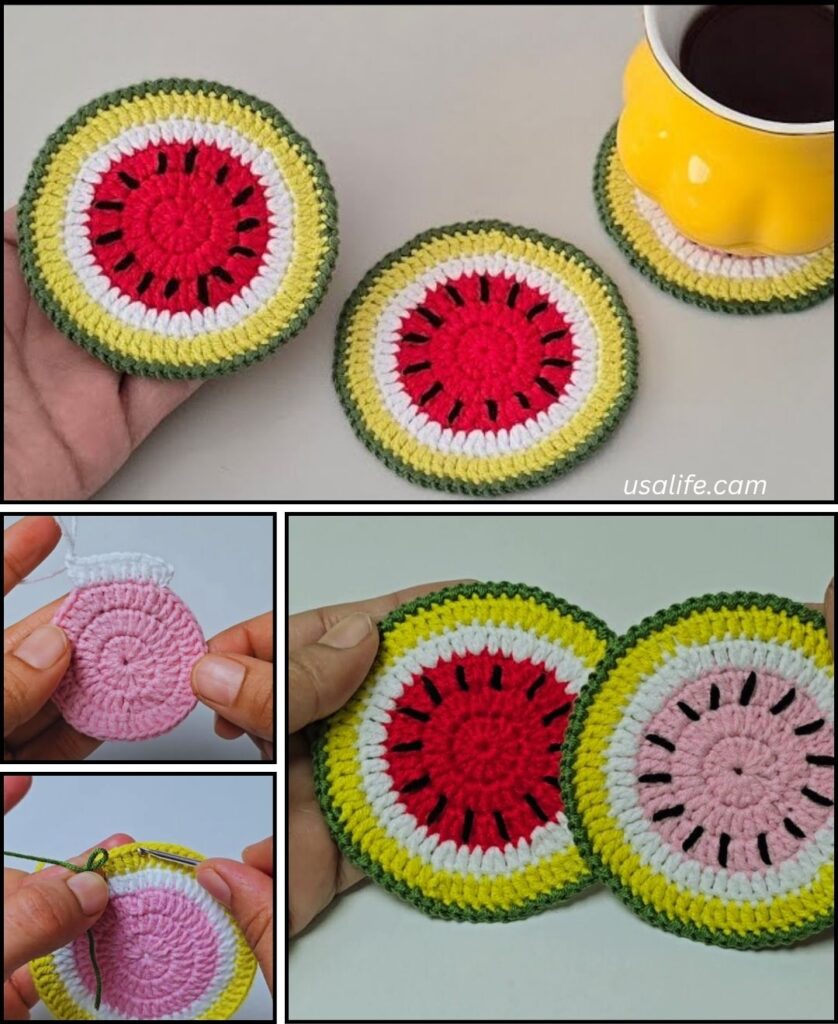
by A crochet watermelon coaster is an absolutely delightful and refreshing project, perfect for summer, picnics, or just adding a pop of vibrant color to your home! These little coasters are quick to make, excellent for using up small yarn scraps, and fantastic for practicing working in the round, color changes, and basic shaping.
Given that it’s warm in Phnom Penh, 100% cotton yarn is an ideal choice for this project. Cotton is highly absorbent (perfect for soaking up condensation from drinks), durable, and easy to wash – all essential qualities for a coaster! It also provides excellent stitch definition, which will make your watermelon’s distinct colors and “seeds” look crisp and charming.

How to Crochet a Watermelon Coaster: Step-by-Step
This tutorial will guide you through creating a classic round watermelon slice coaster, complete with a red/pink center, white rind, green edge, and embroidered “seeds.”
1. Essential Materials You’ll Need
- Yarn:
- Main Color (MC – Red/Pink): Worsted Weight (Aran / Medium / Category 4) 100% Cotton Yarn. You’ll need a small amount for the center.
- Accent Color 1 (AC1 – White/Cream): Small amount of Worsted Weight 100% Cotton Yarn for the rind.
- Accent Color 2 (AC2 – Green): Small amount of Worsted Weight 100% Cotton Yarn for the outer crust.
- Accent Color 3 (AC3 – Black/Dark Brown): Very small amount of embroidery floss or thin black yarn for the seeds.
- Crochet Hook:
- A 4.0mm (US G/6) or 4.5mm (US 7) hook. Choose a hook size that creates a dense, firm fabric for your coaster so it lays flat and protects surfaces well. If your stitches are naturally loose, go down a hook size.
- Scissors: For cutting yarn.
- Yarn Needle (Tapestry Needle): Essential for weaving in ends and embroidering the seeds.
- Stitch Marker (Optional but helpful): To mark the beginning of rounds.

2. Basic Crochet Stitches You’ll Use
This project relies on fundamental crochet stitches, working in the round, and color changes:
- Magic Ring (MR) / Adjustable Ring: (Highly Recommended!) Creates a tight, hole-free center for your coaster. Alternatively, you can
ch 4and thensl stto the first chain to form a ring, and work your first round of stitches into this chain ring. - Chain (ch): For starting and turning.
- Slip Stitch (sl st): For joining rounds seamlessly.
- Single Crochet (sc): A dense, short stitch.
- Half Double Crochet (hdc): A versatile, medium-height stitch, used for the main body.
- Double Crochet (dc): A taller stitch, sometimes used for a larger coaster or a different look.
- Increase (inc): Work 2 stitches into the same stitch to expand the circle.
- Fasten Off: To securely end your work.
- Weaving in Ends: Hiding yarn tails for a neat and professional finish.
- Color Changes: How to switch between your watermelon colors neatly.
Crochet Watermelon Coaster Pattern
This pattern creates a circular watermelon slice coaster, approximately 4-5 inches (10-12.5 cm) in diameter.
Abbreviations (US Crochet Terms):
- MC: Main Color (Red/Pink)
- AC1: Accent Color 1 (White/Cream)
- AC2: Accent Color 2 (Green)
- AC3: Accent Color 3 (Black/Dark Brown)
- MR: Magic Ring
- ch: chain
- sl st: slip stitch
- sc: single crochet
- hdc: half double crochet
- inc hdc: increase half double crochet (work 2 hdc into the same stitch)
- st(s): stitch(es)
- FO: Fasten off
Understanding Color Changes in Joined Rounds
For neat, seamless color changes when working in joined rounds:
- Work the last stitch of the current round (which will be a
hdcin this pattern) up to the last yarn over. You should have 3 loops on your hook. - Drop the current color yarn. Pick up your new color yarn.
- Yarn over with the new color and pull through all 3 loops on your hook to complete the
hdcstitch. - Now, with the new color, make your sl st to join the round (into the first hdc of the round, not the ch-2 turning chain).
- Ch 2 (with the new color, this will be your turning chain for the next round).
- Turn your work.
- Cut the old color yarn, leaving a 4-6 inch tail to weave in later.
Part 1: Watermelon “Flesh” (MC – Red/Pink)
- Round 1: With MC, create a MR. Ch 2 (does not count as a stitch). Work 10 hdc into the Magic Ring. Join with a sl st to the top of the first hdc. (10 hdc)
- Gently pull the tail of the MR to close the center hole tightly. Weave in this short starting tail now to secure it.
- Round 2: Ch 2 (does not count as a stitch). Work inc hdc in each st around. Join with a sl st to the top of the first hdc. (20 hdc)
- Round 3: Ch 2 (does not count as a stitch).
*Hdc in the next st, inc hdc in the next st.*Repeat 10 times around. Join with a sl st to the top of the first hdc. (30 hdc) - Round 4: Ch 2 (does not count as a stitch).
*Hdc in the next 2 sts, inc hdc in the next st.*Repeat 10 times around. Change color to AC1 (White/Cream) as you complete the last hdc of this round (on the 30th hdc). Join with a sl st to the top of the first hdc. (40 hdc)- FO MC, leaving a tail for weaving in.
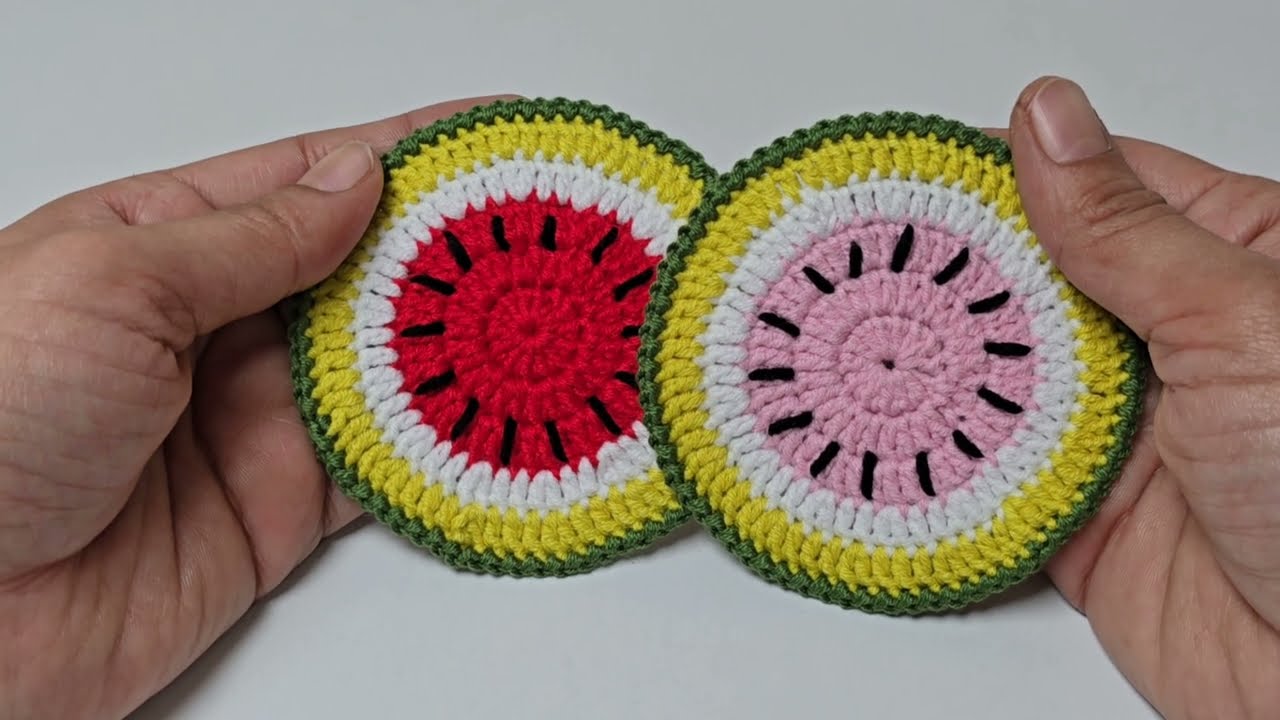
Part 2: White Rind (AC1 – White/Cream)
- Round 5: With AC1, ch 2 (does not count as a stitch).
*Hdc in the next 3 sts, inc hdc in the next st.*Repeat 10 times around. Change color to AC2 (Green) as you complete the last hdc of this round (on the 50th hdc). Join with a sl st to the top of the first hdc. (50 hdc)- FO AC1, leaving a tail for weaving in.
Part 3: Green Crust (AC2 – Green)
- Round 6: With AC2, ch 2 (does not count as a stitch).
*Hdc in the next 4 sts, inc hdc in the next st.*Repeat 10 times around. Join with a sl st to the top of the first hdc. (60 hdc) - Fasten Off, leaving a tail about 6 inches (15 cm) long.
Part 4: Add the “Seeds” (AC3 – Black/Dark Brown)
This step adds the signature watermelon detail.
- Thread your yarn needle with AC3 (black embroidery floss or thin yarn).
- On the red/pink “flesh” section of your coaster, embroider small “V” shapes or tiny straight stitches randomly to represent watermelon seeds. Aim for 5-8 seeds, scattered naturally.
- Knot the ends securely on the wrong side and trim them close.
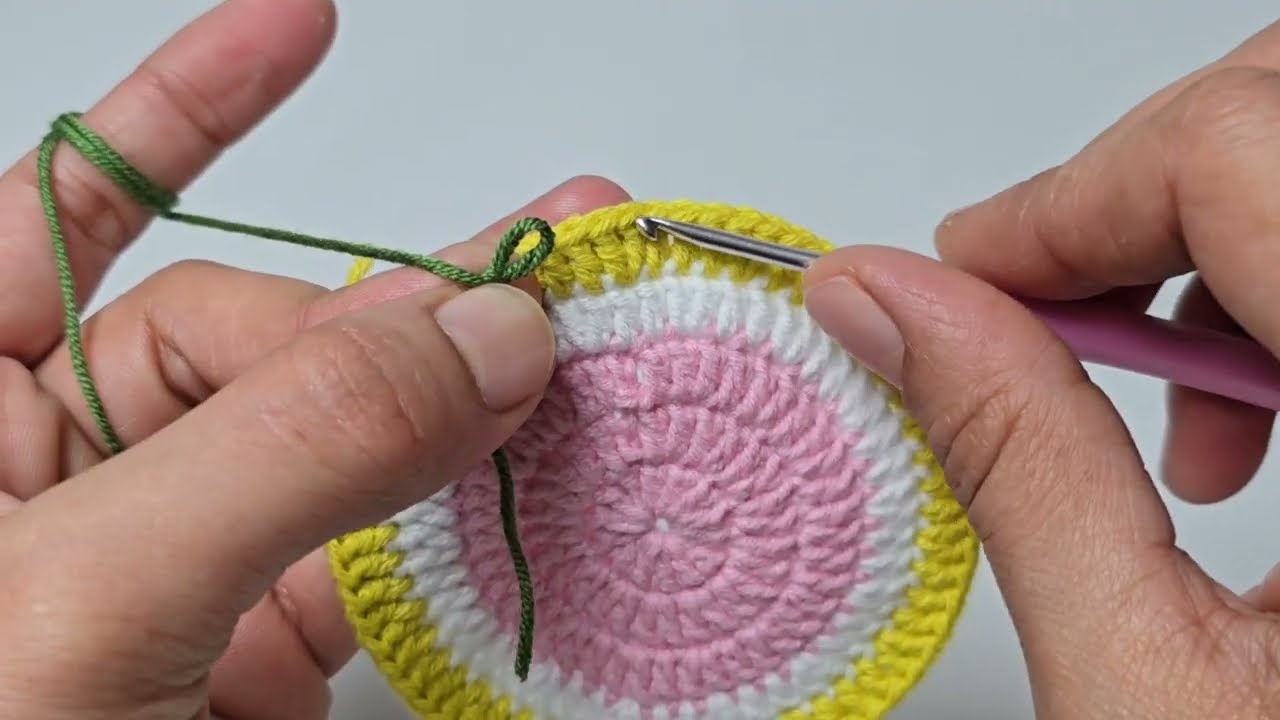
Part 5: Finishing Your Coaster
- Weave in All Ends NEATLY: This is crucial for a clean and professional-looking coaster.
- Use your yarn needle to carefully weave in every single yarn tail on the wrong side of your coaster. Pay extra attention to the tails from the color changes. Go back and forth through stitches of the same color for at least 1-2 inches to ensure they are hidden and won’t unravel with use or washing.
- Blocking (Highly Recommended!): Blocking will really make your coaster shine! It helps to:
- Even out your stitches and tension.
- Flatten the coaster so it lays perfectly flat on your table.
- Define the circular shape and the color transitions.
- Method:
- Gently wet your finished coaster (you can submerge it in cool water with a tiny bit of mild soap, then gently squeeze out excess water, or simply mist it thoroughly with a spray bottle).
- Lay it flat on a blocking mat or a clean towel.
- Gently stretch and shape the coaster into a perfect circle. You can use rust-proof pins to hold it in place.
- Allow it to air dry completely. This might take several hours or even overnight. Do not use heat (like a hairdryer) as it can distort the yarn.
Tips for a Beautiful Watermelon Coaster
- Consistent Tension: Try to maintain even tension throughout your work. This is the most important factor for a flat coaster that doesn’t curl or wave.
- Yarn Choice: Cotton is definitely the best for absorbency and durability in a coaster.
- Counting Stitches: For a project this small, every stitch counts! Take your time and count at the end of each round to ensure your circle stays flat and doesn’t ruffle or cup.
- Neat Color Changes: Practice the technique of changing colors on the last yarn over of the last stitch. This makes a huge difference in how clean your stripes look.
- Seed Placement: Don’t overthink the seeds! A random scattering looks most natural.
- Gift Idea: Make a set of 4-6 watermelon coasters for a refreshing and thoughtful handmade gift! They’re also perfect for summer party favors.
- Half-Slice Option: Once you master the full circle, you can easily adapt this by making just half a circle for a “slice” effect (working in rows back and forth instead of rounds).
You’re now ready to crochet your very own cheerful watermelon coaster! Enjoy adding this sweet, summery touch to your home.