 by
by You’re looking for a detailed guide on how to crochet a Baby Blanket Flower Granny Square! This is a very popular and lovely motif for baby blankets, as it combines a sweet floral design with the modularity and charm of a granny square. You can make many of these squares and join them together to create a custom-sized, colorful, and cozy blanket.
Here’s a detailed tutorial:
How To Crochet a Baby Blanket Flower Granny Square Motif
This pattern creates a charming square with a flower at its heart, perfect for combining into a soft and beautiful baby blanket. Using different colors for the center, petals, and outer rounds will make your blanket truly eye-catching.
Skill Level: Intermediate (Requires comfort with basic stitches, working in the round, making clean color changes, and shaping a circle into a square).
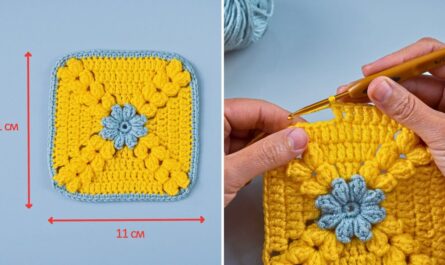
Finished Square Dimensions (Approximate):
- Size: 6 x 6 inches (15 x 15 cm)
Materials You’ll Need:
- Yarn:
- Worsted Weight (Medium #4) Baby-Friendly Yarn: Approximately 30-40 yards (27-37 meters) per 6×6 inch square.
- Recommended: Soft acrylic, cotton, or a cotton/acrylic blend. Look for yarns labeled “baby yarn” for extra softness and easy washability.
- You will use three different colors per square for a vibrant flower effect:
- Color A (Flower Center): Small amount (e.g., yellow)
- Color B (Petals): Small amount (e.g., pink or blue)
- Color C (Squaring Off/Outer Rounds): Larger amount (e.g., white or green)
- Crochet Hook:
- Size H/5.0mm (or the hook size that gives you a soft fabric that’s not too open, and lies flat).
- Yarn Needle (Tapestry Needle): Essential for weaving in loose ends and seaming squares.
- Scissors
- Measuring Tape: Useful for checking motif size and overall blanket length.
- Stitch Markers (Optional but Recommended): To mark the beginning of rounds or corner spaces.
Gauge (Crucial for Consistent Square Size!):
Maintaining a consistent gauge is vital if you’re making multiple squares to join. It ensures they are all the same size and will connect neatly without distortion.
- With your H/5.0mm hook and chosen yarn, after Round 5, your square should measure approximately 6 inches (15 cm) from side to side.
- If your square is significantly smaller, try a larger hook. If it’s significantly larger, try a smaller hook.
Abbreviations Used:
- ch: chain
- sl st: slip stitch
- sc: single crochet
- hdc: half double crochet
- dc: double crochet
- st(s): stitch(es)
- ch-sp: chain space
- MR: Magic Ring (also known as Magic Circle or Adjustable Ring)
- FO: fasten off
How to Make a Clean Color Change:
When you need to switch colors at the end of a round, this method creates a neat transition:
- Work the last stitch of the round with the current color as normal, but stop when you have two loops left on your hook.
- Drop the current color.
- Pick up the new color, yarn over with the new color, and pull it through the remaining two loops on your hook to complete the stitch.
- You have now successfully changed colors. Sl st into the first stitch of the round (with the new color) to join.
- Cut the old color yarn, leaving a 4-6 inch tail to weave in securely later.
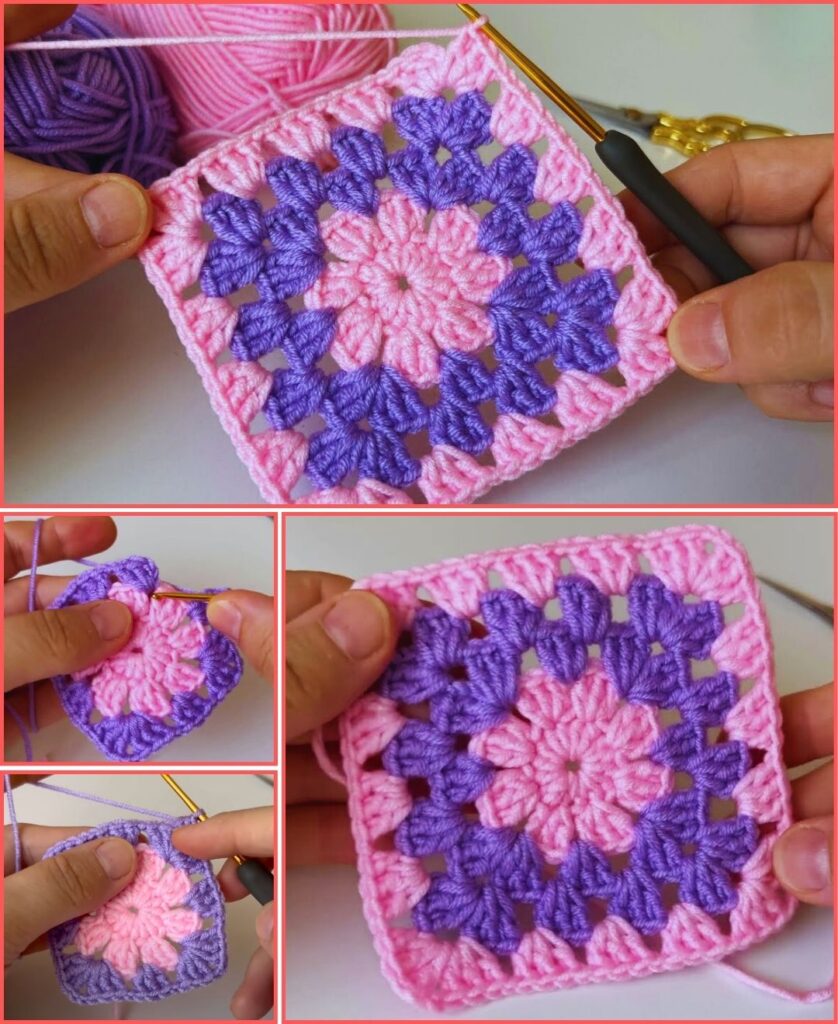
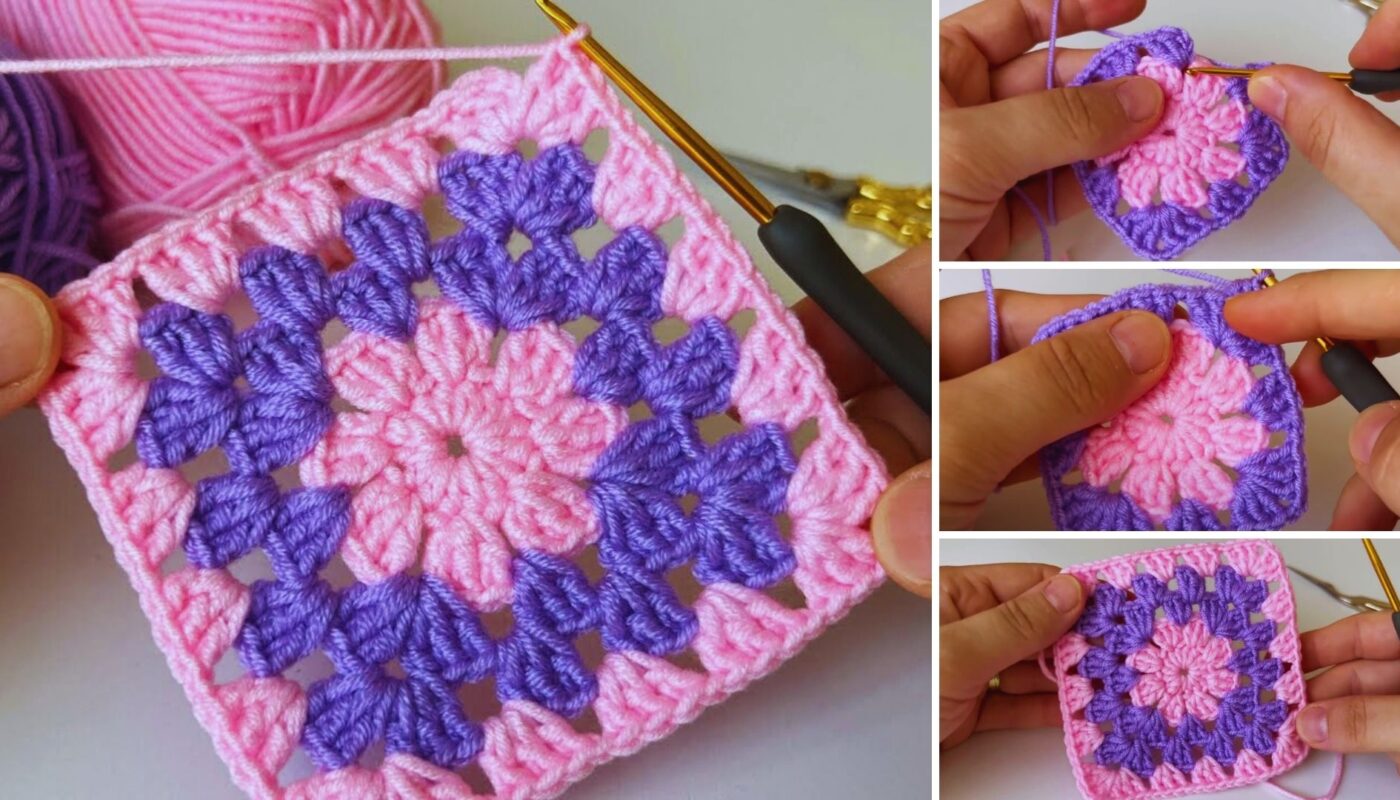
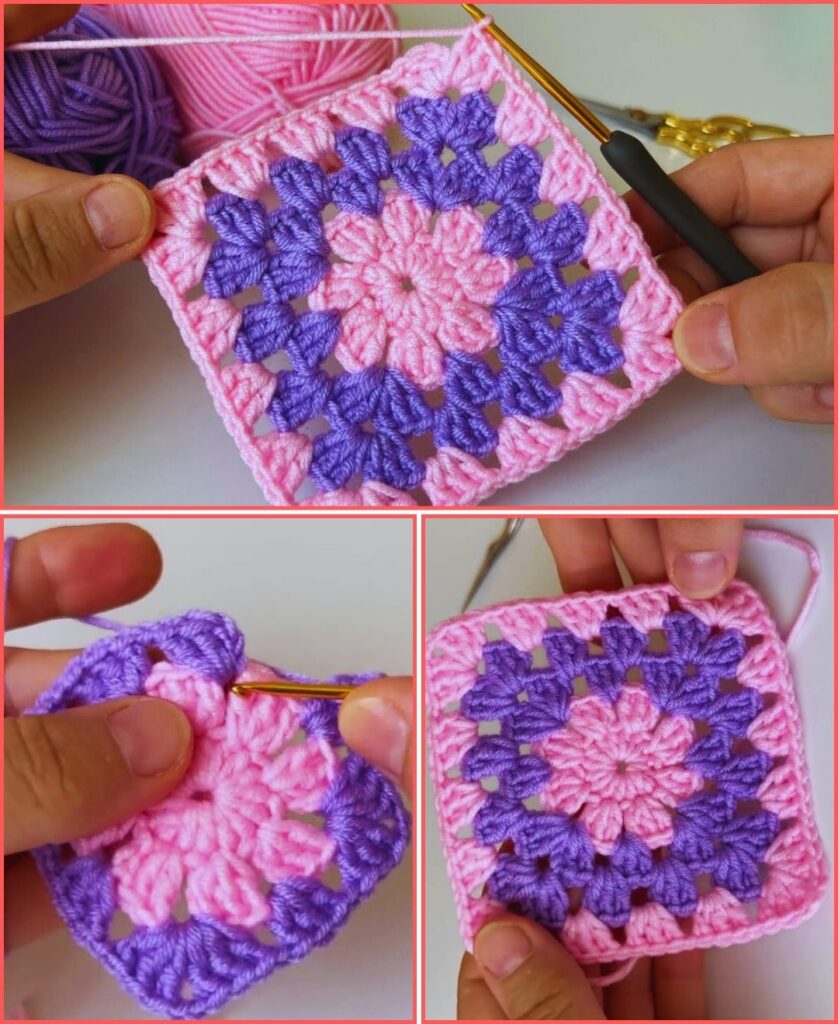
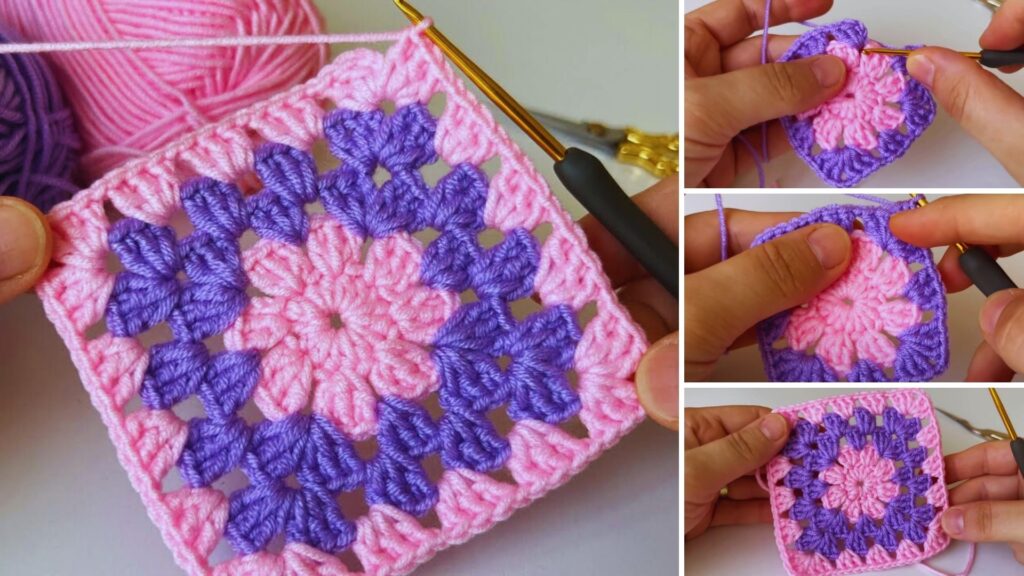
Understanding Flower Granny Square Construction:
This square builds from a central flower motif outwards. It starts with a small, round flower, and then subsequent rounds “square off” this circle using a combination of double crochet stitches and chain spaces, much like a traditional granny square. This allows for lovely color blocking and a distinct flower design at the center of each square.
Let’s Start Crocheting Your Baby Blanket Flower Granny Square!
Part 1: Flower Center (Color A)
Option A: Magic Ring (Recommended for a tight center)
- With Color A, make a Magic Ring (MR).
- Round 1: Ch 2 (does NOT count as a stitch). Work 10 hdc into the MR. Pull the tail tight to close the ring.
- Perform a clean color change to Color B. Sl st to the top of the first hdc to join. (Total: 10 hdc).
Option B: Chain 4 Method (Alternative)
- With Color A, Ch 4, sl st into the 1st ch to form a ring.
- Round 1: Ch 2 (does NOT count as a stitch). Work 10 hdc into the ring.
- Perform a clean color change to Color B. Sl st to the top of the first hdc to join. (Total: 10 hdc).
Part 2: Petals (Color B)
This round creates the distinct textured petals of your flower.
- Round 2 (Petals):
- With Color B, Ch 1 (does NOT count as a stitch). Sc in the same st as join.
- (Ch 3, sc in the next hdc). Repeat from * to * 9 more times. You will have 10 sc and 10 ch-3 spaces.
- Perform a clean color change to Color C. Sl st to the first sc to join. (Total: 10 sc, 10 ch-3 sps).
Part 3: Squaring Off (Color C)
Now, we will transform the circular flower into a square. We will be working into the ch-3 spaces from Round 2.
- Round 3 (First Square Round):
- With Color C, Sl st into the first ch-3 sp.
- Ch 2 (does NOT count as a stitch). Work (2 dc, ch 2, 3 dc) into the same ch-3 sp (this is your first corner).
- (Ch 1, 3 dc into the next ch-3 sp). Repeat from * to * 3 more times. You will have 4 “sides” of 3 dc groups separated by ch-1 spaces.
- (Ch 1, Work (3 dc, ch 2, 3 dc) into the next ch-3 sp). Repeat from * to * 3 more times (these are your remaining 3 corners).
- Ch 1. Sl st to the top of the initial ch-2 to join. (Total: 4 corners of (3 dc, ch 2, 3 dc), and 4 sides of (3 dc, ch 1)).
- You can place stitch markers in the ch-2 corner spaces to easily identify them.
- Round 4:
- Sl st into the next 2 dc to reach the first ch-2 corner sp.
- Ch 2 (does NOT count as a stitch). Work (3 dc, ch 2, 3 dc) into the same ch-2 sp (your first corner).
- (Dc in each of the next 3 dc, 3 dc in next ch-1 sp, dc in each of the next 3 dc). This is your first side.
- (Work (3 dc, ch 2, 3 dc) into the next ch-2 corner sp). Repeat from * to * 3 more times for the remaining corners.
- (Dc in each of the next 3 dc, 3 dc in next ch-1 sp, dc in each of the next 3 dc). Repeat for the remaining sides.
- Sl st to the top of the initial ch-2 to join.
- Round 5:
- Sl st into the next 2 dc to reach the first ch-2 corner sp.
- Ch 2 (does NOT count as a stitch). Work (3 dc, ch 2, 3 dc) into the same ch-2 sp (your first corner).
- (Dc in each dc across the side until you reach the next ch-2 corner sp).
- (Work (3 dc, ch 2, 3 dc) into the next ch-2 corner sp). Repeat from * to * 3 more times for the remaining corners.
- (Dc in each dc across the side until you reach the next ch-2 corner sp). Repeat for the remaining sides.
- Sl st to the top of the initial ch-2 to join.
- FO, leaving a long tail (approx. 10-12 inches / 25-30 cm) if you plan to seam your squares together.
Your square should now measure approximately 6×6 inches (15×15 cm).
Part 4: Finishing a Single Square
- Weave in All Ends: This is essential for a neat, professional-looking blanket. Thread each yarn tail onto your yarn needle. Carefully weave them through several stitches on the back side of your motif, securing them invisibly. Take your time, especially with the color changes.
- Blocking (Recommended!): Blocking will help your flower motif lie perfectly flat and ensure all squares are the exact same size, which is critical for easy joining and a professional finish.
- Method: Gently wet your finished motif (by misting with water or a quick dip and gentle squeeze – do not wring). Lay it flat on a blocking mat or a clean towel. Gently shape it into a perfect square, ensuring corners are sharp and sides are straight. Pin it if necessary. Allow it to air dry completely.
Part 5: Assembling the Baby Blanket
Once you’ve made several identical flower squares (the number will depend on your desired runner length), you’ll join them together.
Typical Baby Blanket Sizes (Approximate):
- Stroller/Receiving: 30×35 inches (76×89 cm) -> Needs 5 squares across x 6 squares down (30 squares total)
- Crib/Toddler: 36×50 inches (91×127 cm) -> Needs 6 squares across x 8 squares down (48 squares total)
- Adjust as needed based on your square size and desired blanket dimensions.
Joining Squares (Method: Mattress Stitch – Recommended for an invisible seam)
- Arrange your squares: Lay out all your blocked squares on a flat surface in your desired pattern and arrangement (e.g., 5 squares across by 6 squares down for a stroller blanket).
- Prepare for seaming: Place two squares (e.g., Square A and Square B) next to each other, right sides up. You will be working into the loops of the top edge of each square.
- Seam:
- Thread your yarn needle with a long piece of Color C yarn (or a new neutral color for seaming).
- Bring your needle up from back to front through the first available bar or loop on Square A.
- Go straight across to Square B and bring the needle up through the corresponding bar or loop.
- Go straight back to Square A and pick up the next available bar/loop.
- Continue this zigzag motion, picking up corresponding bars/loops on each square, pulling the seam gently taut as you go. This creates an invisible seam on the front.
- Join rows: Join all squares in each horizontal row first. Then, join these long strips together using the same method.
Adding an Optional Border to the Entire Blanket:
Once all squares are joined and all individual tails are woven in, you can add a final border around the entire blanket for a polished finish.
- Join yarn: With Color C (or a new border color), join yarn with a sl st to any corner of the assembled blanket.
- Round 1 (Border Base): Ch 2 (does NOT count as a stitch). Work (3 dc, ch 2, 3 dc) into the corner space.
- Work 3 dc into each ch-space or seam between the squares along the sides. Work 3 dc into the appropriate stitch group across the tops/bottoms of squares.
- When you reach a corner of the blanket, work (3 dc, ch 2, 3 dc) into that corner.
- Continue around the entire blanket. Sl st to the top of the initial ch-2 to join.
- Round 2 (Optional – Border Reinforcement): Ch 2. Dc in each dc around, working (2 dc, ch 2, 2 dc) in each corner ch-2 sp. Sl st to join.
- You can repeat this round or add more complex border patterns if desired.
- FO and weave in all remaining ends.
Your beautiful, handmade crochet baby blanket with flower granny squares is now complete! It’s a cherished item that will be loved for years to come.