 by
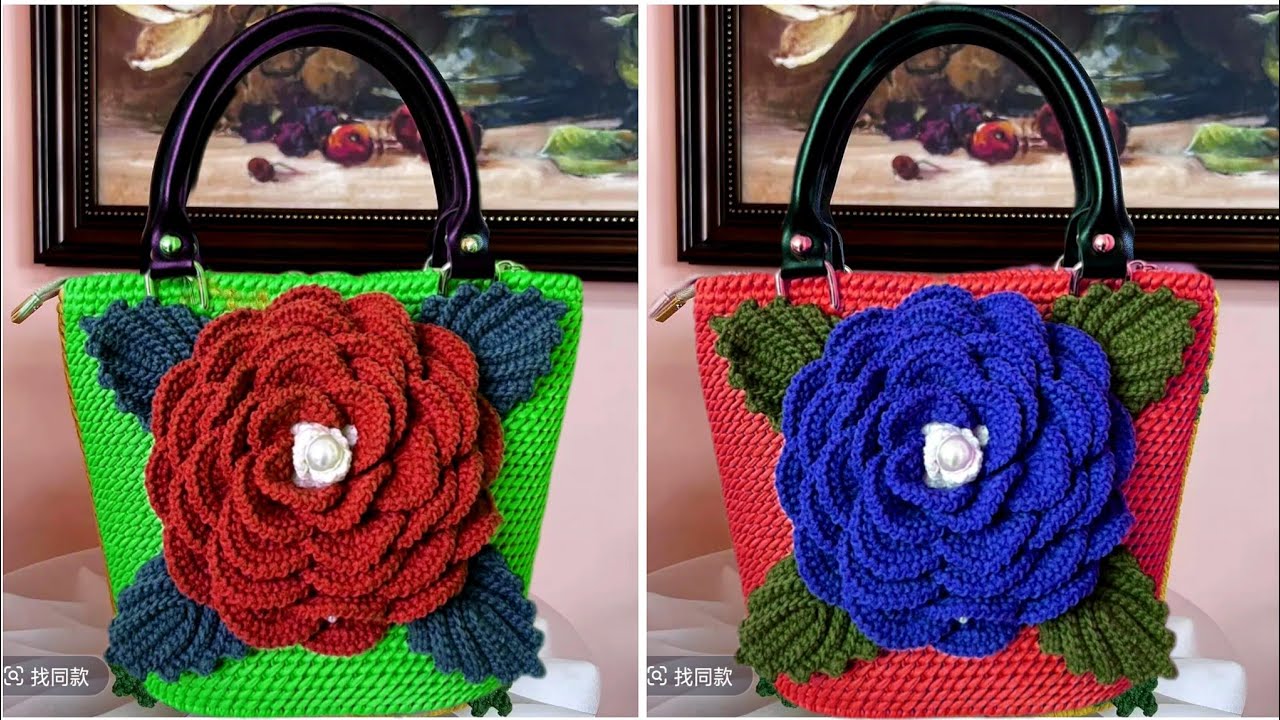
by The creation of a crochet handbag adorned with a large rose flower is a beautiful and rewarding project. It combines the practicality of a bag with the delicate artistry of floral crochet. Due to the extensive nature of providing a full, detailed pattern for both the bag and a complex rose flower within a single response, this guide will provide a comprehensive overview of the process, key techniques, and considerations for each component, along with tips on assembly.
This project is best suited for crocheters with at least intermediate skills, as it involves shaping, potentially working in the round, and creating a multi-layered flower.
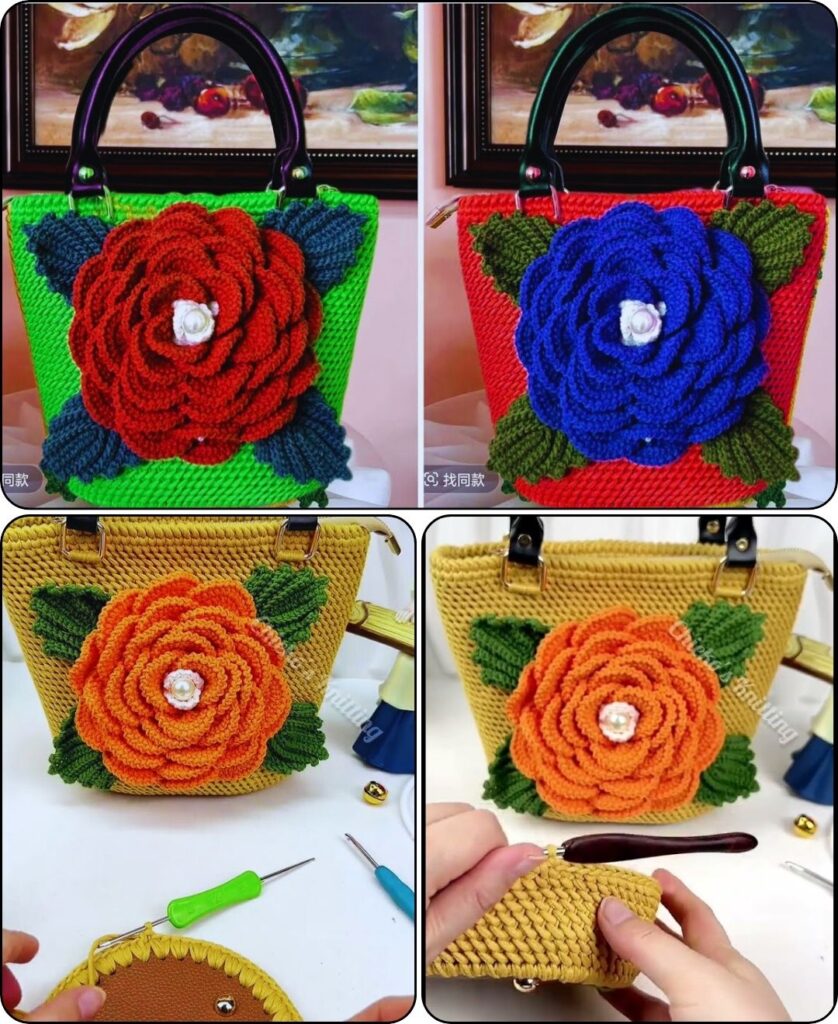
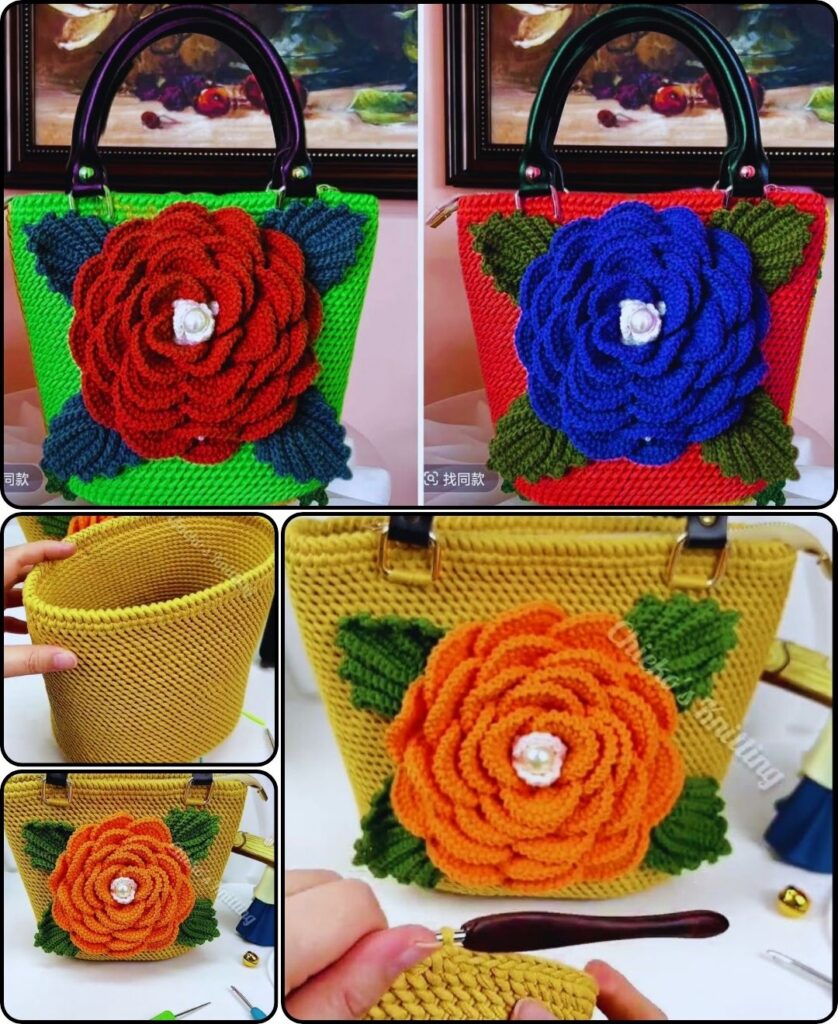
How To Crochet a Handbag with a Large Rose Flower
This tutorial will outline the steps to create a charming handbag and then embellish it with a prominent, crocheted rose.
Section 1: Designing and Crocheting the Handbag Body
The handbag body should be sturdy enough to hold its shape and large enough to feature your rose prominently.
1. Handbag Style and Shape: Consider a simple, classic shape to allow the rose to be the focal point.
- Tote Bag: A simple rectangular or trapezoidal shape, often with an open top.
- Shoulder Bag: Similar to a tote, but potentially more structured or with a flap closure.
- Clutch Bag: Smaller, often held in hand, or with a wrist strap.
For an “easy” approach, a simple rectangular tote or shoulder bag is recommended.
2. Materials for the Handbag:
- Yarn:
- Worsted Weight (Medium #4) or Aran Weight (Heavy Worsted #4/5) Cotton or Cotton Blend Yarn: This is highly recommended for bags due to its durability, sturdiness, and stitch definition. It will help the bag hold its shape. Choose a color that complements your intended rose color.
- Amount: Approximately 300-600 yards (275-550 meters) depending on the bag size.
- Crochet Hook:
- Size H/5.0mm to J/6.0mm: Choose a hook size appropriate for your yarn that creates a dense fabric, minimizing gaps, for better bag structure.
- Yarn Needle (Tapestry Needle): For weaving in ends and seaming.
- Scissors
- Stitch Markers: For marking rows/rounds.
- Measuring Tape: For checking dimensions.
- Optional for Structure: Fabric lining, plastic canvas, bag feet, magnetic snap closure, D-rings for straps.
3. Choosing a Stitch Pattern for the Handbag: A dense, sturdy stitch is ideal for a handbag.
- Single Crochet (sc): Creates a very dense, sturdy fabric. Slow to grow but excellent for bags. You can work it in rows or continuously in a spiral for a seamless look.
- Half Double Crochet (hdc): Faster than sc, but still dense and firm.
- Moss Stitch (Granite Stitch): Alternating sc and ch 1, creates a beautiful texture while remaining relatively solid.
- Basketweave Stitch: Creates a woven, textured look. More complex but very sturdy.
4. Basic Handbag Body Construction (Example: Simple Tote Bag): This example uses single crochet for a sturdy bag.
- Base:
- Ch a desired length (e.g., 30-40 chains for the bottom width of your bag).
- Work a foundation row of sc around the chain to form an oval base (working sc down one side of the chain, then around the end, then up the other side, and around the other end). Continue in rounds.
- Increase stitches evenly at the ends of the oval for a few rounds until your base is the desired width and length.
- Body:
- Once the base is formed, work in continuous rounds of sc (or your chosen stitch) without increasing, working into the back loop only of the first round to create a defined edge, or simply through both loops.
- Continue working rounds until the bag reaches your desired height.
- Top Edge:
- For a neat finish, work a few rounds of slip stitch or reverse single crochet (crab stitch) around the top edge.
5. Handles:
- Crocheted Handles: You can create long strips of sc or hdc and sew them to the top inside edges of the bag. Alternatively, make a rope handle by chaining many stitches and slip stitching back, then twisting or braiding multiple chains.
- Pre-made Handles: Attach bamboo, wooden, or faux leather handles for a professional finish.
Section 2: Crocheting the Large Rose Flower
A large, multi-layered rose is typically made by crocheting a long strip that curls naturally, or by building layers of petals individually. The “strip method” is often easier for a realistic, full rose.
1. Materials for the Rose Flower:
- Yarn:
- Worsted Weight (Medium #4) or DK (Light Worsted #3) Cotton or Acrylic Yarn: A slightly lighter weight yarn than the bag can give finer detail. Choose a vibrant color (red, pink, deep fuchsia, cream).
- Amount: Approximately 50-100 yards (45-90 meters).
- Crochet Hook:
- Size G/4.0mm to H/5.0mm: A hook size that creates a moderately dense but still flexible fabric for the petals.
- Yarn Needle: For assembly.
- Scissors
2. Basic Large Rose Flower Construction (Strip Method Example): This method involves crocheting a long strip where the stitches increase in height, causing it to naturally curl into a rose shape.
- Foundation Chain: Ch a long length (e.g., 60-100 chains, depending on desired rose size and fullness).
- Row 1 (Petal Base): Work a row of sc or hdc into the chain.
- Row 2 (First Petal Layer):
- Ch 2 (counts as hdc). Hdc in the same st.
- (Hdc in next st, 2 hdc in next st). Repeat across the row. This increasing will start the curl.
- Row 3 (Larger Petals):
- Ch 3 (counts as dc). Dc in the same st.
- (Dc in next st, 2 dc in next st). Repeat across.
- Row 4 (Largest Petals):
- Ch 4 (counts as tr). Tr in the same st.
- (Tr in next st, 2 tr in next st). Repeat across.
- Final Row (Optional Shaping):
- You can add a final row of sc or sl st along the bottom edge of the strip (the foundation chain side) to create a neat base for sewing.
- Assembling the Rose:
- Starting from the narrower end of the strip, begin to roll it tightly to form the center of the rose.
- Continue rolling, allowing the strip to naturally curl. You can gently twist the strip as you roll to adjust the petal formation.
- Use your yarn needle and matching yarn to stitch through all layers at the base of the rose, securing it firmly. Ensure it’s very secure to prevent unraveling.
3. Optional Rose Elements:
- Leaves: Crochet simple leaf shapes (e.g., small ovals or pointed shapes in green yarn) and attach them to the back of the rose.
- Stem (if detached): A crocheted stem or a wire wrapped in yarn can be added if the rose is part of a larger floral arrangement.
Section 3: Assembling and Finishing the Handbag
Once your handbag body is complete and your large rose is crocheted, it’s time to bring them together.
1. Attach Handles (if not integrated into the bag body):
- If you’re using crocheted strips, sew them securely to the inside top edges of your bag.
- If using pre-made handles, follow the manufacturer’s instructions for attachment, or sew them on using sturdy yarn and a strong needle.
2. Position the Rose:
- Carefully decide where you want to place the large rose on your handbag. Most commonly, it’s placed centrally on one side, or slightly off-center for an asymmetrical look.
- Pin the rose in place to visualize the final result.
3. Attach the Rose to the Handbag:
- Thread your yarn needle with matching yarn (the color of your rose).
- Starting from the back of the rose, begin stitching it securely to the handbag fabric.
- Work your needle through the base layers of the rose and into the stitches of the handbag, making small, invisible stitches on the front of the bag.
- Stitch all the way around the base of the rose, and for larger roses, you may want to add a few hidden stitches into the center and outer petals to keep them from flopping.
- Ensure the rose is firmly attached and won’t detach with use.
4. Optional Lining:
- For a truly durable and professional handbag, consider cutting and sewing a fabric lining. This hides all the stitches, prevents stretching, and allows for internal pockets. Sew the lining into the inside of the bag.
5. Final Touches:
- Weave in any remaining loose ends securely.
- Lightly block the finished handbag if necessary, especially if the cotton yarn needs shaping or softening.
This detailed guide provides a framework for creating your crochet handbag with a large rose flower. For very specific stitch counts and complex shaping, it’s highly recommended to consult dedicated patterns from experienced crochet designers.
To find detailed patterns, you can use these search terms:
- “Easy crochet tote bag pattern”
- “Free crochet rose applique pattern”
- “Crochet handbag with floral embellishment pattern”
- “Crochet puff stitch rose pattern” Creating a crocheted handbag adorned with a large rose flower is a beautiful and personalized project. This involves two main components: the handbag itself and the large rose appliqué, which are then assembled.
Below is a detailed guide on how to approach this project, including general instructions for both parts and advice on assembly. Due to the extensive nature of full, row-by-row crochet patterns, this will serve as a conceptual tutorial to guide you in finding or creating specific patterns for your desired look.
How To Crochet a Handbag with a Large Rose Flower
This project combines structural crochet (for the bag) with decorative crochet (for the rose appliqué). The key to success is choosing appropriate yarns and practicing good tension for a sturdy bag and a detailed flower.
Skill Level: Intermediate to Advanced
This project requires familiarity with:
- Basic crochet stitches (ch, sc, hdc, dc, sl st).
- Working in rounds and/or rows.
- Shaping and increasing/decreasing stitches.
- Basic seaming/assembly.
- Working with different types of yarn (potentially).
Materials You’ll Need:
- For the Handbag Body:
- Yarn: Sturdy yarn is essential for a handbag that holds its shape.
- Recommended: Worsted weight (#4) cotton, cotton blend, or T-shirt yarn (for a very sturdy, chunky bag). Even macrame cord or nylon cord can be used for extra durability.
- Quantity: 300-600 yards (275-550 meters) depending on bag size and yarn thickness.
- Crochet Hook: Appropriate for your chosen yarn (e.g., H/5.0mm to J/6.0mm for worsted weight, larger for T-shirt yarn).
- Optional: Bag lining fabric, sewing machine/needle and thread (if you want a lined bag).
- Optional: Zipper, magnetic snap, or button for closure.
- Optional: D-rings, purse feet, chain straps (if not crocheting handles).
- Yarn: Sturdy yarn is essential for a handbag that holds its shape.
- For the Large Rose Flower:
- Yarn: A medium to fine weight yarn that drapes well and holds shape for petals.
- Recommended: DK weight (#3) cotton, acrylic, or mercerized cotton.
- Color: Your desired rose color(s) (e.g., red, pink, white, yellow).
- Green yarn: For leaves (optional but recommended).
- Quantity: Small amounts (e.g., 50-100 yards depending on rose size).
- Crochet Hook: Smaller than the bag hook (e.g., E/3.5mm to G/4.0mm).
- Yarn: A medium to fine weight yarn that drapes well and holds shape for petals.
- Tools for Both:
- Yarn Needle (Tapestry Needle): For weaving in ends and assembly.
- Scissors
- Stitch Markers
- Measuring Tape
- Pins (for attaching the rose)
Part 1: Crocheting the Handbag Body
There are many ways to crochet a handbag. Here are a few common approaches:
A. Simple Rectangle/Pouch Style Bag:
This is the most straightforward option, good for beginners.
- Base:
- Ch a length equal to the desired width of your bag.
- Work a round of single crochet (sc) or half double crochet (hdc) around both sides of the chain to create an oval base. Work extra stitches in the end chains to turn the corner smoothly.
- Continue working in continuous rounds (spiral) or joined rounds (sl st to join each round) for a few more rounds, increasing slightly at the ends if needed to maintain a flat base.
- Body:
- Once your base is the desired size, stop increasing.
- Work straight up in continuous rounds (or joined rounds) using sc, hdc, or dc. You can vary the stitch for texture (e.g., single crochet through the back loop only for a ribbed effect, moss stitch, or basket weave stitch).
- Work until the bag reaches your desired height.
- Top Edge/Handles:
- For Crocheted Handles: You can continue working a few rounds of sc or sl st for a sturdy top edge. Then, mark sections for handle openings and chain across those openings for the handles, continuing to crochet in rounds over these chains to form sturdy straps.
- For Purchased Handles: Work a few rounds of sc or sl st for a sturdy top edge. You can then attach purchased bamboo, leather, or plastic handles directly to this edge using a yarn needle and matching yarn, or by sewing them onto a fabric lining.
- Closure: Plan for a zipper, magnetic snap (sewn onto lining or directly to top edge), or a simple button/loop closure.
B. Square/Rectangular Base with Sides (Boxy Bag):
- Base: Crochet a flat square or rectangle for the bottom of the bag. Use a dense stitch like sc or hdc.
- Sides: Once the base is done, turn your work and crochet up the sides, working into the stitches of the base. You can work in rows for each side and then seam them, or work in continuous rounds around the entire perimeter of the base, creating corners with increases (e.g., 3 sc in the corner stitch).
- Handles/Top: Similar to the pouch style, add crocheted handles or prepare for purchased handles.
C. Other Bag Styles:
- Granny Square Bag: Make large granny squares (or several smaller ones) and seam them together to form the bag. This can create a very vintage or bohemian look.
- Market Bag (Openwork): While usually not for a structured handbag, if you want a lighter, more casual look, you can use openwork stitches.
Tips for the Handbag:
- Sturdy Stitches: Single crochet (sc) and half double crochet (hdc) create a denser fabric, which is good for bags. Using a hook size slightly smaller than recommended for your yarn can also make the fabric firmer.
- Even Tension: Maintain consistent tension throughout to ensure the bag holds its shape and stitches look even.
- Blocking (Optional): For a very defined shape, especially with cotton yarn, you can wet-block the finished bag body before adding the rose.

Part 2: Crocheting the Large Rose Flower Appliqué
A “large rose flower” typically involves crocheting a long strip of ruffled fabric that is then rolled and stitched to form the rose shape.
General Steps for a Rolled Rose:
- Foundation Chain: Start with a relatively long chain (e.g., 30-60 chains or more, depending on desired rose size).
- First Row (Base of Petals): Work a row of stitches (e.g., hdc or dc) into the foundation chain. This forms the base of your petal strip.
- Subsequent Rows (Creating Ruffles/Petals):
- In the next rows, you’ll create the “ruffles” that become the petals. This is often done by working multiple stitches (e.g., 3-5 dc) into each stitch or chain space of the previous row. This increase in stitches causes the fabric to curl and ruffle.
- You might make 2-4 rows of these ruffles, with each row potentially increasing the number of stitches per base stitch to create larger, more pronounced ruffles. Some patterns will vary stitch types (e.g., dc, tr, even dtr) to create different petal heights.
- Shaping and Rolling:
- Once your ruffled strip is complete, carefully begin rolling it from one end. The end you start with will be the center of the rose.
- As you roll, keep the bottom edge of the strip relatively flat and even.
- Gently arrange the ruffles to resemble petals, overlapping them naturally.
- Securing the Rose:
- Using your yarn needle and a long tail of the same color yarn, stitch through all layers of the rolled rose from the bottom, securing it firmly. Go back and forth several times, ensuring the rose won’t unravel.
- Weave in any remaining ends.
Optional: Adding Leaves:
- Crochet a few simple leaf shapes (e.g., using a small chain and working sc, hdc, dc, then decreasing on the other side of the chain).
- Attach these to the back of the rose or directly to the bag near the rose.
Tips for the Rose:
- Yarn Choice: Use a yarn that has good stitch definition and a nice drape. Mercerized cotton can give a slightly crisp, elegant look.
- Tension: Consistent tension is important for evenly sized ruffles.
- Experiment: Don’t be afraid to try different stitch counts for your ruffles to see how it changes the size and fullness of your rose.
Where to find specific rose patterns:
- Search online for “crochet rolled rose pattern,” “crochet large rose applique free pattern,” or “crochet flower applique tutorial.” Many designers offer free patterns with step-by-step photos or videos.
Part 3: Assembling Your Handbag with the Large Rose Flower
- Finalize Bag Body: Ensure your handbag body is complete, all ends are woven in, and it’s optionally blocked. If adding a fabric lining or a zipper, it’s often easiest to do this before attaching the rose.
- Position the Rose:
- Place your crocheted rose on the handbag in your desired location. Typically, a large rose looks best off-center or covering a significant portion of one side.
- Use pins to securely hold the rose in place. Stand back and look at it from different angles to ensure you’re happy with the placement.
- Attach the Rose:
- Thread your yarn needle with a long piece of yarn that matches the color of the bottom/back of your rose (this will make the stitches less visible).
- Starting from the inside of the bag (or from underneath the rose, hiding the knot), begin to sew the rose onto the bag.
- Work small, neat stitches around the entire perimeter of the rose’s base, catching stitches on both the rose and the bag.
- For extra security, you can also make a few small stitches through the inner layers of the rose onto the bag, ensuring the entire appliqué is firmly attached and won’t sag.
- If you’ve made leaves, position them and sew them on as well.
- Knot securely on the inside of the bag (if unlined) or on the back of the appliqué (if lined) and weave in all tails.
- Final Touches:
- Weave in any remaining loose ends.
- If you haven’t already, add your bag closure (zipper, snap, button) and any desired hardware.
- Give the entire handbag a final, gentle shaping or light steam if needed, being careful not to flatten the rose too much.
This detailed guide provides a framework for creating your crocheted handbag with a large rose flower. Remember to enjoy the process and customize it to your heart’s content!