by
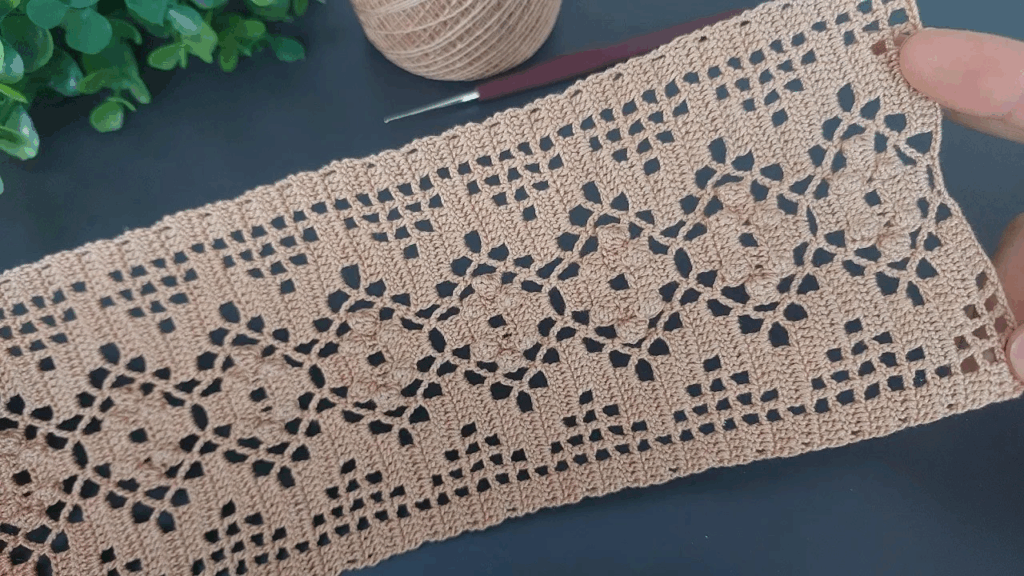
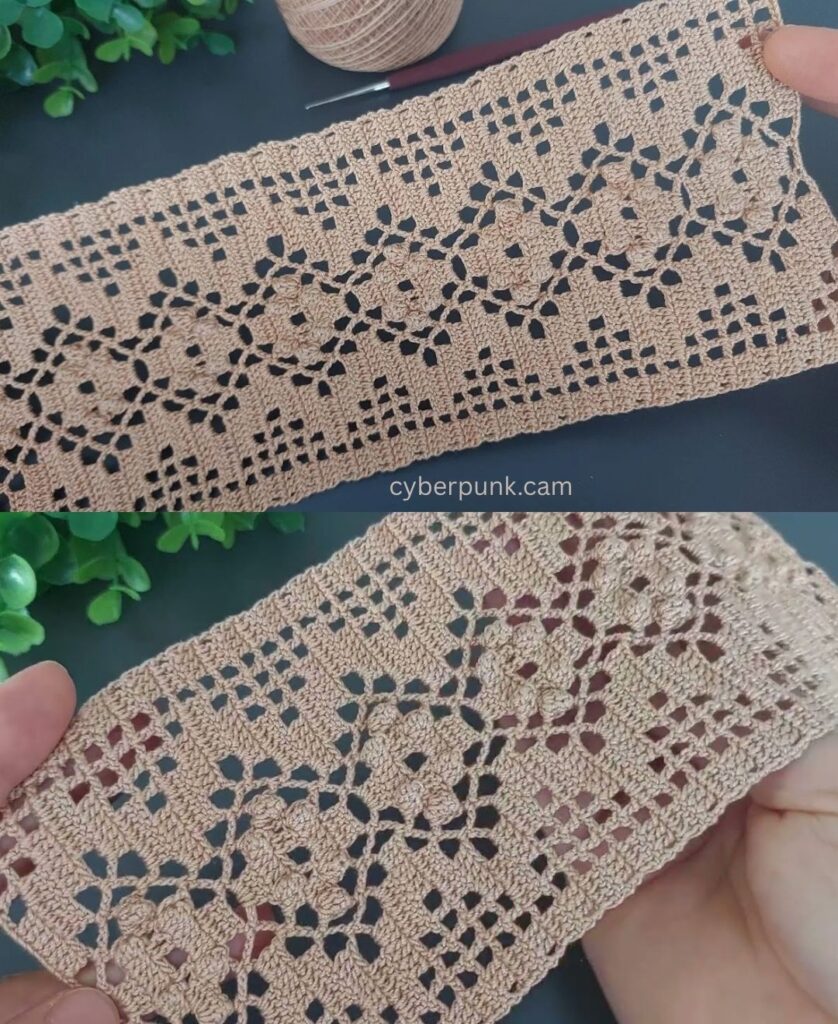
by You’ve requested a detailed tutorial for an Elegant Filet Crochet Flower Lace Border—a fantastic project that uses simple stitches to create stunning patterned lace! Filet crochet is easy because it only relies on two elements: the block (solid) and the space (mesh).
Here is a step-by-step guide to crocheting a beautiful, pointed flower lace border.
🌸 Filet Crochet Flower Lace Border Tutorial
This pattern creates a rhythmic, downward-pointing lace border featuring a simple flower motif. The foundation stitch count must be divisible by 4 + 1 for the pattern repeat to work correctly across a flat edge.
Materials and Core Terminology
- Yarn/Thread: The same thread/yarn used for your project, or a contrasting color. Fine cotton thread (like Size 10) is ideal for a delicate, crisp finish.
- Hook: The size used for your main project.
- Block (B): 4 DC stitches total (or DC over DC, DC over CH-2 SP, DC over DC).
- Space (S): 1 DC, CH 2, Skip 2 stitches.

Preparation: Base Round
Before starting the filet pattern, you must ensure your project edge is stable and ready for the filet grid.
- Work a Round of Single Crochet (SC): Join your border yarn and work one full round of single crochet (sc) evenly around the entire perimeter of your project.
- Corners: Work 3 sc into each corner stitch to keep the edge flat and prevent pulling.
- Finish: Join with a sl st to the first sc.
Step-by-Step Filet Pattern
Row 1: Establishing the Mesh Foundation
This row sets up the open mesh grid that the filet pattern will be built upon.
- Start Grid: Ch 3 (counts as 1 DC). Dc in the next stitch.
- Pattern: Work a Space sequence: [Ch 2, skip 2 stitches, dc in the next stitch]. Repeat this sequence all the way across the side.
- Corner Transition: When you reach the corner, work the established corner pattern from your Base Round, then resume the [Ch 2, skip 2, dc] pattern.
- Finish: Join with a sl st to the top of the beginning ch 3.

Row 2: Starting the Scallop and Point
In this row, we start shaping the border by leaving an equal number of mesh spaces unworked on both sides.
- Turn your work. Sl st across the next 2 mesh spaces (sl st into the chain spaces and the DC posts) to position your hook at the beginning of the working row.
- Start Row: Ch 3 (T). Dc in the next DC post. (Start Block: 2 DC).
- Work Blocks: Work 1 Block (4 DC) over the next open mesh space (DC in the DC post, 2 DC in the ch-2 sp).
- Work Mesh: Work Spaces (S) across the side until you have 3 mesh spaces remaining.
- Finish Row: Work 1 Block (4 DC) over the last open mesh space. Dc in the next 2 DC posts. Fasten off. (You have created a small, centered scallop.)
Row 3: Crocheting the Flower Motif
This row uses a sequence of solid Blocks to create the triangular “petal” shape of the flower.
- Turn your work. Join yarn into the 4th DC from the starting edge of Row 2.
- Start Pattern: Ch 3 (T). Work DC in the next 2 sts (Start Block: 3 DC).
- Flower Pattern Repeat: [Ch 2, skip 2 sts (Space), dc in the next 5 sts (Block/Side/Block)]. Repeat this sequence across the row.
- Finish: Work a final Space and a final Block cluster (4 DC). Fasten off.

Row 4: Finishing the Pointed Edge
This final row reinforces the flower and creates the sharp, clean point of the border.
- Turn your work. Join yarn into the 4th DC from the starting edge of Row 3.
- Pattern Start: Ch 3 (T). Work DC in the next 2 sts. (Start Block: 3 DC).
- Connect to Center: Ch 2. Work a sl st into the center of the Space from the previous row. Ch 2.
- Flower Top: Work DC in the next 5 sts (This covers the top block of the flower).
- Repeat Point: [Ch 2, sl st in the next space, ch 2, dc in the next 5 sts]. Repeat this pattern across the row.
- Finish: Work a final cluster (4 DC) at the end. Fasten off.
Final Step: Blocking
Blocking is essential for any lace border. It opens up the spaces and straightens the lines of the filet pattern, making the flower motif crisp and defined.
- Soak: Gently wet the border (or the entire project) with water or a mild starch solution.
- Pin: Lay the wet lace flat and use rust-proof pins to carefully pin out the points and edges, stretching the mesh into even squares.
- Dry: Let it dry completely before removing the pins.
Your elegant Filet Crochet Flower Lace Border is now complete! Would you like to try a different filet design, perhaps one that forms hearts or geometric shapes?
Video tutorial: