 by
by Sure! Here’s a long, detailed step-by-step tutorial on how to crochet a striped bucket hat, perfect for beginners and intermediate crocheters alike. We’ll cover everything from materials, stitch instructions, creating the base, adding the stripes, and shaping the brim.

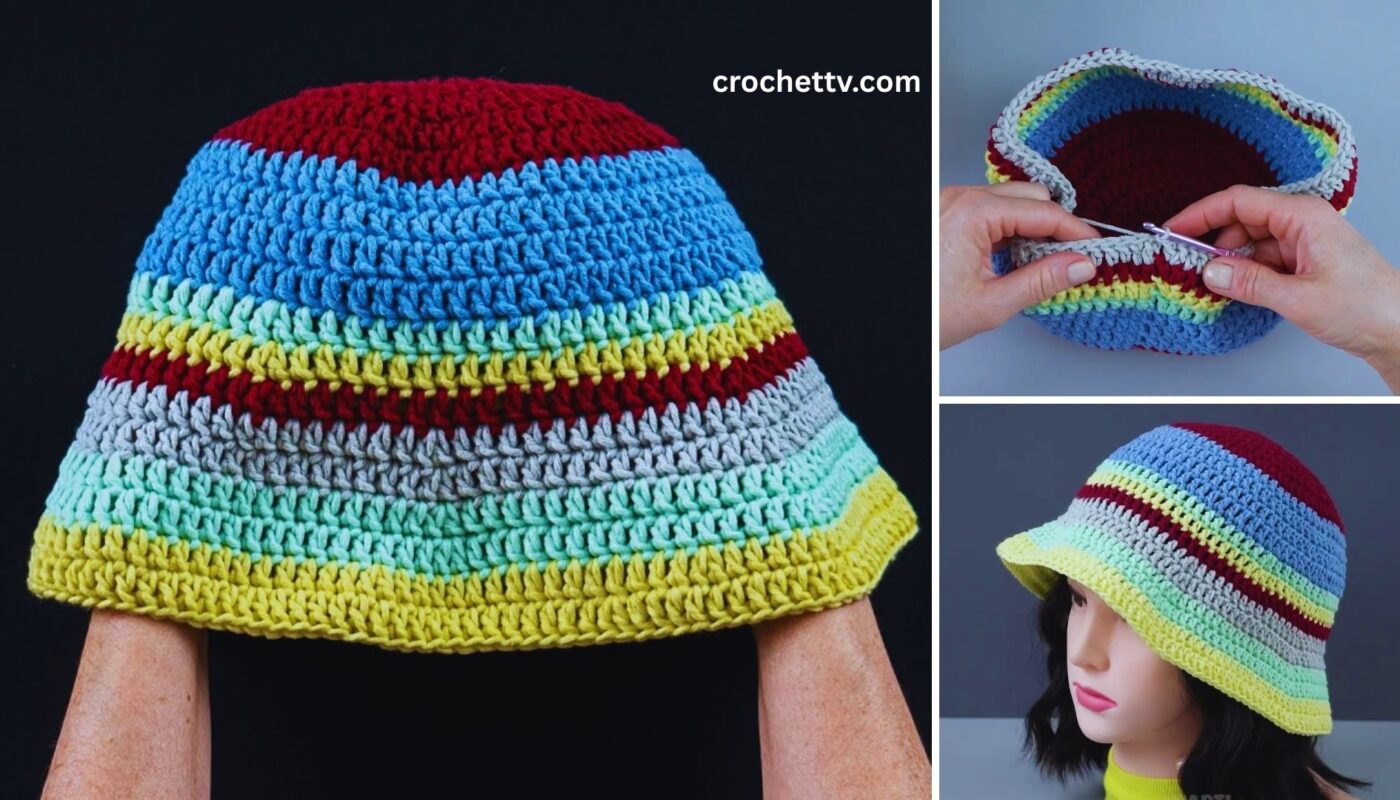
🧶 How to Crochet a Striped Bucket Hat – Step-by-Step Tutorial
Crocheting your own bucket hat is not only trendy and fun, but it’s also a great way to improve your skills and customize your look. With this detailed striped bucket hat tutorial, you’ll learn exactly how to crochet a stylish hat with clean, colorful stripes – perfect for sunny days or just making a fashion statement.
Whether you’re new to crochet or have some experience, this project will be satisfying and wearable. Let’s dive in!
🧵 Materials Needed
Before starting, make sure you have all your tools and materials ready:
- Yarn: Worsted weight (category 4) cotton yarn – 2 or more colors
(Cotton is breathable and perfect for hats. Acrylic works too.)- Color A (Main color)
- Color B (Accent stripe color)
- Crochet hook: Size 4.5 mm (US 7) or 5.0 mm (US H-8)
- Scissors
- Yarn needle (for weaving in ends)
- Stitch marker (optional but helpful)
📏 Sizing Guide
This pattern makes a standard adult-sized bucket hat with a circumference of approximately 21-22 inches (53-56 cm).
To adjust size:
- Use a larger hook/yarn for a bigger hat.
- Add or subtract rounds in the crown or body as needed.
🧶 Stitches & Abbreviations (US Terms)
- MR – Magic Ring
- ch – Chain
- sl st – Slip Stitch
- sc – Single Crochet
- hdc – Half Double Crochet (used for a softer fabric)
- inc – Increase (2 stitches in one stitch)
- BLO – Back Loop Only (optional for brim edge definition)
🎯 Finished Structure Breakdown
The striped bucket hat is made up of three parts:
- Crown (Top Circle)
- Body (Straight Sides)
- Brim (Flared Edge)
🧩 Pattern Instructions – Step by Step
🌀 Part 1: Crown of the Hat
We’ll begin from the top of the hat and work in spiral rounds (no joining at the end of each round).
Using Color A:
Round 1: Start with a Magic Ring, ch 1, make 6 sc into the ring.
Pull tight. (6 sts)
Round 2: 2 sc in each st around. (12 sts)
Round 3: 1 sc, inc repeat around. (18 sts)
Round 4: 2 sc, inc repeat around. (24 sts)
Round 5: 3 sc, inc repeat around. (30 sts)
Round 6: 4 sc, inc repeat around. (36 sts)
Round 7: 5 sc, inc repeat around. (42 sts)
Round 8: 6 sc, inc repeat around. (48 sts)
Round 9: 7 sc, inc repeat around. (54 sts)
Round 10: 8 sc, inc repeat around. (60 sts)
🔄 Continue increasing in this pattern (n sc, inc) until the diameter of the circle is about 6.5 inches (16.5 cm).
This forms the crown of your hat.

🎨 Part 2: Body of the Hat (Add Stripes!)
Now that the top is complete, let’s work the body (the straight part). We’ll also introduce striped color changes here.
Tips for stripes:
- Change colors at the last pull-through of the last stitch in the round before the new color.
- Carry the yarn or cut and rejoin (for cleaner inside).
Start Body – Round 1 (Color A):
sc in each stitch around (no increases). (Approx. 72-78 sts depending on crown size)
Repeat 5 rounds in Color A.
Switch to Color B (stripe):
Next 2 Rounds (Color B):
sc in each stitch around. (Maintain same stitch count)
Switch back to Color A:
5 rounds
Stripe Pattern Option:
You can alternate as:
- 5 rounds Color A
- 2 rounds Color B
- 5 rounds Color A
- 2 rounds Color B
- Repeat as desired (typically 3-4 sets)
🧠 Pro Tip: Use a stitch marker to mark the beginning of each round. Helpful since you’re working in spirals.
Total Height (from crown to bottom before brim):
Approx. 5.5 – 6 inches (14-15 cm) for a standard bucket hat look.
☀️ Part 3: Brim (Flared Edge)
The brim gives the hat its classic bucket shape. We’ll slightly increase each round to flare it out gently.
Brim Round 1 (Color A):
1 sc, inc repeat around. (Increase about 10-15% total stitches)
Brim Round 2:
sc in each stitch around.
Brim Round 3:
2 sc, inc repeat around.
Brim Round 4:
sc in each stitch around.
Optional: Work in Back Loop Only (BLO) for the first round to create a defined ridge between body and brim.
Continue adding 1 round with increases, then 1 round straight, until the brim is about 2 inches (5 cm) or your desired length.
You can switch back to Color B for a stripe at the brim, or finish fully in Color A.
🪡 Finishing Touches
- Fasten Off: Once you’re happy with the brim width, finish with a sl st and cut the yarn.
- Weave in all ends using a yarn needle.
- Block your hat (optional): Lightly wet or steam the hat and shape it on a bowl/head to help it settle.
🎨 Customization Ideas
- Use 3 or more colors for rainbow or gradient stripes.
- Add a patch, embroidery, or appliqué for flair.
- Make it in neon yarns for a Y2K aesthetic.
- Use variegated yarn for natural striping effects.

⏱️ Time Estimate
- Beginner: 4–6 hours
- Intermediate: 2–4 hours
Great for a weekend project!
🧼 Care Instructions
If using cotton:
- Machine wash cold
- Lay flat to dry
- Avoid wringing to maintain shape
If using acrylic:
- Machine washable
- Air dry or tumble low
🧺 Summary Pattern (Quick Reference)
Crown:
- MR, 6 sc
- Inc every round until ~6.5" diameter

Body:
- Sc evenly around (no inc) for ~5.5" height
- Add 2-round stripes as desired

Brim:
- *Sc, inc* around (gradual inc every 2 rounds)
- Repeat until brim is ~2” long
- Finish, weave in ends, block if needed
🎉 Final Thoughts
Now you know how to crochet your very own striped bucket hat from start to finish! This hat is a practical, stylish project that lets you play with color combinations and learn to crochet in the round.
Crochet is all about experimentation — don’t be afraid to try new color patterns, adjust sizing, or modify the brim style. Once you’ve made one, you’ll want to make a dozen!