 by
by Absolutely! Here’s a detailed, beginner-friendly guide on how to crochet baby slippers for 3–6 months, including a step-by-step pattern, sizing tips, and helpful instructions. This project is perfect for beginners who want to create something soft, sweet, and practical.
🧶 How to Crochet Easy Baby Slippers (3–6 Months) for Beginners | Step-by-Step Pattern
Crocheting baby slippers is a heartwarming project that’s both functional and adorable. It’s ideal for beginners because it requires minimal yarn, time, and skill. Whether you’re making a pair for your little one or as a baby shower gift, this guide will help you crochet soft and cozy slippers for babies aged 3–6 months.
🧵 Materials You’ll Need
To get started, gather the following supplies:
- Yarn: Worsted weight (medium #4) yarn – soft acrylic or cotton is best for baby skin.
- Crochet hook: Size 4.0 mm (G/6) or 4.5 mm (7) depending on your tension.
- Yarn needle (tapestry needle) – for sewing and weaving in ends.
- Scissors
- Stitch marker (optional, but helpful)
💡 Tip: Choose baby-friendly yarn labeled “soft” or “baby” – it’s gentler for delicate skin and often hypoallergenic.
📏 Sizing Notes
For a 3–6 month-old baby, the average foot length is approximately 3.5–4 inches (9–10 cm).
Finished Measurements:
- Length: ~4 inches (10 cm)
- Width: Adjustable with stitch count and yarn tension
If you crochet tightly, go up a hook size. If you crochet loosely, stick with the recommended hook or go down a size.
🧠 Stitches Used (Beginner-Friendly)
This pattern uses only basic crochet stitches:
- ch – chain
- sc – single crochet
- hdc – half double crochet
- sl st – slip stitch
- inc – increase (2 stitches in one stitch)
Optional: You can replace hdc with sc throughout for a firmer slipper or use dc for a softer look.
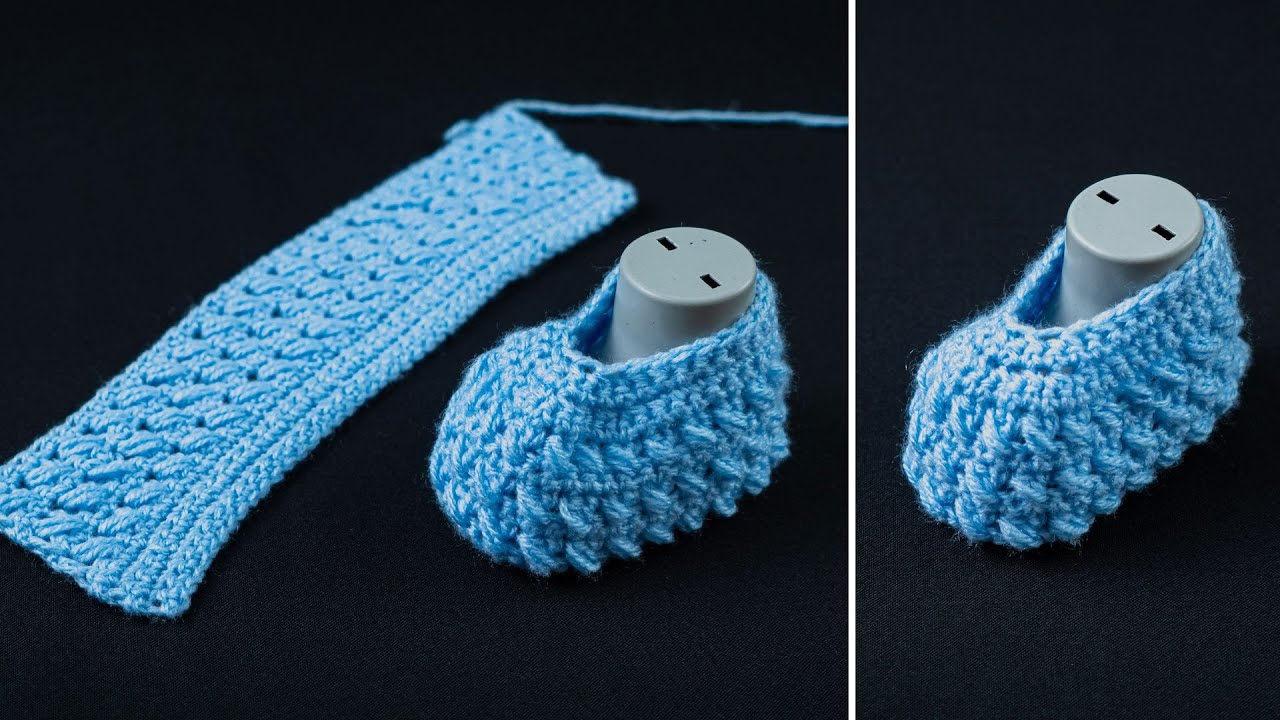
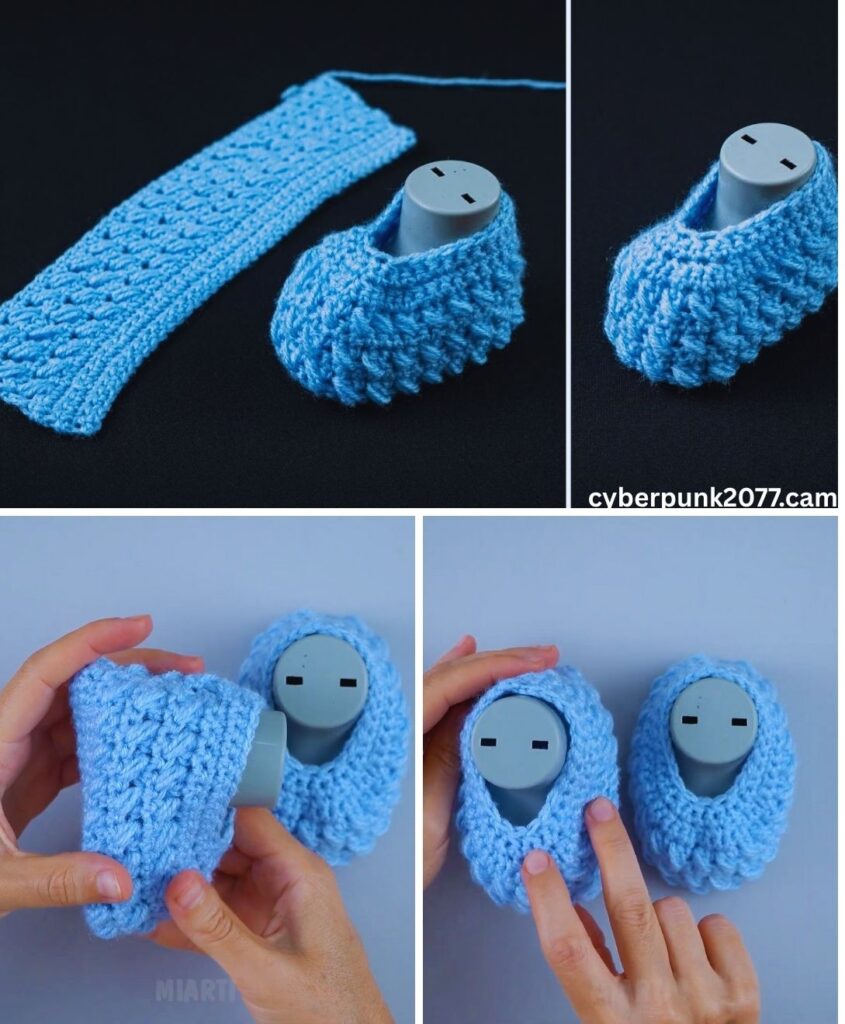
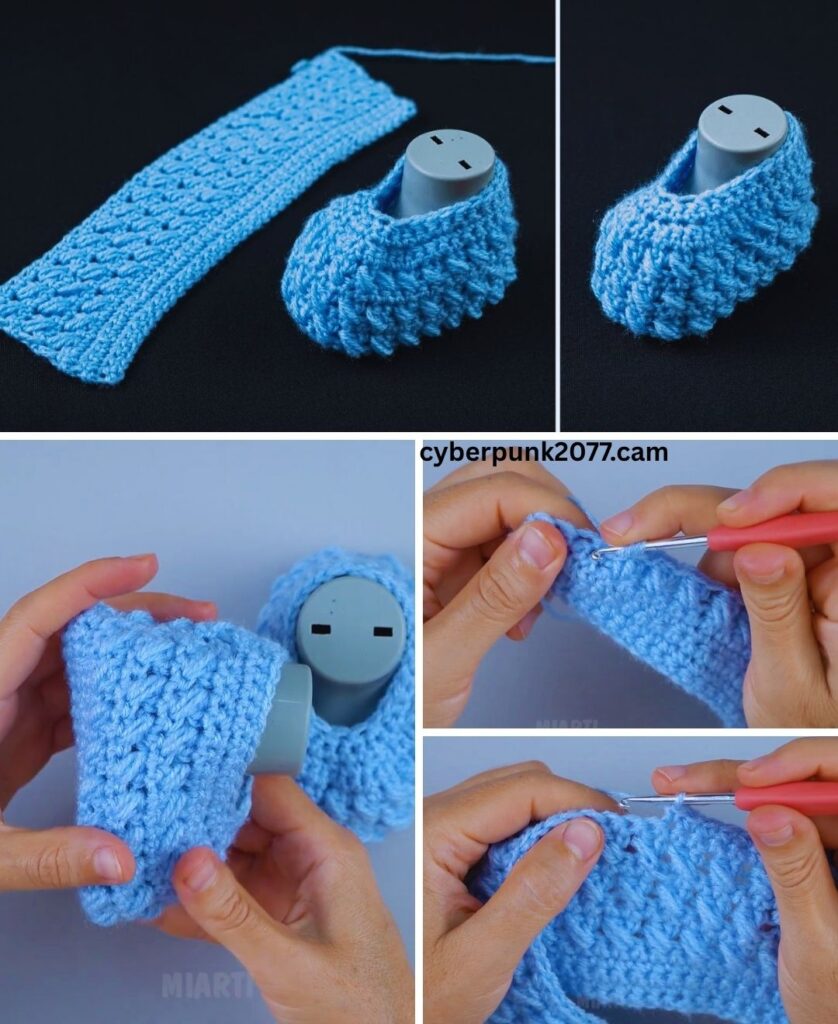
🧦 Step-by-Step Crochet Baby Slippers Pattern (3–6 Months)
Let’s break this down into manageable parts. You’ll crochet the sole first, then the upper, and finally finish with a cuff if desired.
✨ PART 1: Crochet the Sole
This is the base of your slipper.
Ch 11

Round 1:
- Hdc in 2nd ch from hook and next 8 ch.
- 5 hdc in last ch (turning around to other side of chain).
- Hdc in next 8 on opposite side.
- 2 hdc in last ch.
- Join with sl st to first hdc. (Total: 26 sts)

Round 2:
- Ch 1, 2 hdc in first st, hdc in next 8 sts.
- 2 hdc in each of next 5 sts (heel curve).
- Hdc in next 8 sts.
- 2 hdc in each of next 2 sts.
- Join with sl st. (Total: 34 sts)

Round 3 (Optional for slightly larger sole):
- Ch 1, *hdc in next st, 2 hdc in next* around heel and toe areas.
- Maintain hdc in straight parts.
- Sl st to join. (Total: ~42 sts)

Fasten off and weave in tail.
✅ Your sole should now look like a small oval, ~4 inches long.
✨ PART 2: Building the Upper
Now we build the sides and toe.
Attach yarn at the back of the sole.

Round 1:
- Ch 1. Working in **back loops only**, hdc in each stitch around.
- Join with sl st. (34–42 sts depending on your sole)

Round 2–3:
- Ch 1, hdc around in both loops now.
- Join with sl st.

(Adjust number of rounds for desired slipper height.)

Round 4 (Start toe shaping):
- Ch 1, hdc in next 10 sts, *hdc2tog* (half double crochet two together) 7 times, hdc in remaining sts.
- Join with sl st.

Round 5:
- Hdc around, decreasing 1–2 more times at toe for snug fit.
🧵 Tip: Try turning the slipper inside out to hide the seam if it looks messy.

✨ PART 3: Final Rows or Cuff (Optional)
You can stop here for a basic slipper or add a decorative cuff.
Option 1: Simple Border
Round 6:
- Sc around to tighten the edge.
- Sl st to join and fasten off.
Option 2: Ribbed Cuff
Round 6:
- Ch 2, *fpdc (front post dc), bpdc (back post dc)* around.
- Repeat for 2–3 more rounds to create ribbed effect.
🎀 You can also add a tiny bow, pom-pom, or button for decoration!
📷 Visualizing the Process (Step Summary)
- Crochet the sole – a small oval (3 rounds)
- Build up the sides – 2–3 rounds of hdc
- Shape the toe – decrease with hdc2tog
- Finish with edge or cuff
💡 Tips for Beginners
- Use a stitch marker to track rounds – especially helpful for counting decreases.
- Keep tension consistent – too tight and the slipper will shrink, too loose and it may fall off.
- Make both slippers at the same time (alternate between them) to ensure consistency.
🧼 Washing and Care
Since these slippers are for babies, washing is important.
- Use baby-safe, machine-washable yarn.
- Wash on a gentle cycle, cold or warm.
- Lay flat to dry – avoid high heat.
🎁 Perfect Gift Idea
These slippers are a thoughtful, handmade gift for:
- Baby showers
- Holidays
- Birthdays
- Christenings or naming ceremonies
You can even make matching hats or booties!
🔁 Pattern Recap (Quick Version)
Sole:
Ch 11
Rnd 1: Hdc in 2nd ch from hook and next 8, 5 hdc in last ch, hdc in next 8, 2 hdc in last ch. Join. (26 sts)
Rnd 2: 2 hdc in 1st, hdc 8, 2 hdc in next 5, hdc 8, 2 hdc in last 2. Join. (34 sts)

Upper:
Attach yarn at back.
Rnd 1: BLO hdc around. Join.
Rnd 2-3: Hdc in each st. Join.
Rnd 4: Hdc 10, hdc2tog x7, hdc to end. Join.
Rnd 5: Hdc around with 1–2 dec at toe. Join.

Edge:
Rnd 6: Sc around or add ribbed cuff.
Fasten off and weave in ends.
❓Frequently Asked Questions
Q: How long does this project take?
A: Around 1–2 hours per pair, depending on skill level.
Q: Can I make these larger or smaller?
A: Yes. Add or subtract stitches in the foundation chain and rounds of the sole.
Q: What kind of yarn is best for baby slippers?
A: Soft acrylic or cotton. Look for yarn labeled as baby-friendly.
Q: Can I use only single crochet?
A: Yes, but it will be denser and less stretchy. Feel free to experiment.
🧶 Yarn Recommendations for Baby Projects
- Bernat Baby Softee
- Lion Brand Baby Soft
- Paintbox Yarns Baby DK
- Red Heart Soft Baby Steps
These are gentle, washable, and available in pastel or fun colors.
🌟 Final Thoughts
Crocheting baby slippers is a heartwarming beginner project that combines creativity with comfort. With just basic stitches and an hour or two of work, you can create something truly special. It’s a perfect first wearable project that will build your confidence and crochet skills.
Whether you’re crocheting for your own baby or as a handmade gift, these slippers are sure to bring smiles and warmth to little feet.