by
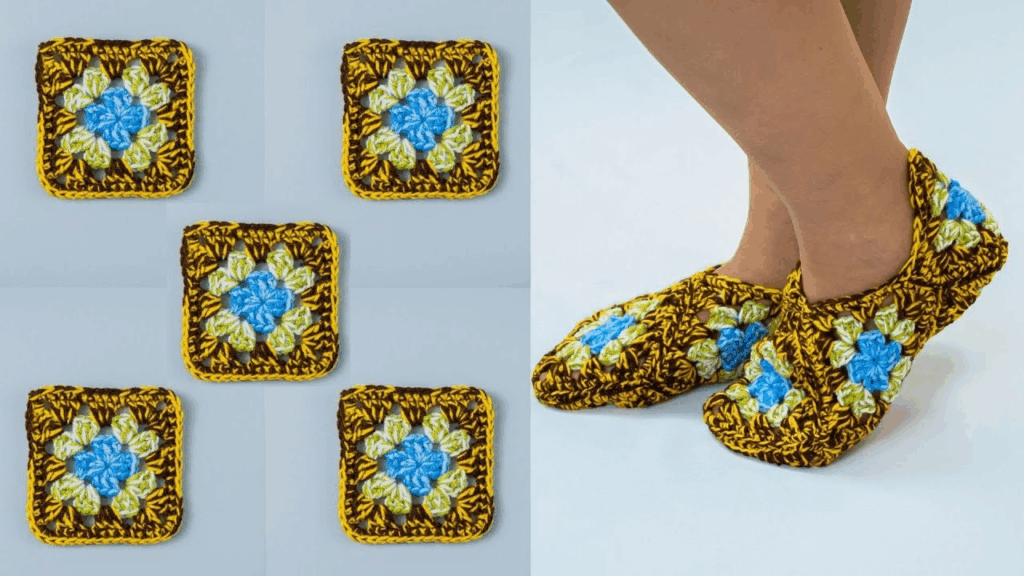
by Crocheting granny square slippers is a fantastic project for beginners! It’s satisfying to take a simple motif like a granny square and transform it into a functional and cozy item. These slippers are highly customizable in terms of color and can be adjusted for different foot sizes.
For slippers, especially in a warmer climate like Phnom Penh, 100% cotton yarn or a durable acrylic yarn are excellent choices. Cotton is breathable and comfortable, while acrylic is often more hard-wearing and available in a vast array of colors. A medium to worsted weight yarn is usually best for a good balance of warmth and structure.
How to Crochet Easy Granny Square Slippers
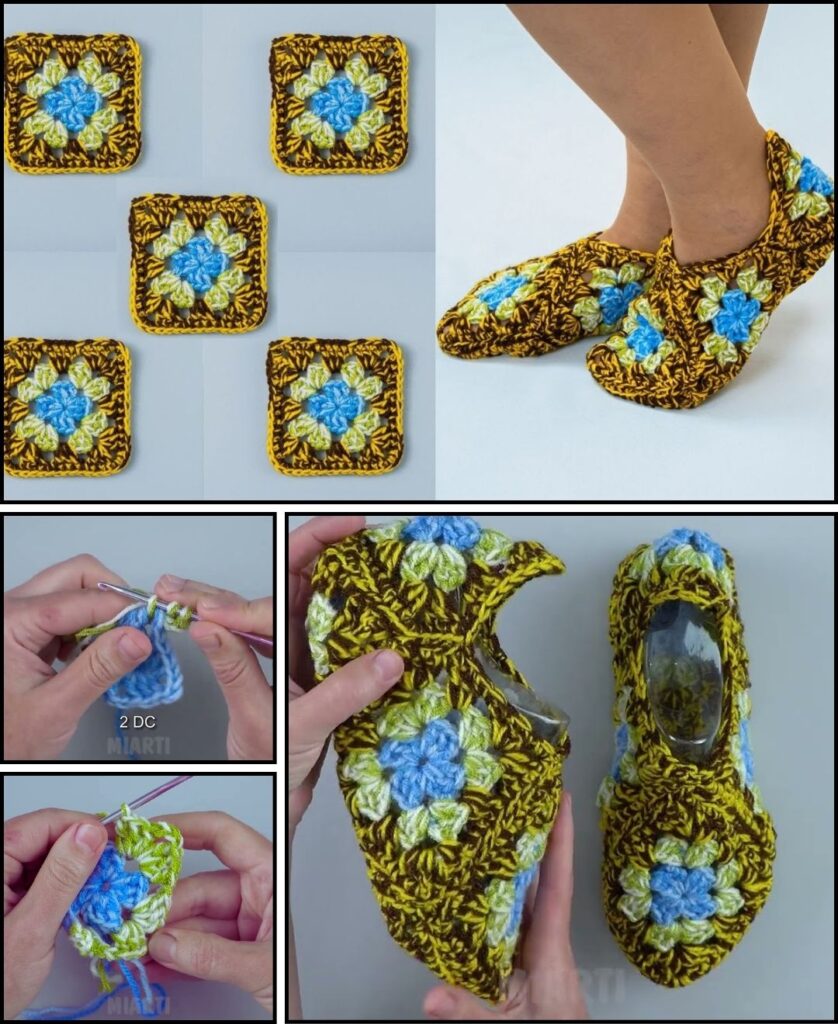
This pattern typically involves making six granny squares per slipper, then strategically joining them to form the shoe shape. This approach is very beginner-friendly as it breaks down the project into manageable units.
1. Essential Materials You’ll Need
- Yarn:
- Worsted Weight (Aran / Medium / Category 4) yarn.
- Choose 1 to 3 colors for your granny squares (e.g., one for the center, one for the middle rounds, one for the outer round).
- You’ll also need a joining color (this can be one of your granny square colors or a new one for contrast).
- Quantity: Approximately 100-150g per pair of adult slippers (depending on size and square rounds). This is a great project for using up yarn scraps!
- Crochet Hook:
- A 4.0mm (US G/6) or 5.0mm (US H/8) hook. Choose a hook size that makes a nice, firm fabric for your granny squares so the slippers hold their shape.
- Scissors: For cutting yarn.
- Yarn Needle (Tapestry Needle): Absolutely essential for weaving in ends and seaming the squares together.
- Stitch Markers (Optional but helpful): To mark corners or beginning of rounds.
2. Basic Crochet Stitches You’ll Use
This project relies on the core stitches used in classic granny squares and simple joining techniques:
- Magic Ring (MR) / Adjustable Ring: (Highly Recommended!) Creates a tight, hole-free center for your first round. Alternatively,
ch 4, then sl st to joininto the first chain to form a ring. - Chain (ch): Used for foundation, spacing, and forming corner spaces.
- Slip Stitch (sl st): For joining rounds and neatening.
- Double Crochet (dc): The main stitch for granny square clusters.
- Single Crochet (sc): Often used for the final edging.
- Working in Rounds: You’ll build the granny squares in circles from the center out.
- Fasten Off: Securely ending your work.
- Weaving in Ends: Hiding yarn tails for a neat finish.

Crochet Granny Square Slippers Pattern
This pattern will guide you through making a pair of slippers for an average adult size (approx. US Women’s 6-9 / EU 37-40). You’ll make 6 granny squares per slipper (12 total for a pair). Each square will be 3 rounds for this size.
Abbreviations (US Crochet Terms):
- MR: Magic Ring
- ch: chain
- sl st: slip stitch
- dc: double crochet
- st(s): stitch(es)
(...): work stitches into the same stitch/space[...]: repeat instructions in brackets
Part 1: Making the Granny Squares (Make 12 total)
You’ll make 12 identical 3-round granny squares. Feel free to use different colors for each round or stick to one solid color. It’s often easiest to weave in the ends after finishing each square.
- Start (Color A): Create a Magic Ring (MR).
- (Alternatively: Ch 4, then sl st into the 1st ch to form a ring.)
- Round 1: Ch 3 (counts as 1st dc). Work 2 dc into the ring.
*Ch 2 (creates a corner space). Work 3 dc into the ring.*Repeat from*to*2 more times. Ch 2. Join with a sl st to the top of the beginning Ch 3. (You’ll have 4 clusters of 3 dc, separated by ch-2 corner spaces).- Fasten off Color A.
- Round 2 (Color B): Join Color B with a sl st into any ch-2 corner space. Ch 3 (counts as 1st dc). Work (2 dc, ch 2, 3 dc) all into the same ch-2 corner space.
*Ch 1 (creates a side space). In the next ch-2 corner space, work (3 dc, ch 2, 3 dc).*Repeat from*to*2 more times. Ch 1. Join with a sl st to the top of the beginning Ch 3.- Fasten off Color B.
- Round 3 (Color C): Join Color C with a sl st into any ch-2 corner space. Ch 3 (counts as 1st dc). Work (2 dc, ch 2, 3 dc) all into the same ch-2 corner space.
*Ch 1. Work 3 dc into the next ch-1 side space. Ch 1. In the next ch-2 corner space, work (3 dc, ch 2, 3 dc).*Repeat from*to*2 more times. Ch 1. Work 3 dc into the last ch-1 side space. Ch 1. Join with a sl st to the top of the beginning Ch 3.- Fasten off Color C.
- Weave in ALL yarn ends on each individual granny square as you complete them. This is crucial for a neat finish and to avoid a huge task at the end.

Part 2: Assembling One Slipper
You’ll use 6 granny squares for each slipper. The easiest way to join them for beginners is often with a single crochet (sc) join or a whip stitch using your yarn needle. For a seamless look, use your joining color.
Slipper Layout (imagine looking at the bottom of your foot):
- Sole: 2 squares joined end-to-end.
- Sides: 2 squares, one on each side of the sole.
- Heel: 1 square folded in half and sewn to the back.
- Toe/Top: 1 square for the top of the foot.
Step-by-Step Assembly:
- Prepare for Joining: Lay out your 6 squares for one slipper according to the diagram below. Take a moment to visualize how they will fold. It helps to use stitch markers to hold squares in place as you join them.
(TOP/TOE SQUARE) [ 6 ] / \ [ 2 ] -- [ 1 ] -- [ 3 ] (Squares 1 and 4 form the sole) \ / [ 4 ] (HEEL SQUARE - folded in half)- Squares 1 & 4 = Sole
- Squares 2 & 3 = Sides
- Square 6 = Top of foot/Toe
- Square 5 (not shown in simple diagram but will be the folded heel)
- You will essentially create a cross-like shape, then fold it up.
- Imagine a plus sign
+. The center square is your sole. The squares above, below, left, and right are the sides/toe/heel.
- Squares 1, 2, 3 in a row will form the bottom and sides.
- Square 4 will sit on top of Square 1 for the toe.
- Square 5 & 6 will be joined to the sides of Square 2 & 3 to complete the main body.
- Form the Base (Sole & Heel/Toe sections):
- Join Square 1 to Square 2 along one edge. (This will be part of the sole).
- Join Square 2 to Square 3 along one edge. (Now you have a strip of 3 squares).
- Joining method: Place squares wrong sides together. Insert hook into first stitch of both squares.
Sl storscacross the edge, through both loops of both squares. Fasten off and weave in joining tails after each seam.
- Add the Toe Square:
- Take Square 4. This will be the top of the toe.
- Join one edge of Square 4 to the top edge of Square 1 (the first square in your strip).
- Add the Side Squares (Heel to instep):
- Take Square 5. Join one edge of Square 5 to the side edge of Square 2 (the middle square in your strip), aligning it so it starts forming the heel/side.
- Take Square 6. Join one edge of Square 6 to the side edge of Square 3 (the last square in your strip), aligning it to mirror Square 5.
- Close the Heel:
- Now you’ll have an opening at the back where the heel goes. Fold the edges of Square 5 and Square 6 together at the back heel. Join these edges together to form the back seam of the slipper.
- Join the Top and Sides:
- You’ll have remaining open edges from Square 4 (the toe top) and Squares 5 & 6 (the side/heel pieces). Carefully join these remaining open edges together, working around the curves of the foot opening.
- Periodically try the slipper on (if it’s for you) or compare it to the intended foot size to ensure a good fit. You’re essentially sewing up all the remaining open seams until you have just the foot opening left.

Part 3: Finishing the Slipper
- Weave in ALL Remaining Ends: This is the most tedious but important part. Use your yarn needle to securely weave in all loose ends. Make sure they are hidden and won’t unravel with wear.
- Add an Edging (Optional but Recommended):
- Join your joining color (or a new accent color) with a sl st anywhere along the top opening of the slipper.
- Round 1: Ch 1. Work 1 sc evenly around the entire opening of the slipper. In the corners (where seams meet), you might work a sc2tog to subtly decrease and bring the opening in, or just a single sc for a looser fit.
- Join with a sl st to the first sc.
- Fasten off.
- Make the Second Slipper: Repeat all steps to create a matching pair!
4. Tips for Easy Granny Square Slippers
- Yarn Choice: For a warmer climate, cotton is great. For more squish and bounce, acrylic works well. Avoid super bulky or very fine yarns for your first pair, as worsted weight is easiest to manage.
- Consistent Tension: Try to maintain even tension when making your granny squares and when joining them. This ensures your slippers are symmetrical and hold their shape.
- Blocking Squares (Optional but Helpful): Before joining, you can gently block your finished granny squares. Wet them, pin them to shape, and let them dry. This makes them perfectly square and easier to join neatly.
- Seaming Methods:
- Single Crochet Join: Creates a visible, raised seam. It’s durable and easy for beginners.
- Slip Stitch Join: Creates a flatter, less visible seam than sc join, but can be a bit tighter.
- Whip Stitch (Yarn Needle): Creates a nearly invisible seam if done neatly. Often used for a smoother finish. Use this method if you prefer sewing over crocheting the seams.
- Sizing:
- The size of your finished granny square will determine the final slipper size. If you need larger slippers, add more rounds to your granny squares (e.g., a 4-round or 5-round square).
- For smaller slippers, you might try 2-round squares, or adjust your hook size down.
- Measure: The best way to get the right size is to make one square and measure it. The approximate length of your foot (heel to toe) should be roughly equal to the combined length of two squares.
- Anti-Slip Sole (Optional): If you’re concerned about slipping on smooth floors, you can add “slipper grippers” or “puff paint” to the bottom of the soles after they’re finished. You can find these at craft stores.
Enjoy making your cozy and stylish granny square slippers! They’re a fantastic way to personalize your loungewear.