 by
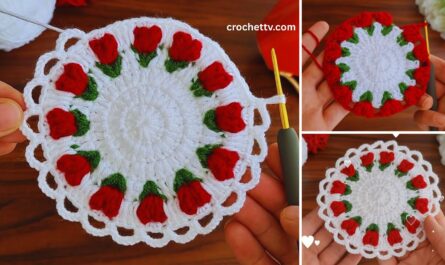
by Crochet flowers bring an everlasting bloom to your life, and among them, the crochet tea rose is one of the most timeless and elegant options. Whether used for decorating garments, hair accessories, or bouquets, the tea rose’s layered petals and delicate form give it a realistic and luxurious touch.
This detailed step-by-step guide will walk you through making your own crochet tea rose with leaves, perfect for crafters of all skill levels.
🧶 What Is a Crochet Tea Rose?
A tea rose is a hybrid rose, often cultivated for its soft, elegant form and layers of petals that open outward. In crochet, it is typically made by creating a long strip of scalloped petals that is then rolled into shape, forming a rose. Adding realistic green leaves completes the look and makes it suitable for use in bouquets, boutonnieres, or appliqué.
🧵 Materials Needed
To make one crochet tea rose with leaves, you will need:
For the Rose:
- Cotton or acrylic yarn in rose/petal color (DK or sport weight recommended)
- Optional: lighter shade of the same color for inner petals
For the Leaves:
- Green yarn (similar weight)
Tools:
- Crochet hook (3.0 mm – 4.0 mm depending on yarn weight)
- Scissors
- Yarn needle (for sewing and weaving ends)
- Stitch markers (optional)
✅ Tip: Use a smaller hook than recommended for tight stitches that help the rose hold its shape.
✨ Crochet Stitches & Techniques Used
If you’re familiar with these basic stitches, you’re good to go:
- Chain (ch)
- Slip stitch (sl st)
- Single crochet (sc)
- Half double crochet (hdc)
- Double crochet (dc)
- Treble crochet (tr) – optional for leaf points
- Back loop only (BLO) – for shaping leaves
🌹 Crochet Tea Rose Pattern – Step by Step
We’ll first create the flower by making a petal strip, then roll it into a rose shape and stitch it together. After that, we’ll crochet a couple of leaves and attach them.
🔸 Step 1: Start the Petal Strip
- Chain 51 (or any multiple of 5 + 1 for adjusting rose size)
The length of your chain determines the fullness and number of petals. For a medium rose, ch 51 is a great start.
🔸 Step 2: First Petal Row (Foundation)
- Work 1 sc in the 2nd ch from hook.
- (Skip next ch, 5 dc in next ch, skip next ch, sc in next ch) – repeat this pattern across the row.
You’ll have scalloped clusters of 5 dc forming petals.
📌 By the end, you should have 10 petals.
🔸 Step 3: Second Petal Row (For More Dimension)
We now build a second petal layer behind the first to create a layered rose.
- Turn your work.
- Chain 3 (acts as turning chain).
- (sc in center dc of each petal, ch 3) – repeat to the end.
Now, in each ch-3 space, you’ll crochet larger petals.
- Turn again and in each ch-3 space: (sc, hdc, 3 dc, hdc, sc).
This creates larger petals behind the first layer.
📌 You should now have 10 big petals (Row 2) and 10 small petals (Row 1), creating a realistic depth.
🌹 Step 4: Form the Rose Shape
Now that you have a long strip of scalloped petals, you’ll form the rose by rolling and stitching.
- Begin at the narrow end of the petal strip.
- Roll the strip tightly for the inner bud, then more loosely for outer petals.
- Shape as desired – adjust petals outward as you go.
- Using a yarn needle and matching yarn, sew the bottom edge as you roll to secure the rose.
Take your time shaping – this determines the final look!
🍃 Crochet Leaf Pattern (Make 2–3 Leaves)
Now let’s add leaves to make the rose look complete.
🔹 Step 1: Leaf Foundation
- Chain 10
- Starting in 2nd ch from hook:
- sc in first ch
- hdc in next
- dc in next 3
- hdc in next
- sc in next
- sl st in last ch
🔹 Step 2: Other Side of Leaf
Now continue on the opposite side of the foundation chain:
- sl st in the same last stitch again
- sc, hdc, dc in next 3, hdc, sc, sl st
Now you have a full oval leaf shape.
🔹 Optional: Add Vein or Texture
- You can add a center vein using surface slip stitch or embroidery.
- Or, make another row in back loop only (BLO) to give a realistic ribbed texture.
✂️ Final Assembly
- Use your yarn needle to attach 1–3 leaves to the base of the rose.
- You can also glue the flower to a pin, hairclip, headband, or brooch base.
- Or sew it onto a bag, pillow, or garment as an appliqué.
🌿 Optional Variations
- 🌈 Multicolor Petals: Change yarn shades midway for a gradient rose.
- 🌹 Larger Roses: Start with longer chains (ch 61, 71, etc.).
- 🍃 Double Leaves: Crochet two leaves together with slip stitches around the edge for a thicker, stiffer result.
- 🎀 Add a stem: Crochet an I-cord or wrap green yarn around floral wire for a realistic stem.
🧼 Care Instructions
- Hand wash only (if attached to garments)
- Lay flat to dry
- Store in dry place
- Avoid high heat
🎁 Gift and Use Ideas
Crochet tea roses are extremely versatile! Here are some ways to use them:
- 💐 Bridal bouquets (with multiple roses)
- 🎀 Hair accessories or baby headbands
- 🎁 Add to gift wrapping for a handmade touch
- 👜 Sew onto bags or clutches
- 🏡 Use in wreaths, wall hangings, or as centerpieces
- 📔 Scrapbooking and craft projects
🧵 Final Thoughts
The crochet tea rose with leaves is a gorgeous and satisfying project that never goes out of style. It’s a great way to practice shaping and layering in crochet. With a bit of yarn and patience, you can create flowers that bloom forever – no watering needed!
📸 Share Your Roses!
Once you’ve completed your crochet rose, don’t forget to show it off! Use hashtags like:
- #CrochetRose
- #CrochetFlowers
- #TeaRoseCrochet
- #HandmadeBlooms
Join online communities and inspire others with your floral creations.