by
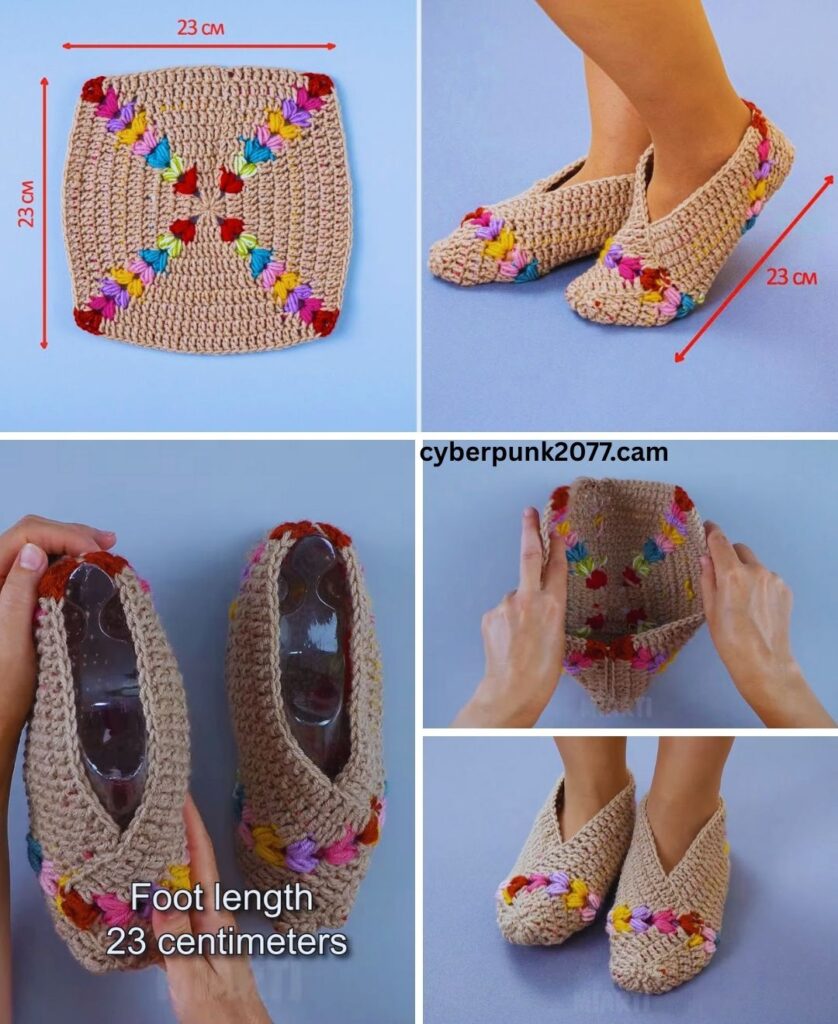
by Crocheting slippers from granny squares is a fantastic project that allows you to combine comfort with the classic, customizable appeal of the granny motif. These slippers are quick to assemble, fit nicely, and are perfect for keeping your feet cozy. This tutorial will guide you through creating two distinct granny squares and assembling them into a functional pair of slippers.
Materials You’ll Need
- Yarn: Approximately 100-150 grams of worsted weight (aran/10-ply) yarn. Wool or acrylic yarn is recommended for warmth and comfort. Using contrasting colors allows for a beautiful, patterned look.
- Color A: For the sole and joining.
- Color B & C: For the main granny square design.
- Crochet Hook: A hook size appropriate for your yarn, typically a 4.0mm (G/6) or 5.0mm (H/8) hook.
- Scissors
- Yarn Needle (Tapestry Needle): Essential for weaving in ends and seaming the squares together.
- Optional: Anti-slip fabric paint or leather/suede patches for the soles.
Key Crochet Stitches and Techniques
- Chain (ch): The basic stitch.
- Slip Stitch (sl st): Used to join rounds and stitches.
- Single Crochet (sc): Used for the sole and assembly.
- Double Crochet (dc): The main stitch for the granny squares.
- Granny Square Technique: Creating the familiar cluster and chain-space pattern.
Part 1: Crocheting the Granny Squares
You will need a total of 4 squares per slipper (8 total) for this method: 3 small squares for the top/toe and 1 larger square for the heel.
A. Small Squares (Make 6 Total – 3 per Slipper)
These form the toe and top of your foot. Use Colors B and C for these squares.
- Foundation: Start with a magic ring.
- Round 1 (Color B): Ch 3 (counts as 1 dc). Work 2 dc into the ring.
(Ch 2, 3 dc into the ring). Repeat from()two more times. Ch 2, sl st to the top of the initial Ch 3 to join. (Four 3-dc clusters). - Round 2 (Color C): Join Color C with a sl st to any corner ch-2 space.
- In the same corner,
(ch 3, 2 dc, ch 2, 3 dc). Ch 1, (3 dc, ch 2, 3 dc)into each remaining corner space.- Ch 1, sl st to the top of the initial Ch 3 to join.
- In the same corner,
- Round 3 (Color B): Join Color B with a sl st to any corner ch-2 space.
- In the same corner,
(ch 3, 2 dc, ch 2, 3 dc). Ch 1, 3 dcinto the next ch-1 space along the side.Ch 1.- Repeat the corner and side pattern around. Sl st to join. Fasten off.
- In the same corner,
B. Large Squares (Make 2 Total – 1 per Slipper)
These squares will be for the heel and need to be slightly larger. Use Colors B and C.
- Follow the pattern for the small square, but complete 4 rounds instead of 3, ensuring you increase the side clusters as needed (2 clusters along the side in Round 4). Fasten off.
Part 2: Crocheting the Simple Sole
The sole is worked in simple rows to create an elongated oval shape that fits your foot. Use Color A for the sole.
- Foundation Chain: Chain 21 (adjust length for your foot size; the finished chain length should be about 1 inch shorter than your foot).
- Row 1: Sc in the 2nd ch from the hook and in the next 18 chs. Hdc in the last ch. Work 4 hdc into the same last ch. Continue working down the other side of the chain: Hdc in the next 19 chs. Sl st to the first sc to join.
- Round 2: Ch 1. Sc in the first 20 stitches. Work 2 sc into each of the next 4 stitches (this rounds the toe). Sc in the next 18 stitches. Work 2 sc into each of the last 2 stitches (this rounds the heel). Sl st to join.
- Rounds 3-4 (Shaping): Continue working sc rounds, placing small increases (1-2 single crochets in specific spots) at the toe and heel of the sole to maintain the flat oval shape. Stop when the sole is the same width as the large granny square. Fasten off.
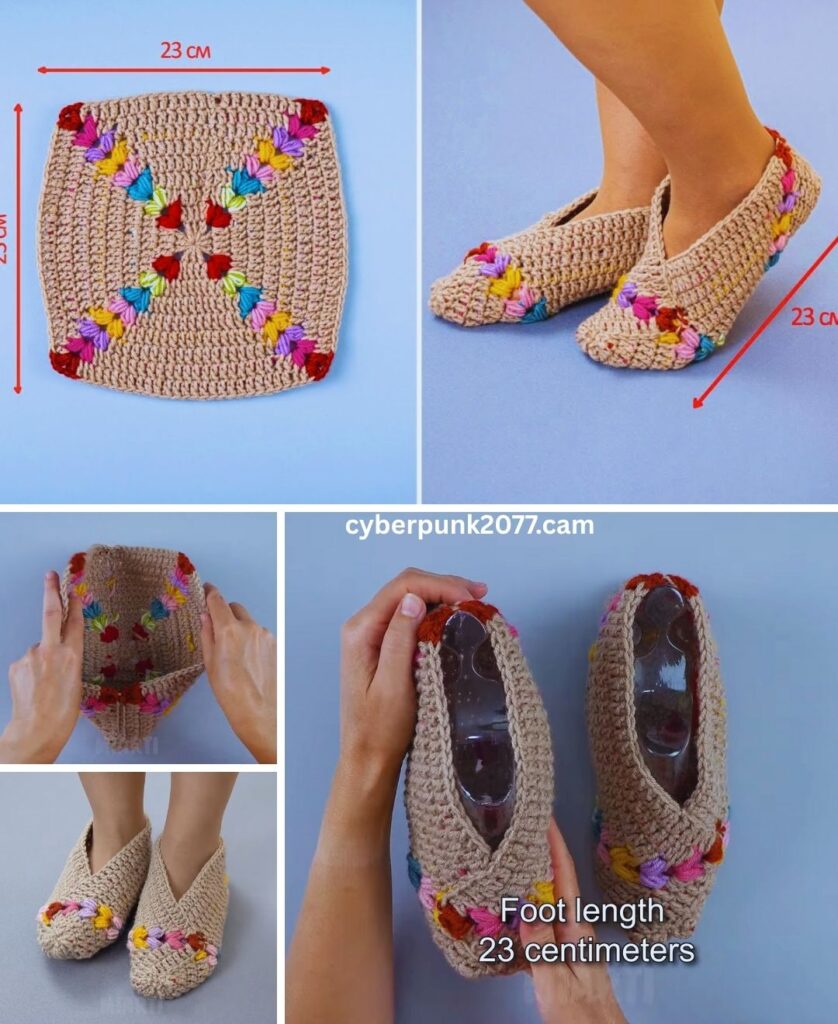
Part 3: Assembling the Slipper
This is the process of seaming the squares together and attaching them to the sole.
A. Assembling the Top/Heel
- Toe: Join the three small squares into a line using a slip stitch join or whipstitch along the long edges.
- U-Shape: Join the ends of the three-square strip to the sides of the large heel square, forming a loose “U” shape. The large square is the heel panel.
- Seam the Heel: Fold the large square in half and seam the top edge together to close the back of the slipper.
B. Attaching to the Sole
- Prepare: Turn the assembled top piece right side out and place it over the crocheted sole. The heel seam should align with the center back of the sole. Pin the pieces together if needed.
- Joining: Join Color A to the heel corner of the assembled piece. Ch 1.
- Seam: Using a single crochet join (working through both the top piece and the sole piece), sc all the way around the entire edge, firmly joining the top to the sole. Ensure your sc stitches are even and tight.
- Finish: Sl st to the first sc to join. Fasten off.
Part 4: Finishing Touches
- Final Edge: Using Color A, join with a sl st to the top opening of the slipper. Ch 1. Work one round of reverse single crochet (crab stitch) or simple slip stitches around the opening. This creates a neat, non-stretching edge.
- Weave in All Ends: Use your yarn needle to carefully weave in all remaining loose ends securely.
- Anti-Slip (Crucial): For safety, you must treat the sole.
- Apply a few drops of anti-slip fabric paint to the bottom and let dry completely.
- OR cut and hand-sew suede or leather patches onto the heel and toe of the sole.
Congratulations! You have successfully created a cozy and unique pair of granny square slippers.