 by
by 🎥 Video Master Class | Knitting from Cord (Step-by-Step Guide)
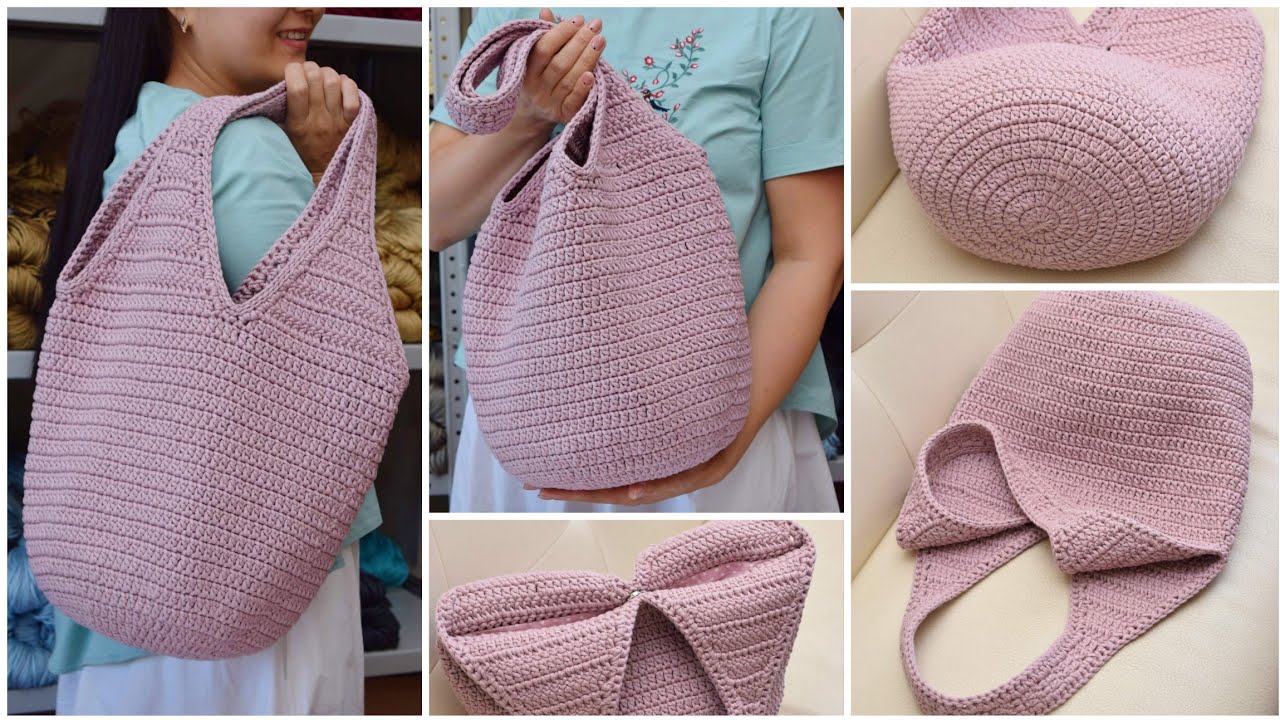
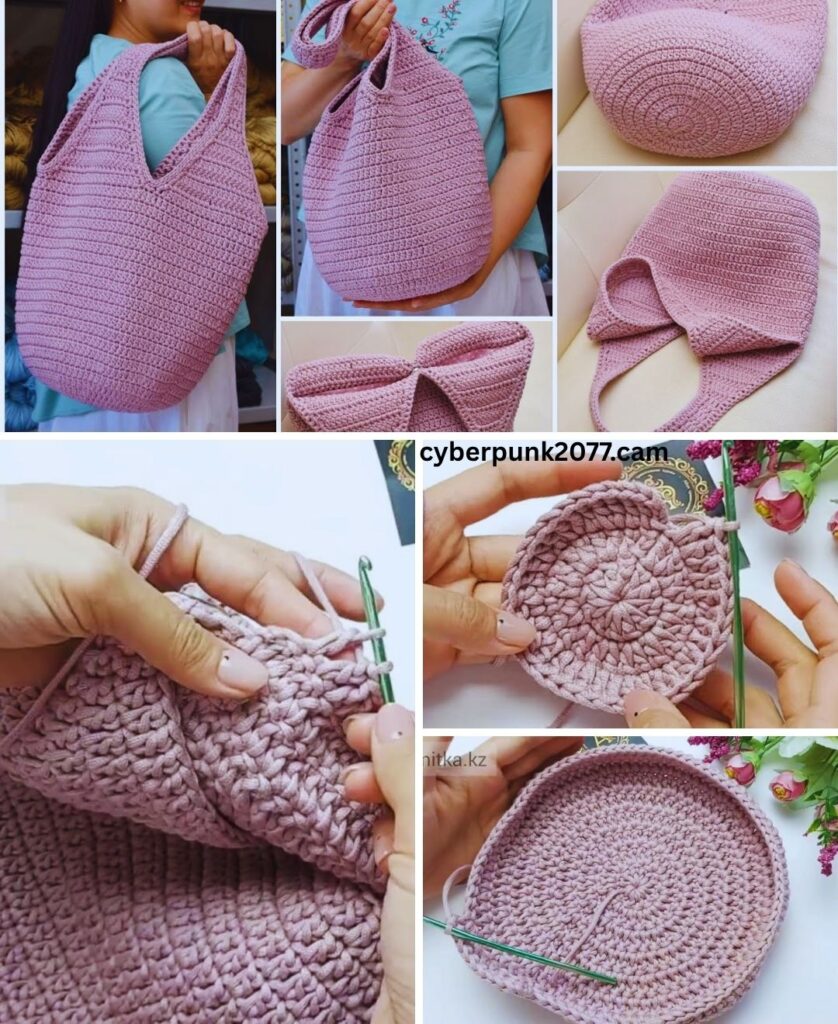
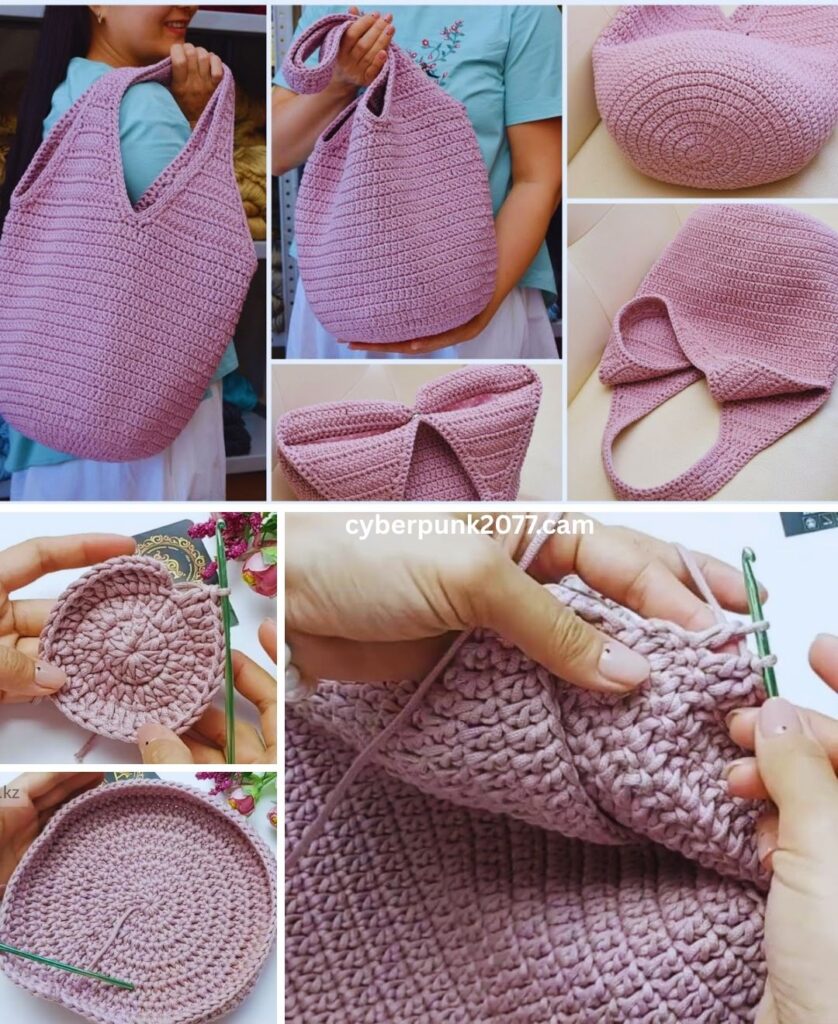
Looking for a sturdy, stylish, and spacious bag you can use every day? A shopper bag knitted from cord is a perfect project that combines fashion with functionality. This technique creates a highly durable, modern bag with a clean, structured look that’s perfect for groceries, market visits, or a casual day out. Best of all, cord bags are long-lasting, washable, and beautifully textured.
In this guide, you’ll learn how to make a beautiful and roomy shopper bag using thick cord yarn, and we’ll outline how to turn this into a video master class for visual learners. Whether you’re knitting with needles or using crochet techniques (often referred to as “knitting with cord” in casual terms), you’ll find this tutorial clear, comprehensive, and inspiring.
🧶 Why Use Cord Yarn?
Cord (often referred to as polyester cord, macramé cord, or paracord) is a thick, rope-like yarn that’s ideal for bags. It holds shape, provides structure, and gives your handmade items a high-end, designer finish.
✔️ Advantages of Cord:
- Strong and durable
- Water-resistant
- Keeps shape well
- Comes in vibrant colors and finishes
- Easy to clean
- Great for knitted or crocheted bags
🧵 Materials You’ll Need
Before we begin, let’s look at the tools and materials required for this project:
| Material | Description |
|---|---|
| Cord Yarn | 3–4 mm polyester cord, approx. 250–300 meters (depends on bag size) |
| Knitting Needles or Crochet Hook | 6–8 mm size (depending on your method) |
| Handles | Wooden, leather, rope, or crochet handles |
| Scissors | For cutting yarn |
| Tapestry Needle | For weaving in ends |
| Lining (optional) | Cotton or synthetic fabric |
| Magnetic snap/button | For closure (optional) |
| Measuring tape | To measure dimensions |
🪡 Skill Level
This project is suitable for:
- Adventurous beginners (who understand basic knitting or crochet)
- Intermediate-level crafters
- Perfect for anyone who wants to create a structured, fashionable bag
📐 Finished Dimensions (Approx.)
- Width: 40 cm (16 inches)
- Height: 35 cm (14 inches)
- Depth: 10–12 cm (4–5 inches)
- Handle Drop: 20–25 cm (8–10 inches)
📝 You can easily resize the bag by adding more stitches or rows.
🎥 Suggested Structure for a Video Master Class
If you’re creating a video tutorial, break the content into these clear chapters:
| Segment | Content |
|---|---|
| 1. Introduction | Show the finished bag and materials |
| 2. Base | Demonstrate cast-on and bottom shaping |
| 3. Body | Walk through body construction |
| 4. Handles | How to add or attach handles |
| 5. Finishing | Lining, closure, decoration |
| 6. Showcase | Model the bag in use |
🧺 Step-by-Step Instructions
You can knit this shopper bag using flat knitting and sewing, or with circular needles. Below is a flat knitting method with seamed sides.
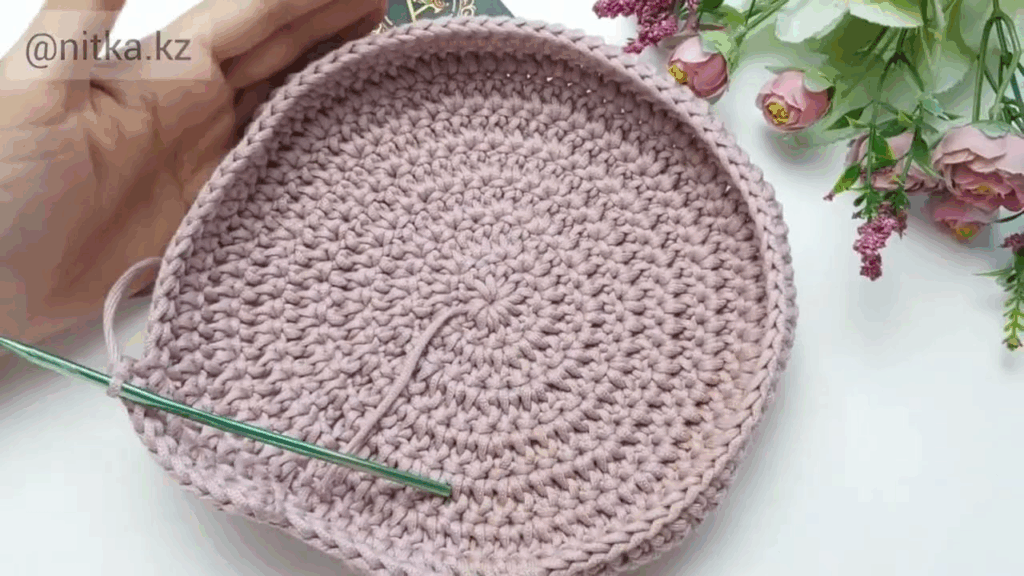
🪢 STEP 1: Cast On the Base
You’ll start with the base of the bag — a rectangular foundation worked in garter stitch for strength.
🧶 Pattern (Flat Base):
- Cast on 30 stitches using long-tail cast-on.
- Rows 1–20: Knit every row (garter stitch).
- The base should measure approx. 30 cm x 10 cm (12 x 4 inches).
📝 If you’re using crochet instead, make a chain of 20–25 stitches and work rows of single crochet to match the desired size.
🧢 STEP 2: Pick Up and Knit the Sides
Once the base is complete, you will pick up stitches along all four sides to form the bag body.
🧶 Pattern:
- Rotate the base and pick up stitches along the long edge: 30 stitches.
- Then along the short edge: 10 stitches.
- Repeat on all sides — you’ll end up with stitches on all four edges.
- Join in the round using circular needles.
📝 Total stitch count: ~80 stitches in the round.
🪡 STEP 3: Knit the Body
Now, knit the body in a stitch pattern of your choice. For structure and beauty, a linen stitch or basketweave pattern works well.
📏 Option A: Garter Stitch Body (Beginner-Friendly)
- Knit every round for about 25–30 cm (10–12 inches) in height.
🧶 Option B: Linen Stitch (Textured Look)
- Round 1: K1, sl1 with yarn in front, K1 to end.
- Round 2: Sl1 with yarn in front, K1, sl1 to end.
- Repeat for 25 cm (10 inches).
📝 Keep tension firm — this keeps the bag structured.
👜 STEP 4: Shape the Top & Add Handles
Once your body is tall enough, finish off with a neat edge and handle openings.
Option 1: Integrated Handles (Cord)
- Knit 10 stitches.
- Bind off 10–12 stitches (for handle gap).
- Knit remaining stitches.
- Next round: Cast on 10–12 stitches over the gap using backward loop method.
- Knit 3 more rounds.
Repeat for the second handle.
Option 2: Attach Separate Handles
- Bind off all stitches.
- Sew on wooden/leather handles or macramé rope handles.
🧵 STEP 5: Finishing Touches
Now that your bag is shaped, let’s finish it beautifully.
Seaming:
- If you knit flat panels, seam up the sides using mattress stitch.
- Reinforce base corners to stand upright.
Weave in Ends:
- Use a tapestry needle to hide all yarn ends inside the stitches securely.
Lining (Optional):
- Cut fabric to the shape of the bag.
- Hem the edges.
- Hand sew or hot glue into the inside of the bag.
Add Closure (Optional):
- Attach a magnetic snap or button and loop at the top center.
🌟 Customization Ideas
Make your cord shopper bag truly unique:
| Idea | Description |
|---|---|
| Color Block | Use two shades of cord (e.g., neutral + bold) |
| Stripes | Alternate colors every few rows |
| Pockets | Add knit or fabric inner pockets |
| Tassels/Charms | Attach to handles for decoration |
| Embroidery | Stitch initials or simple motifs on the front |
🧽 Care Instructions
Cord bags are super easy to maintain:
- Hand wash or machine wash (gentle cycle)
- Air dry only
- Spot clean stains with soap and water
- Avoid ironing (cord may melt)
🪡 Recap: Steps to Knit a Cord Shopper Bag
| Step | Action |
|---|---|
| 1 | Cast on and knit base |
| 2 | Pick up stitches and knit sides in the round |
| 3 | Knit the body in garter or textured stitch |
| 4 | Add handles (knit or attached) |
| 5 | Seam and finish |
| 6 | Optional lining and closure |
🧶 How Much Cord Do I Need?
| Bag Size | Cord Quantity |
|---|---|
| Small (A5) | ~150–180 meters |
| Medium (our size) | ~250–300 meters |
| Large / Tote | 350–400 meters |
🧵 Use 3–4 mm thickness for best structure and flexibility.
📹 Want to Make a Video Tutorial?
Here’s a sample video master class outline:
- Intro (30 sec): “Let’s make a stylish and sturdy shopper bag using cord!”
- Materials (1 min): Show yarn, needles, and optional tools.
- Base (2–3 min): Demo the cast-on and garter base.
- Body (5–6 min): Show the stitch pattern in the round.
- Handles (3 min): Walk through integrated or attached handles.
- Finishing (2 min): Demonstrate lining and finishing.
- Closing (30 sec): Model the bag and share ideas for use.
💬 Final Thoughts
Knitting a cord shopper bag is not just a craft — it’s a journey into sustainable, functional fashion. With just a few simple tools and some sturdy cord, you can create a bag that rivals high-end boutique styles in both appearance and durability. Whether you’re making it for yourself, as a gift, or to sell in your handmade shop, this roomy and beautiful shopper bag is sure to impress.
And remember — every stitch is a statement. 🧵