by
by Absolutely! Here’s a long-form, detailed article on how to crochet a cute mini bag that’s both easy and stylish. This pattern is perfect for beginners and can be completed in just a few hours. Whether you’re looking to create a trendy accessory, a coin pouch, or a small gift bag, this project is functional, fun, and fashionable.
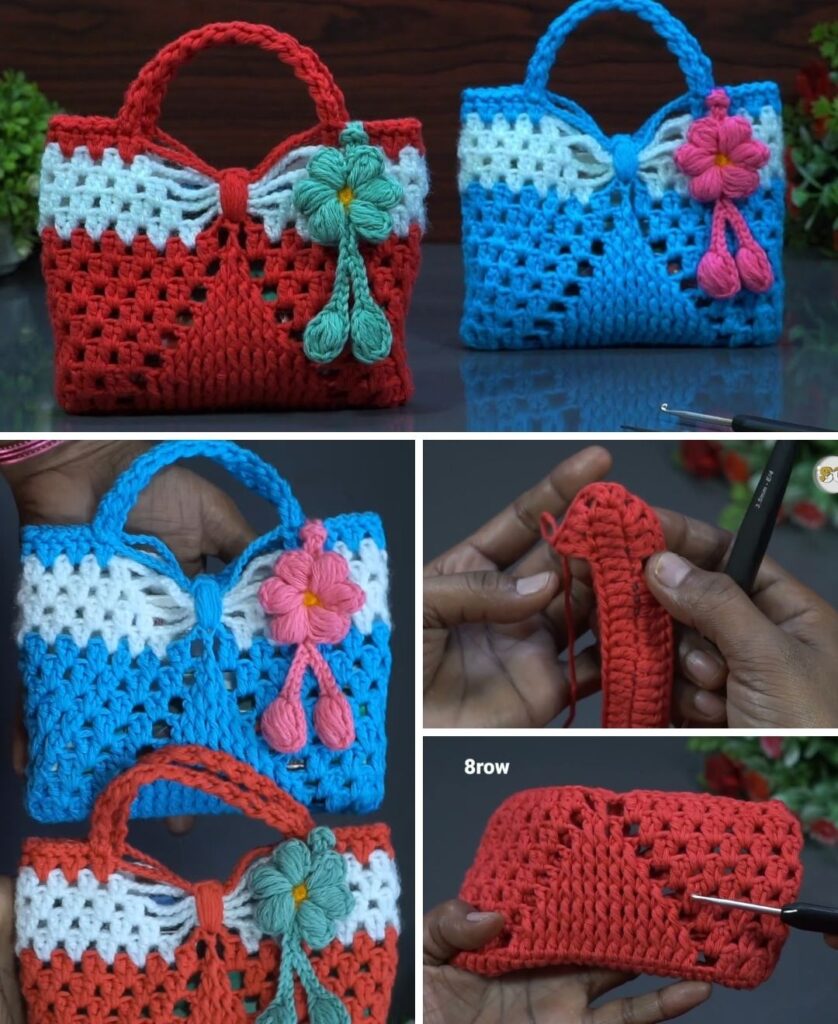
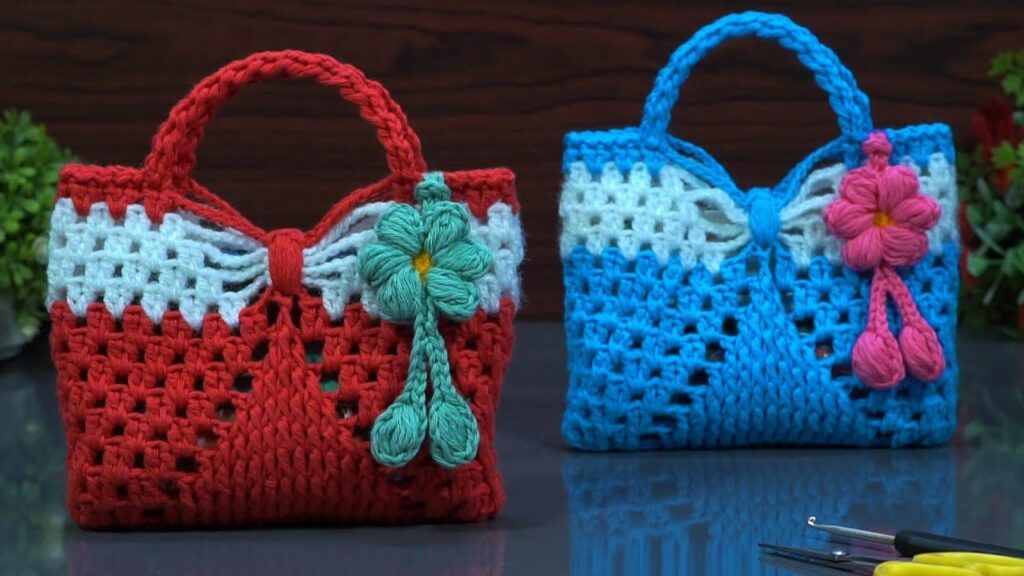
👜 How to Crochet a Cute Mini Bag – Easy & Stylish | Step-by-Step Pattern
Crochet fashion is all the rage right now, and mini bags are leading the trend. They’re adorable, quick to make, and just the right size for essentials like lip balm, cards, cash, and earbuds. Whether you’re a crochet newbie or a seasoned stitcher looking for a fast, satisfying project, this cute mini bag is a must-try!
In this article, you’ll get a complete step-by-step pattern to create your own stylish crochet mini bag. It’s designed to be easy, customizable, and completed in just a few hours with basic crochet stitches.
💖 Why You’ll Love This Project
- ✅ Quick & beginner-friendly
- ✅ Requires minimal yarn
- ✅ Super customizable (size, strap, closures)
- ✅ On-trend and useful
- ✅ Great for gifting, craft fairs, or personal use
🧺 Materials You’ll Need
Here’s what you’ll need to get started:
| Item | Description |
|---|---|
| Yarn | Medium weight (Worsted / Category 4) cotton or acrylic yarn – approx. 80–100 yards |
| Crochet hook | 4.0 mm (G-6) or 5.0 mm (H-8) depending on yarn |
| Tapestry needle | For weaving in ends |
| Scissors | For trimming yarn |
| Button (optional) | For closure |
| Stitch marker (optional) | To mark rounds or center stitches |
Yarn suggestions: Lily Sugar’n Cream (for a sturdy texture), Paintbox Cotton Aran, or any leftover worsted yarn.
🧵 Crochet Stitches Used (US Terms)
This pattern uses simple stitches only:
| Abbreviation | Stitch Name |
|---|---|
| ch | Chain |
| sc | Single Crochet |
| hdc | Half Double Crochet |
| sl st | Slip Stitch |
| st(s) | Stitch(es) |
📐 Finished Size
- Bag Body: approx. 5″ wide x 6″ tall
- Strap: approx. 40″ long (adjustable)
🧶 Construction Overview
This mini bag is made in three parts:
- The Body – a rectangle folded in half and seamed at the sides
- The Strap – made by chaining and crocheting a simple cord
- The Flap – optional closure with a button or tie
You’ll be working in rows for the body and adding details afterward. Super simple!
🪡 Step-by-Step Crochet Mini Bag Pattern
Let’s begin!
🧱 Step 1: Crochet the Body (Rectangle)
We’ll start with a rectangle and later fold and seam it.
Foundation Chain:
- Ch 21 (adjustable – this will be the width of the bag)
Row 1:
- Hdc in 2nd ch from hook and in each st across. (20 hdc)
- Ch 1, turn.
Rows 2–26:
- Hdc in each st across, ch 1, turn.
🧵 You should now have a rectangle approx. 5″ wide and 12″ tall.
Add or subtract rows to make it taller or shorter.
🔄 Step 2: Fold & Seam the Sides
Now that your rectangle is done:
- Fold it in half with the short ends together (like a book).
- Using slip stitch or whip stitch and your tapestry needle, seam both sides, starting from the bottom corners up to the top edge (leave top open).
- Fasten off and weave in all ends.
🎉 Congratulations! You now have the basic pouch shape of your mini bag.
🧵 Step 3: Add a Strap (Optional Crossbody or Shoulder Strap)
There are several ways to create a strap. Here’s a crochet chain strap, which is fast and stylish.
Option 1: Chain Strap (Beginner-Friendly)
- Attach yarn to one corner of the top edge.
- Chain 100 (or to desired strap length).
- Sl st to the opposite corner of the bag’s top edge.
- Fasten off and weave in ends.
Option 2: Sturdy Strap
- Ch 100.
- Turn, sc in each ch across.
- Attach both ends to the top sides of the bag using sl st or sewing.
✅ You can also use a leather cord, macrame rope, or a store-bought strap if you prefer.
🎀 Step 4: Optional Flap or Button Closure
Want a little flap? It’s easy to add!
Flap:
- Attach yarn to the back center of the top opening.
- Ch 1, sc across about 10 stitches to form a narrow tab.
- Turn, sc in each st for 4–6 more rows.
- On the last row, ch 2, skip center 2 stitches, sc to end – this creates a buttonhole.
- Fasten off and weave in ends.
Sew a button to the front center of the bag so the flap can close over it.
🌟 Optional Embellishments
Now that your mini bag is done, you can customize it further:
- 🌸 Add a flower appliqué or embroidery
- 🎨 Use two or three yarn colors for a striped bag
- 🧵 Sew in a fabric liner for added structure
- 🌈 Use variegated yarn for a multicolor effect
- 🔑 Add a keyring, tassel, or charm to the strap
🧼 Care Tips
- Hand wash or machine wash on gentle
- Lay flat to dry
- Avoid heavy items to preserve shape
🧵 Tips for Success
- Use cotton yarn for a sturdier, non-stretchy bag
- Keep tension even for a clean look
- Don’t overstuff – this is a mini bag for small essentials
- Use stitch markers if you’re customizing the flap or shape
🧺 Variations to Try
| Style | How to Do It |
|---|---|
| Drawstring Mini Bag | Replace flap with a chain woven through top row |
| Mini Backpack | Add two short straps and a button flap |
| Phone Pouch | Make it a bit taller, add a snug flap |
| Zippered Mini Purse | Sew in a zipper and add a lining |
| Granny Square Mini Bag | Use 2–4 granny squares joined together |
✅ Quick Recap
| Step | Action |
|---|---|
| Step 1 | Crochet a rectangle using hdc |
| Step 2 | Fold and seam sides |
| Step 3 | Add strap using chains or sc rows |
| Step 4 | Add optional flap and button |
| Step 5 | Decorate and personalize! |
🎉 Final Thoughts
Crocheting a cute mini bag is one of the most satisfying beginner projects you can tackle. It’s functional, trendy, and fun to make — and it helps build confidence in using simple stitches and shaping techniques. Plus, you can get creative with colors, textures, and embellishments to make each bag uniquely yours.
Once you finish one, you’ll want to make a dozen more — for yourself, your friends, or even for your next craft market!