 by
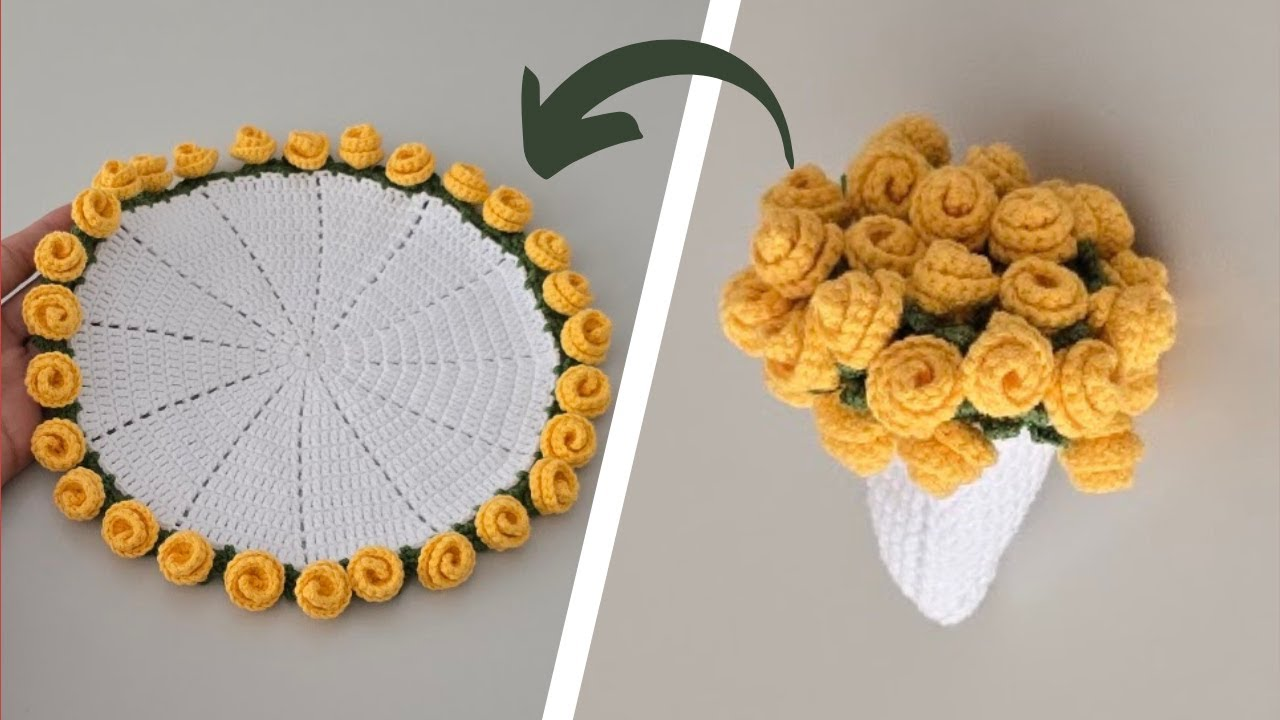
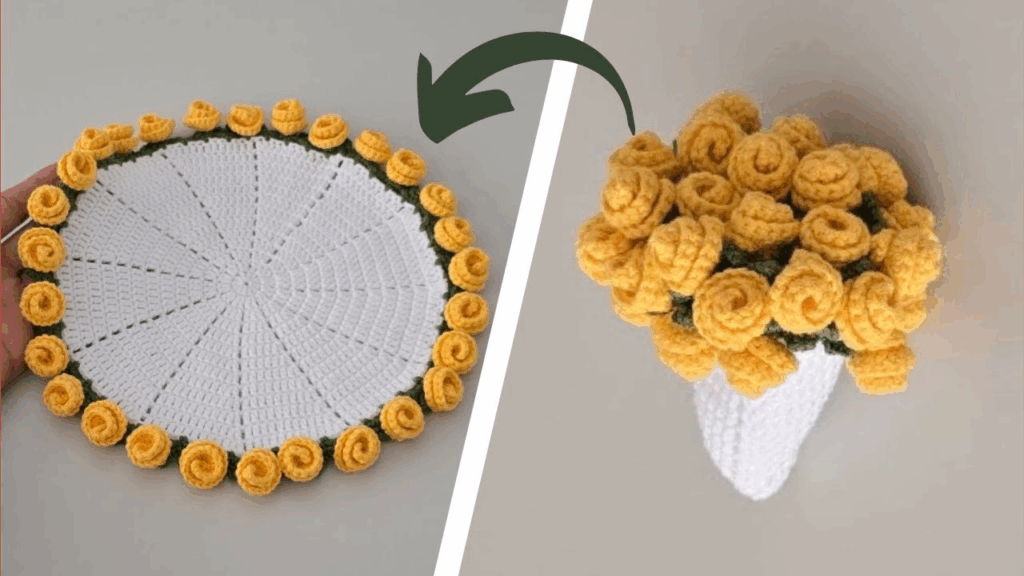
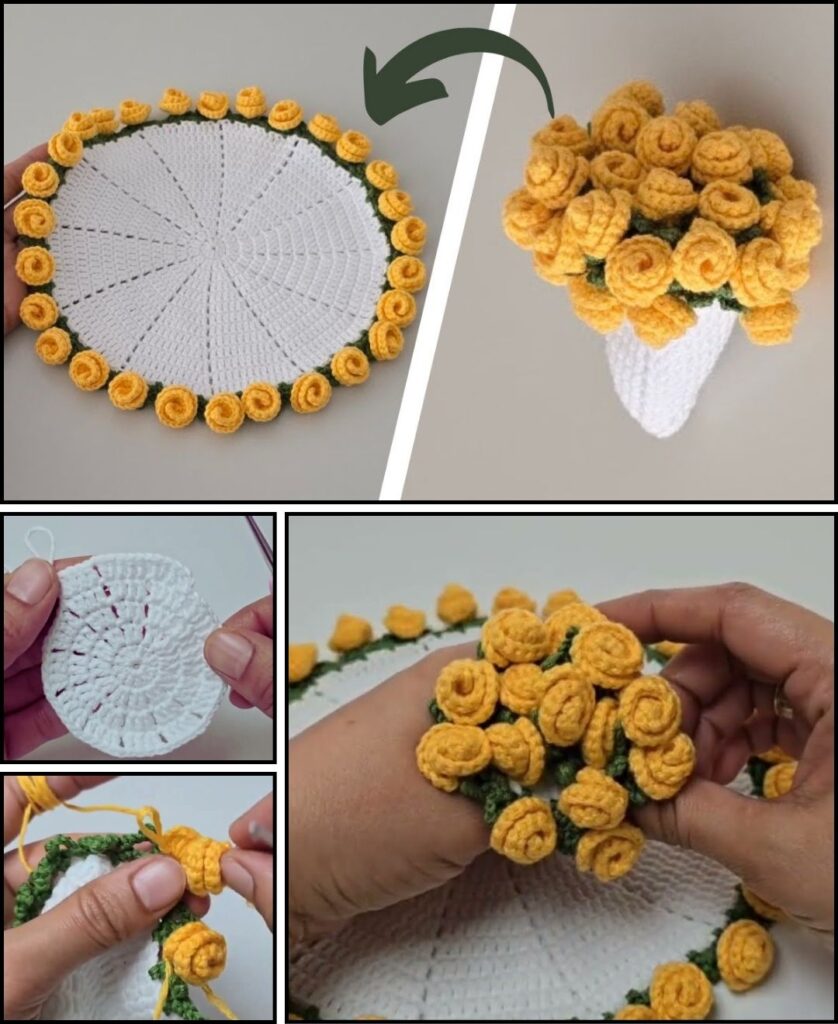
by Crocheting a beautiful placemat is a fantastic way to add a touch of handmade charm and personality to your dining table. Whether you’re aiming for a rustic, elegant, modern, or whimsical look, crochet allows for endless design possibilities through stitch patterns, shapes, and colors. These pieces aren’t just decorative; they’re also highly practical, protecting your table from spills and heat.
Given that it’s warm in Phnom Penh, choosing the right yarn for your placemat is crucial. 100% cotton yarn is by far the best choice for placemats. Cotton is highly absorbent, durable, and easy to wash – all essential qualities for table linens! It also provides excellent stitch definition, which means your chosen pattern will really stand out.
How to Crochet a Beautiful Placemat: A Detailed Guide
This guide will walk you through creating a classic, rectangular placemat using a simple yet elegant stitch pattern that provides good texture and density. We’ll use the Half Double Crochet (HDC) in the Third Loop to create a subtle ribbed texture that mimics knitting, giving your placemat a refined look.
1. Essential Materials You’ll Need
- Yarn:
- 100% Cotton Yarn (Worsted Weight / Aran / Medium / Category 4): Choose a color that complements your dining area or one that makes a statement. You’ll need approximately 150-250 grams (about 250-450 yards) per placemat, depending on your tension and the exact size you desire.
- Crochet Hook:
- A 4.0mm (US G/6) or 4.5mm (US 7) hook. The goal is to create a dense, firm fabric for your placemat so it lays flat and offers good protection. If your stitches are naturally loose, go down a hook size.
- Scissors: For cutting yarn.
- Yarn Needle (Tapestry Needle): Essential for neatly weaving in all your yarn ends.
2. Basic Crochet Stitches You’ll Use
This pattern utilizes fundamental crochet stitches, plus one specific technique for adding texture:
- Chain (ch): For your foundation row and turning.
- Half Double Crochet (hdc): Your primary stitch for the placemat’s body.
- Half Double Crochet in the Third Loop (hdc in 3rd loop): This is the special technique that creates the lovely ribbed texture.
- To find the third loop: When you look at the top of an HDC stitch, you’ll see the typical “V” shape formed by the front and back loops. Just behind the back loop, there’s another horizontal bar – that’s the third loop (sometimes called the “back bar” or “back bump”). When you work into this loop, it pushes the regular “V” forward, creating a beautiful ribbed effect.
- Fasten Off: To securely end your work.
- Weaving in Ends: Hiding yarn tails for a neat and professional finish.
Crochet Placemat Pattern (Approx. 12 x 18 inches / 30 x 45 cm)
This size is standard for a rectangular placemat. You can easily adjust the width by changing your starting chain count and the length by changing the number of rows.
Abbreviations (US Crochet Terms):
- ch: chain
- hdc: half double crochet
- hdc in 3rd loop: half double crochet in the third loop
- st(s): stitch(es)
- FO: Fasten off

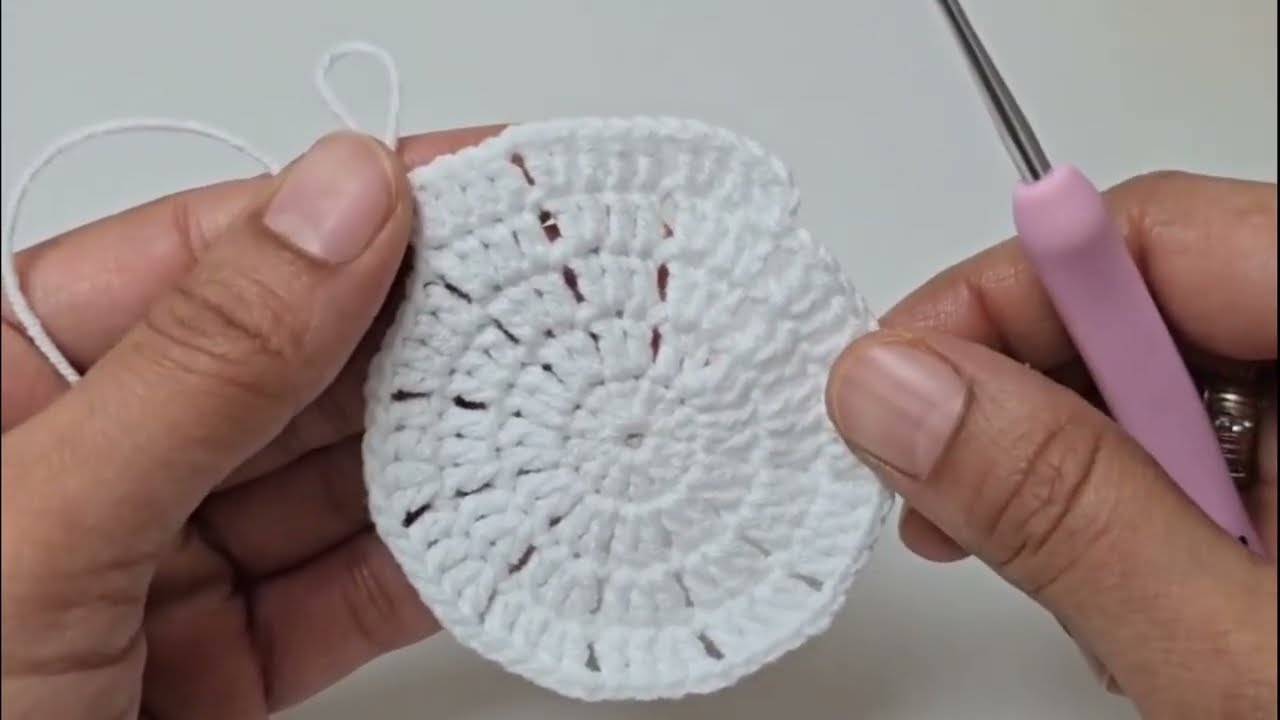
Part 1: Create the Foundation Chain (Determines Placemat Width)
- Make a slip knot on your hook.
- Ch 62. (This will create a placemat approximately 12 inches wide. If you want it wider, chain more stitches; for a narrower one, chain fewer. Aim for an even number for this pattern to maintain symmetry.)
Part 2: Work the First Row (Setting the Base)
This row establishes your first line of half double crochet stitches and prepares for the textured rows.
- Hdc in the 3rd ch from your hook. (The first 2 chains you skipped count as the turning chain for your first hdc stitch.)
- Hdc in each remaining chain across the row.
- You should have 60 hdc stitches in this first row. (Your hdc count will be 2 less than your starting chain.)
- Ch 2 (this is your turning chain for the next row).
- Turn your work.
Part 3: Work Subsequent Rows (Creating the Texture and Length)
You’ll repeat this step, focusing on the “hdc in 3rd loop” technique, until your placemat reaches the desired length.
- Hdc in 3rd loop in the first hdc stitch of the previous row. (Always work into the first actual stitch, not into the turning chain from the previous row.)
- Hdc in 3rd loop in each hdc stitch across the row.
- You should always have 60 hdc stitches in each row.
- Ch 2.
- Turn your work.
Part 4: Continue Until Desired Length
- Repeat Part 3, working back and forth in rows, until your placemat is as long as you want it to be.
- For a standard placemat, aim for about 18 inches (45 cm) in length. Measure it against a ruler as you go. A typical placemat is about 12×18 inches (30×45 cm), so you’ll likely be making about 45-50 rows (depending on your tension and yarn thickness) after your foundation row.

Part 5: Fasten Off
Once your placemat has reached its desired length:
- After completing your last hdc in 3rd loop stitch in the final row, cut your yarn, leaving a tail about 6 inches (15 cm) long.
- Yarn over your hook, and then pull the cut tail completely through the loop on your hook.
- Pull the tail firmly to create a knot and secure your work.
Part 6: Finishing Your Placemat
- Weave in All Ends NEATLY: This is a crucial step for a professional and durable finish.
- Thread your yarn needle with the long tail from where you fastened off.
- Carefully weave the tail into your stitches along the edge of the placemat. Go back and forth through several stitches (about 1-2 inches) to make sure it’s secure and won’t unravel with use or washing.
- Repeat this process for the starting tail at the other end of your placemat.
- Blocking (Highly Recommended!): Blocking makes a significant difference for flat crochet pieces like placemats. It helps to:
- Even out your stitches and improve overall tension.
- Ensure the placemat lays perfectly flat on your table, preventing any curling or buckling.
- Sharpen and define the edges and the beautiful ribbed texture.
- Method:
- Gently wet your finished placemat. You can submerge it in cool water with a tiny bit of mild soap, then gently squeeze out excess water (without twisting), or simply mist it thoroughly with a spray bottle until damp.
- Lay it flat on a blocking mat, a clean towel, or any flat, even surface where it can dry undisturbed.
- Gently stretch and shape the placemat to your desired dimensions (e.g., a perfect rectangle). You can use rust-proof pins to hold the edges in place if you have them.
- Allow it to air dry completely. This might take several hours or even overnight, depending on humidity. Crucially, do not use heat (like a hairdryer) as it can distort cotton yarn and ruin your work.
Tips for a Beautiful Placemat
- Consistent Tension: This is the most important aspect for a flat, even placemat that doesn’t curl or wave. Practice makes perfect!
- Counting Stitches: Always count your stitches at the end of each row to ensure your placemat maintains an even width.
- Identify the Third Loop: Take time to identify the third loop correctly. It’s often just behind the typical “V” of the stitch. Working into it consistently creates the beautiful ribbed effect.
- Yarn Quality: For items that will be used frequently and washed, investing in good quality cotton yarn is worth it. It will hold up better and look more refined.
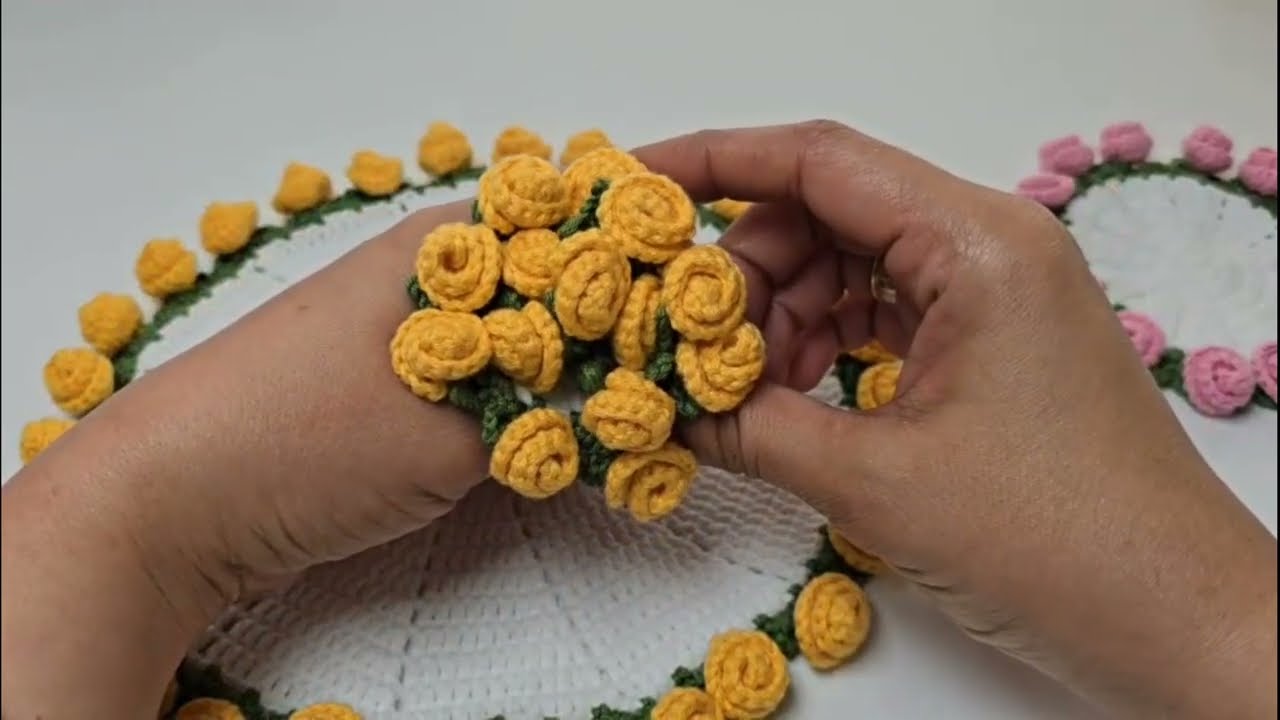
- Experiment with Colors: Once you’re comfortable with the pattern, try making sets in different colors, or even add a contrasting border with a row or two of single crochet around the finished edge for an extra touch of flair.
- Gift Idea: A handmade set of placemats makes a thoughtful and practical gift for housewarmings, weddings, or just because!
You’re now ready to crochet a beautiful, textured placemat! It’s a rewarding project that will add warmth and style to your home. Consider making a set to complete your dining experience.