 by
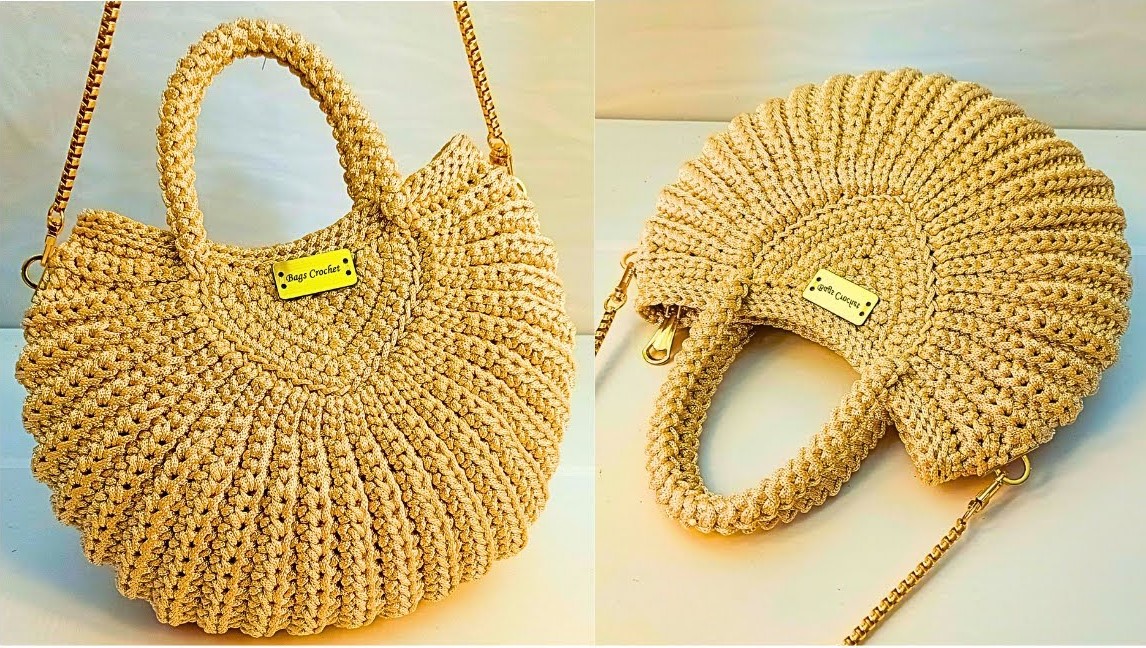
by Creating a “simple yet luxurious” crochet handbag is all about smart yarn choices, effective stitch patterns, and professional finishing touches like a quality lining and hardware. We’ll focus on a clean, structured design that allows the materials to shine, making your handmade bag look high-end and elegant.
How to Make a Simple Yet Luxurious Crochet Handbag
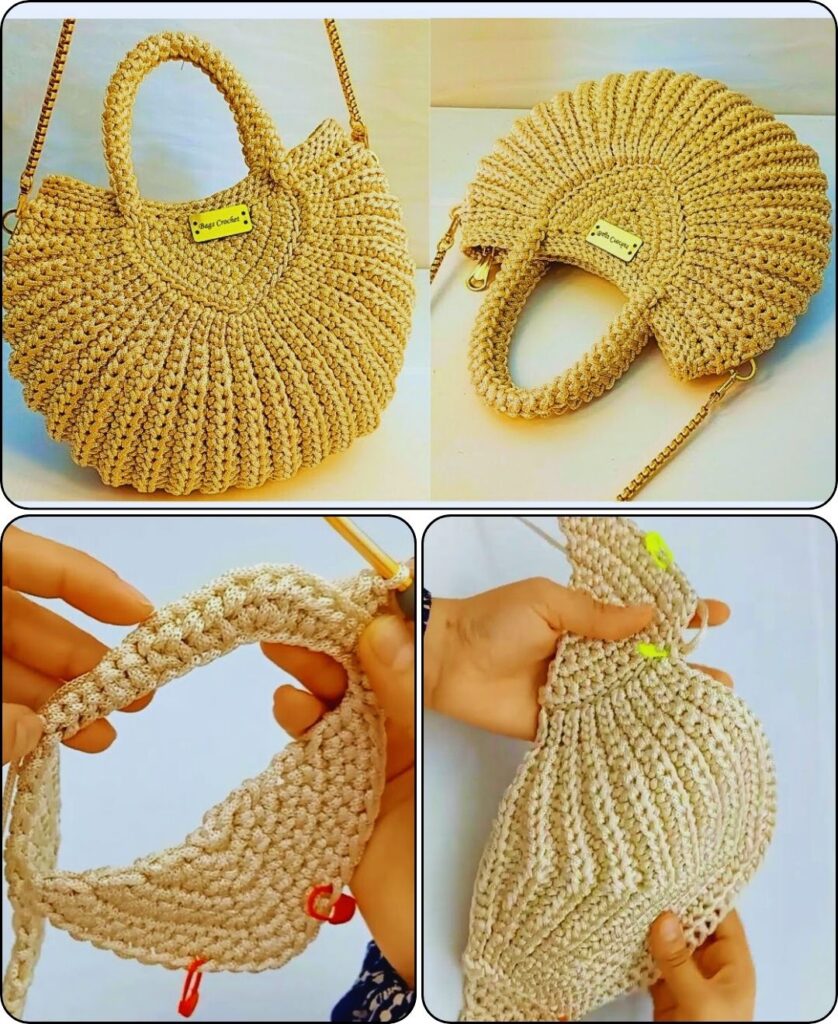
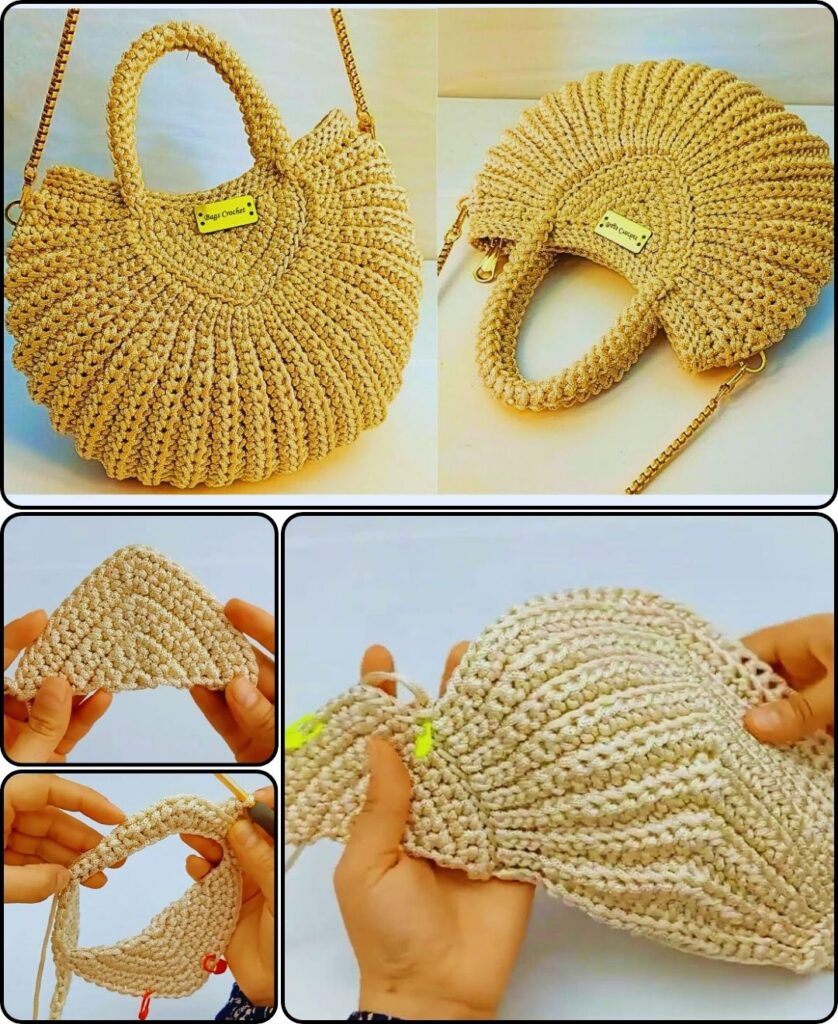
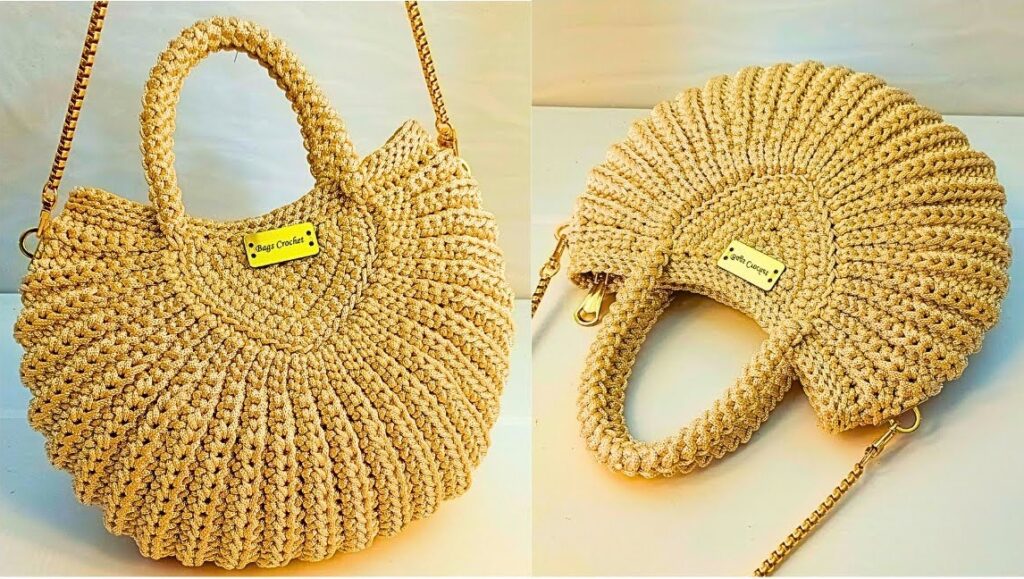
Project Overview: This tutorial guides you through crocheting a beautiful, structured handbag with a ribbed texture, built from a flat oval base. The “luxurious” aspect comes from using quality yarn, creating a dense and defined fabric, and crucially, adding a professional fabric lining and stylish hardware.
Skill Level: Intermediate (Requires comfortable knowledge of basic stitches, working in the round, understanding basic shaping, and willingness to add a fabric lining and hardware).
Finished Bag Dimensions (Approximate):
- Base: 10 inches (25 cm) long x 4 inches (10 cm) wide
- Height: 11 inches (28 cm)
- Handle Drop: Variable, depending on handles used.
Materials You’ll Need:
- Yarn:
- Worsted Weight (Medium #4) Mercerized Cotton or High-Quality Acrylic Yarn: Approximately 600-750 yards (550-685 meters). Choose a yarn known for good stitch definition, durability, and a slight sheen for a luxurious look (e.g., Lion Brand 24/7 Cotton, Scheepjes Cahlista, or a premium acrylic like Caron One Pound for a sturdy yet soft feel).
- Why these? Mercerized cotton has a beautiful sheen, excellent stitch definition, and less stretch than regular cotton, making it ideal for bags. High-quality acrylic can also provide durability and a smooth finish.
- Crochet Hook:
- Size H/5.0mm (or the hook size that gives you a dense, firm fabric. Your bag needs to hold its shape well).
- Yarn Needle (Tapestry Needle): For weaving in ends.
- Scissors
- Stitch Markers: Essential for marking the beginning of rounds and increase points.
- For the LUXURIOUS Touch (Highly Recommended!):
- Fabric for Lining: Approximately 1 yard (90 cm) of sturdy cotton, linen, or satin-backed crepe. Choose a color or pattern that complements your yarn.
- Sewing Machine (or Hand-Sewing Needle & Matching Thread): For creating the lining.
- Magnetic Snap Closure (1 set): For a secure closure.
- Bag Hardware (Choose ONE option for handles):
- Pair of D-Rings (1-1.5 inch / 2.5-3.8 cm): For attaching a detachable strap.
- Pre-Made Bag Handles: (e.g., bamboo, leather, metal chain handles). These instantly elevate the look.
- Leather or Metal Purse Chain: For a shoulder or cross-body strap.
- Heavy Duty Thread (Optional): If sewing D-rings or handles directly onto crochet or lining.
Gauge (Crucial for Shape and Structure!):
With your H/5.0mm hook and chosen yarn, in half double crochet (hdc) in BLO (back loop only):
- 13 hdc BLO = 4 inches (10 cm)
- 10 rows hdc BLO = 4 inches (10 cm)
Your fabric should be dense and firm. Adjust your hook size as needed to achieve this gauge. Consistent tension is vital for a well-shaped bag.
Abbreviations Used:
- ch: chain
- sl st: slip stitch
- sc: single crochet
- hdc: half double crochet
- inc: increase (work 2 stitches into the same stitch)
- hdc BLO: half double crochet in back loop only (insert hook into the back loop of the stitch only)
- st(s): stitch(es)
- FO: fasten off
- RS: Right Side
- WS: Wrong Side
Understanding Bag Construction:
This handbag is constructed in a few simple steps:
- Oval Base: The bag starts with a flat oval base worked in rounds.
- Body: The sides of the bag are built upwards in continuous rounds, using the
hdc BLOstitch for a beautiful, defined ribbed texture that helps the bag hold its shape. Working in continuous rounds avoids a visible seam. - Top Edge: A simple round to finish the opening neatly.
- Lining & Hardware: These are added last, transforming a simple crochet bag into a luxurious accessory.
Let’s Start Crocheting Your Handbag!
Part 1: The Bag Base (Flat Oval)
We’ll start by chaining and working around both sides of the chain to form a flat oval.
- Starting Chain: Ch 29. (This will form the length of your base).
- Round 1:
- Hdc in the 3rd ch from hook (the skipped 2 chs count as 1 hdc).
- Hdc in each of the next 25 chs.
- Inc (5 hdc) in the last ch (this creates the curved end).
- Rotate your work to crochet along the other side of the starting chain.
- Hdc in each of the next 25 chs (working into the bottom loops).
- Inc (4 hdc) in the very last ch (the same chain where you made your first hdc of the round).
- Sl st to the top of the initial ch-2 to join the round. (Total: 60 hdc).
- Place a stitch marker in the first hdc of this round.
- Round 2:
- Ch 2 (does NOT count as a stitch here). Hdc in the same st.
- Hdc in each of the next 26 hdc.
- Inc (2 hdc) in each of the next 4 hdc. (This is the curved end with increases).
- Hdc in each of the next 26 hdc.
- Inc (2 hdc) in each of the next 4 hdc. (This is the second curved end with increases).
- Sl st to the first hdc to join. (Total: 68 hdc).
- Move stitch marker to the first hdc of this round.
- Round 3:
- Ch 2 (does NOT count as a stitch). Hdc in the same st.
- Hdc in each of the next 27 hdc.
- (Hdc in next hdc, inc (2 hdc) in next hdc). Repeat from * to * 4 times. (Curved end increases).
- Hdc in each of the next 27 hdc.
- (Hdc in next hdc, inc (2 hdc) in next hdc). Repeat from * to * 4 times. (Second curved end increases).
- Sl st to the first hdc to join. (Total: 76 hdc).
- Move stitch marker.
Your base should now be a flat oval measuring approximately 10 x 4 inches. If it’s ruffling, check your increases or go down a hook size. If it’s cupping, your tension might be too tight, or you need more increases in a round (unlikely with this pattern).
Part 2: Building the Bag Body (Hdc BLO Ribbed Texture)
Now we’ll work upwards in continuous rounds to form the body of the bag. The hdc BLO stitch creates the beautiful ribbed texture and helps the bag hold its shape. We will not join rounds, but work in a spiral, to avoid a visible seam.
- Round 4 (Starting the Sides):
- Hdc in the BLO of each hdc around. (This round creates the sharp edge of the base and begins the vertical sides).
- Do NOT sl st to join. Simply continue working into the next stitch. Place a stitch marker in the first hdc BLO of this round to mark the beginning of each spiral round. (Total: 76 hdc BLO).
- Rounds 5 – 28 (or until desired height, approx. 11 inches):
- Continue working 1 hdc BLO in each hdc BLO around.
- Move your stitch marker up at the beginning of each round so you know where the round starts/ends.
- Maintain consistent tension.
- Your bag will grow upwards, creating a lovely ribbed texture.
Part 3: Finishing the Top Edge
After completing the last full body round (e.g., Round 28), you’ll finish the top edge for a neat opening.
- Final Round (for top edge): Work 1 sc in the BLO of each hdc BLO around. (This creates a sturdy, neat edge).
- When you reach the stitch marker, work a sl st into the next stitch to make a seamless join.
- FO, leaving a 6-inch tail for weaving in. Weave in the tail securely.
Part 4: Adding the Luxurious Handles/Strap Hardware
This step truly elevates your bag!
- Option A: Attaching D-Rings (for a detachable strap):
- Decide where you want your D-rings. Typically, they are placed centered on the side panels, or slightly towards the ends of the oval opening, about 0.5-1 inch (1-2.5 cm) down from the top edge. Mark the exact stitch placement.
- Using your yarn needle and a long strand of your bag yarn (or heavy-duty thread), sew the D-rings securely to the bag. Go through the fabric multiple times, wrapping the yarn around the D-ring bar and stitching it firmly to the bag. Make sure they are opposite each other.
- You can then attach a pre-made leather or chain strap to these D-rings, or crochet a simple strap (e.g., a strip of hdc BLO) and attach it.
- Option B: Attaching Pre-Made Handles (e.g., leather, bamboo):
- Position your handles evenly on the bag. Mark the points where they will attach.
- For sew-on handles: Use matching thread (or heavy-duty thread) and a sewing needle to sew the handle tabs securely to the top edge of your bag. Go through the crochet fabric multiple times for strength.
- For handles with rings/clips: Attach them to D-rings as in Option A, or create small crocheted loops on the bag and attach the handle clips to those.
Part 5: Optional (but Highly Recommended) Fabric Lining
A lining makes your bag look professional, protects your crocheted stitches from stretching, and prevents small items from falling through.
- Measure Your Bag:
- Width: Lay the bag flat and measure across its widest point (top opening).
- Height: Measure from the base to the top edge.
- Depth/Base: Measure the width of your crocheted base.
- Cut Fabric:
- Cut two pieces for the main body:
- Length: Bag height + 1.5 inches (3.8 cm) for seam allowance and top hem.
- Width: Bag width + 1 inch (2.5 cm) for seam allowance.
- Cut one piece for the bottom (to match your oval base):
- Cut an oval shape slightly larger (approx. 0.5 inch / 1.25 cm all around) than your crocheted base.
- Cut two pieces for the main body:
- Sew Lining:
- Sew the two body pieces together along their sides (right sides facing). Press seams open.
- Gather the bottom edge of this tube slightly if needed to fit the oval base. Pin and sew the oval base piece to the bottom of the body tube (right sides facing). Press seam.
- Fold down the top edge of the lining by 1/2 inch (1.25 cm), press, then fold down another 1 inch (2.5 cm) and press to create a hem. Stitch this hem in place.
- Insert & Attach:
- Carefully insert the finished fabric lining into your crocheted bag. Ensure it sits smoothly inside.
- Magnetic Snap: If using, sew the magnetic snap components onto the lining before sewing the lining into the bag, placing them at the center of the opening.
- Hand-stitch the top hem of the lining to the inside top edge of your crocheted bag using small, neat stitches that don’t show through the outside. Use matching thread.
Part 6: Final Finishing
- Weave in All Remaining Ends: Ensure all crochet yarn tails are neatly and securely woven into the back of your work.
- Light Blocking (Optional): You can gently mist your finished bag with water (avoid soaking if it has delicate hardware), gently reshape it, and allow it to air dry. This can help the stitches settle and maintain structure.
Your beautiful, simple yet luxurious crochet handbag is now complete! It’s a statement piece that combines handmade charm with sophisticated style.