by
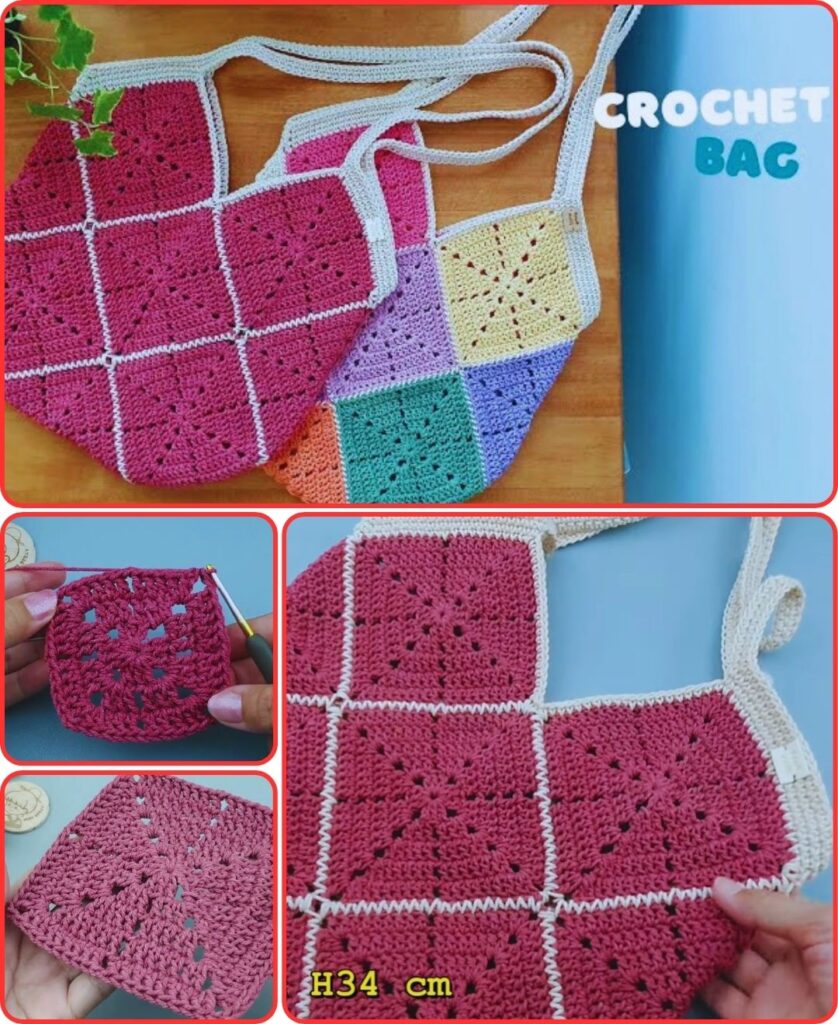
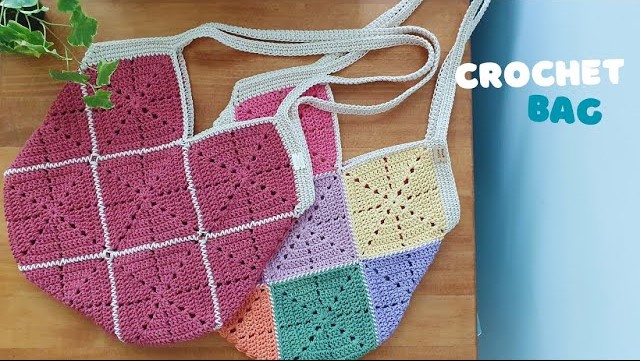
by A crochet granny square bag is a timeless and wonderfully customizable project! It’s a fantastic way to showcase various color combinations and stitch patterns, resulting in a unique and sturdy bag. This tutorial will guide you through making a classic granny square bag, suitable for beginners comfortable with basic crochet techniques.
Pattern: How to Make a Crochet Granny Square Bag
Project Overview: This tutorial will teach you how to crochet individual granny squares and then join them together to form a functional and stylish bag. We’ll focus on a simple tote bag shape using 6 squares.
Skill Level: Intermediate (Requires familiarity with basic crochet stitches, working in the round, and basic seaming techniques).
Finished Bag Dimensions (Approximate for 6-Square Tote):
- If using 4-inch (10 cm) squares: approx. 8 inches (20 cm) tall x 8 inches (20 cm) wide x 4 inches (10 cm) deep.
- Dimensions will vary based on your chosen square size and yarn weight.
Materials You’ll Need:
- Yarn:
- Worsted Weight (Medium #4) Cotton or Acrylic Yarn: Approximately 300-500 yards (275-450 meters) depending on bag size and number of squares.
- Why Cotton/Acrylic? Cotton is durable and offers good stitch definition; acrylic is soft and widely available. Choose a blend for a balance.
- Multiple Colors: Granny squares are perfect for using up scrap yarn! Choose 2-4 colors for a classic look, or many colors for a scrapghan style.
- One Main Joining/Border Color: If you want a cohesive look.
- Crochet Hook:
- Size H/5.0mm (or a size recommended for your yarn, aiming for a firm but not stiff fabric).
- Yarn Needle (Tapestry Needle): Essential for weaving in ends and joining squares.
- Scissors
- Stitch Markers (Optional): Helpful for marking corners or aligning squares.
- Bag Handles/Strap (Optional):
- Crochet Hook/Yarn: For making a crocheted strap (details below).
- Store-bought Handles: Leather, bamboo, or plastic handles can be sewn on.
- D-rings (Optional): If you want to attach a removable strap.
- Fabric for Lining (Optional, but highly recommended): Approximately 1/2 to 1 yard of cotton fabric.
- Matching Sewing Thread and Needle (Optional): For attaching lining and store-bought handles.
Gauge (Crucial for Consistent Square Size!)
- Make one 4-round Classic Granny Square.
- Measure its side length. It should be approximately 4 inches (10 cm).
- If your square is larger, go down a hook size. If smaller, go up a hook size. Consistent square size is vital for a neat bag.
Abbreviations Used:
- ch: chain
- sl st: slip stitch
- sc: single crochet
- hdc: half double crochet
- dc: double crochet
- tr: treble crochet (or triple crochet)
- sp: space
- ch-sp: chain space
- FO: fasten off
Understanding the Bag Structure
We’ll be making a simple boxy tote bag using 6 granny squares:
- Front Panel: 1 granny square
- Back Panel: 1 granny square
- Side Panels: 2 granny squares (1 for each side)
- Bottom Panel: 1 granny square
- Top/Opening Structure: Created by joining the squares and adding a border.
Part 1: The Classic Granny Square Pattern
You will need to make 6 identical (or similarly sized) granny squares. Let’s use a 4-round classic granny square.
Yarn Colors:
- Color A: Center
- Color B: Round 2
- Color C: Round 3
- Color D: Round 4 (also used for joining)
Instructions for one square:
Start: With Color A.
- Round 1: Ch 4, sl st into the 1st ch to form a ring. (Alternatively, make a Magic Ring, ch 3). Ch 3 (counts as 1st dc). Work 2 dc into the ring. (Ch 3, 3 dc) three times into the ring. Ch 3, sl st into the top of the beginning ch 3 to join.
- (4 groups of 3 dc, 4 ch-3 corners)
- FO Color A, weave in ends.
Change to Color B.
- Round 2: Join Color B with a sl st into any ch-3 corner space. Ch 3 (counts as 1st dc). Work (2 dc, ch 3, 3 dc) into the same ch-3 corner space. (Ch 1, 3 dc, ch 3, 3 dc) into each of the next three ch-3 corner spaces. Ch 1, sl st into the top of the beginning ch 3 to join.
- (8 groups of 3 dc, 4 ch-3 corners, 4 ch-1 side spaces)
- FO Color B, weave in ends.
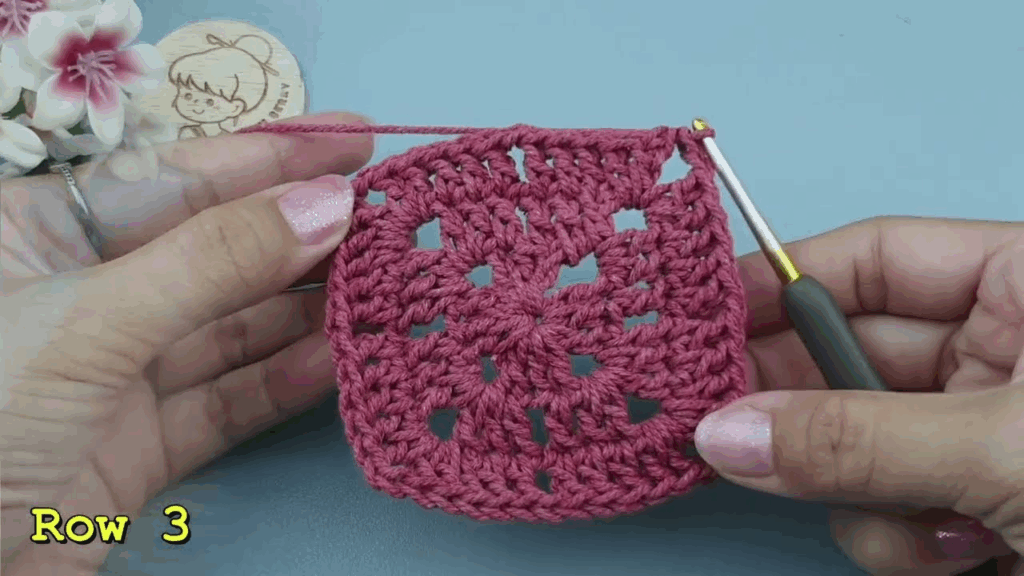
Change to Color C.
- Round 3: Join Color C with a sl st into any ch-3 corner space. Ch 3 (counts as 1st dc). Work (2 dc, ch 3, 3 dc) into the same ch-3 corner space. Ch 1, 3 dc into the next ch-1 side space. Ch 1, 3 dc, ch 3, 3 dc into the next ch-3 corner space. Repeat from * to * two more times. Ch 1, 3 dc into the last ch-1 side space. Ch 1, sl st into the top of the beginning ch 3 to join.
- (12 groups of 3 dc, 4 ch-3 corners, 8 ch-1 side spaces)
- FO Color C, weave in ends.
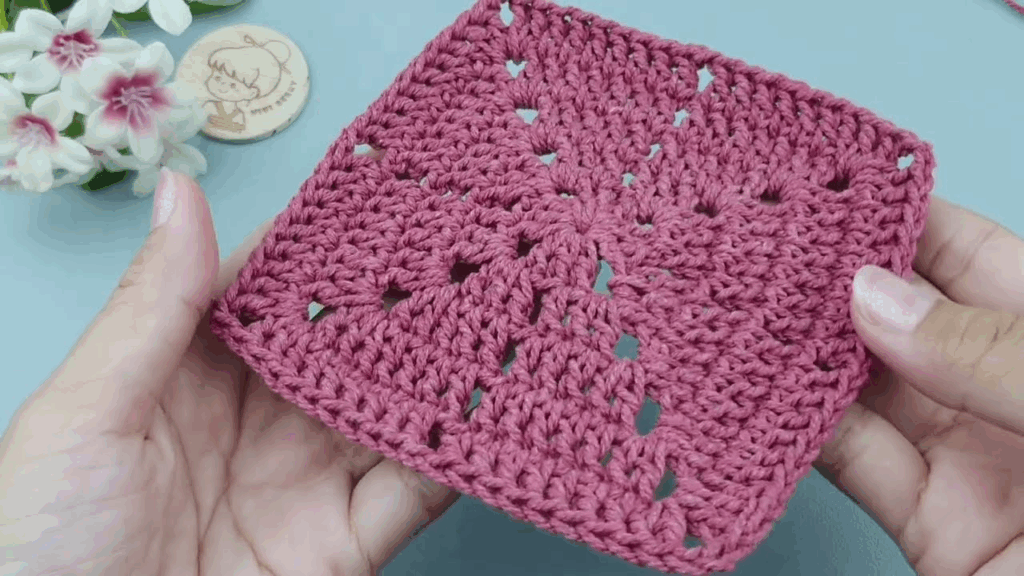
Change to Color D.
- Round 4: Join Color D with a sl st into any ch-3 corner space. Ch 3 (counts as 1st dc). Work (2 dc, ch 3, 3 dc) into the same ch-3 corner space. Ch 1, 3 dc into the next ch-1 side space. Ch 1, 3 dc into the next ch-1 side space. Ch 1, 3 dc, ch 3, 3 dc into the next ch-3 corner space. Repeat from * to * two more times. Ch 1, 3 dc into each of the last two ch-1 side spaces. Ch 1, sl st into the top of the beginning ch 3 to join.
- (16 groups of 3 dc, 4 ch-3 corners, 12 ch-1 side spaces)
- FO Color D, leaving a tail for weaving (you will likely use Color D for joining).
Repeat this pattern 5 more times to create a total of 6 granny squares.
Blocking Your Squares (Highly Recommended):
- Gently wet each square (or spray until damp).
- Pin each square to a blocking mat or towel-covered surface, gently stretching it to your desired, consistent size (e.g., 4×4 inches) and shaping it perfectly square.
- Let them air dry completely. Blocking makes a huge difference in achieving professional-looking seams and a uniform bag.
Part 2: Planning Your Bag Layout (6-Square Tote)
Lay out your 6 squares to visualize the bag structure:
- Side 1 | Front | Side 2 (3 squares in a row, this forms the side-front-side wall)
- Bottom (1 square, centered below the Front square)
- Back (1 square, centered below the Bottom square)
- Top (1 square, usually not a full square, but the open top of the bag)
It might be easier to think of it as:
- A: Front Panel
- B: Back Panel
- C: Left Side Panel
- D: Right Side Panel
- E: Bottom Panel
- F: Top Opening (This is implied by the joining, not a separate square for this tutorial’s shape).
Let’s use a simpler assembly for a basic tote:
- Square 1: Front
- Square 2: Back
- Square 3: Bottom
- Square 4: Left Side
- Square 5: Right Side
- Square 6: Optional (for a flat top/zipper panel if you want, or just extra depth/another row for the main body)
For a simple 4-panel tote (2 front/back, 2 sides) with a separate bottom panel (5 squares total), or a 6-panel box bag (front, back, 2 sides, top, bottom):
Let’s make a 6-panel box bag as it’s a common and straightforward method:
- Front: Square A
- Back: Square B
- Left Side: Square C
- Right Side: Square D
- Bottom: Square E
- Top: Square F (This will be the top of the bag opening)
Part 3: Joining the Granny Squares
There are many ways to join squares. We’ll use the Single Crochet Join (SC Join) and the Whipstitch Join, both easy for beginners. Use Color D (your last round color) for joining for a cohesive look.
A. SC Join (Creates a visible ridge):
- Place two squares right sides together.
- Insert your hook through both layers (through a stitch on the first square and the corresponding stitch on the second square).
- Join Color D with a sl st. Ch 1.
- Work 1 sc through both layers in each corresponding stitch across the edge.
- When you reach a corner space, work 1 sc into the corner space of both squares. If making a continuous line, you might work (sc, ch 1, sc) in the corner for a flexible join.
- FO and weave in ends.
B. Whipstitch Join (Creates a flatter, almost invisible seam):
- Place two squares right sides together (or wrong sides together for a visible seam).
- Thread your yarn needle with Color D.
- Starting from one corner, bring the needle up from the back of both squares, then down through the corresponding stitch on both squares, and back up through the next stitch.
- Continue making small, tight stitches over the edge, catching both loops of both squares, until you reach the end of the edge.
- Secure the yarn and weave in ends.
Joining Layout for the 6-Panel Box Bag:
- Main Body:
- Join Square C (Left Side) to Square A (Front) along one edge.
- Join Square A (Front) to Square D (Right Side) along one edge.
- Join Square D (Right Side) to Square B (Back) along one edge.
- Join Square B (Back) to Square C (Left Side) along one edge.
- You now have a long strip of 4 squares.
- Join the first and last squares in this strip together to form a tube (this will be the main body of your bag). Use the SC join or Whipstitch join for all these connections.
- Bottom:
- Take Square E (Bottom).
- Position it at the bottom opening of your tube.
- Join each side of Square E to the corresponding edge of the bottom of the tube (Front, Back, Left Side, Right Side). You’ll have 4 seams here. Use the SC or Whipstitch join.
- Top:
- Take Square F (Top).
- Position it at the top opening of your tube.
- Join each side of Square F to the corresponding edge of the top of the tube. This will create a flat top with openings on the sides, or you can leave it completely open for a wide top.
Part 4: Finishing the Bag Top Edge
Once your squares are joined into the bag shape, you’ll want to create a neat finished edge around the opening.
- Join Color D with a sl st to any stitch at the top edge of your bag opening.
- Round 1 (Top Edge): Ch 1. Work 1 sc into each stitch around the entire top opening of the bag. When you reach a seam, try to work 1 sc into the seam to keep it neat. Sl st to the first sc to join.
- Round 2: Ch 1. Work 1 sc into each sc around. Sl st to join.
- Round 3: Ch 1. Work 1 sc into each sc around. Sl st to join.
- You can add more sc rounds for a taller border, or work a decorative stitch like a sl st row, crab stitch (reverse sc), or a simple shell stitch (sk 1, 5dc in next, sk 1, sl st in next) for a fancier edge.
- FO and weave in ends.
Part 5: Adding Handles/Strap
A. Crocheted Handle (Simple Method):
- Strap 1: Ch 81 (or desired length for shoulder strap/crossbody strap, e.g., 41 for short handle, 121 for crossbody).
- Row 1: Sc in 2nd ch from hook. Sc in each ch across. (80 sc).
- Row 2: Ch 1, turn. Sc in each sc across. (80 sc).
- Repeat Row 2 for 2-3 more rows (total 3-4 rows for thickness).
- FO, leaving a long tail for sewing.
- Repeat for a second handle if making a tote with two short straps.
Attaching Crocheted Handles:
- Position your handle(s) evenly on the inside top edge of your bag (e.g., 2-3 inches from the side seams).
- Using your yarn needle, securely sew the handle ends to the top edge of the bag, going through multiple layers of the bag’s border for strength. Make sure they are firmly attached.
B. Store-Bought Handles:
- Follow the instructions provided with your handles. Most handles have loops or holes that you can stitch directly onto the top edge of your bag using a yarn needle and strong yarn (or matching sewing thread).
Part 6: Optional Fabric Lining (Highly Recommended)
Adding a fabric lining greatly increases the bag’s durability, prevents stretching, hides yarn ends, and gives it a professional finish.
- Measure Your Bag: Measure the finished width, height, and depth of your crocheted bag.
- Cut Fabric Pieces:
- Main Body: You’ll usually cut one large rectangle for the body (width = bag’s circumference + seam allowance, height = bag’s height + seam allowance). Fold this into a tube and sew the side seam.
- Bottom: Cut a rectangle matching the bag’s bottom panel size + seam allowance.
- Sides: (If your bag has distinct side panels) Cut two rectangles for the sides.
- Flap: If your bag has a flap, cut a piece for the flap lining.
- Add at least 1/2 inch (1.25 cm) seam allowance to all edges.
- Sew the Lining: Sew the fabric pieces together using a sewing machine or hand-stitching to create a fabric bag that matches your crocheted bag’s shape.
- Hem the Top: Fold over and hem the top edge of the fabric lining to create a neat finish.
- Insert and Sew: Insert the completed fabric lining into your crocheted bag. Align the seams. Hand-sew the top edge of the fabric lining to the inside top edge of your crocheted bag using small, neat stitches and matching sewing thread.
Finishing Your Granny Square Bag
- Weave in any remaining yarn ends thoroughly.
- Give your bag a final check for security of joins and handles.
Tips for Success:
- Consistent Granny Squares: Take the time to make sure all your squares are the same size. Blocking them (Part 1) is crucial for this.
- Neat Joins: Practice your chosen joining method on scrap squares first. Straight and even seams make a huge difference.
- Don’t Skimp on Weaving Ends: Weave in ends as you go, or after each square, to prevent a daunting task at the end. It also ensures your bag is secure.
- Sturdy Fabric: Work your stitches firmly, especially for the body and bottom. A loose fabric will cause your bag to stretch and sag.
- Consider the Lining: While optional, a lining will significantly improve the bag’s durability, structure, and professional appearance.
Enjoy making and using your beautiful and unique crochet granny square bag!