by
by Creating a crochet crossbody bag is a fantastic and rewarding project! It allows you to create a functional and stylish accessory tailored to your preferences. For a crossbody bag, durability and minimal stretch are key, so yarn choice and stitch density are important.
This tutorial will guide you through making a classic, rectangular crossbody bag with a flap closure, using sturdy single crochet stitches.
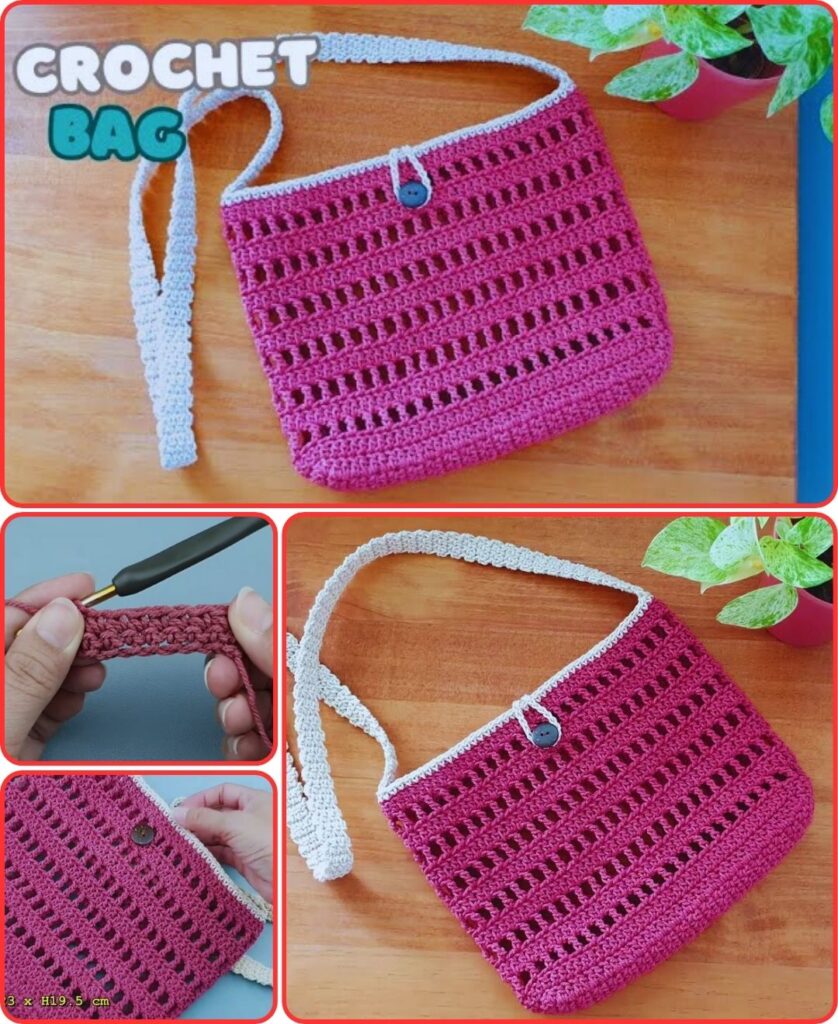
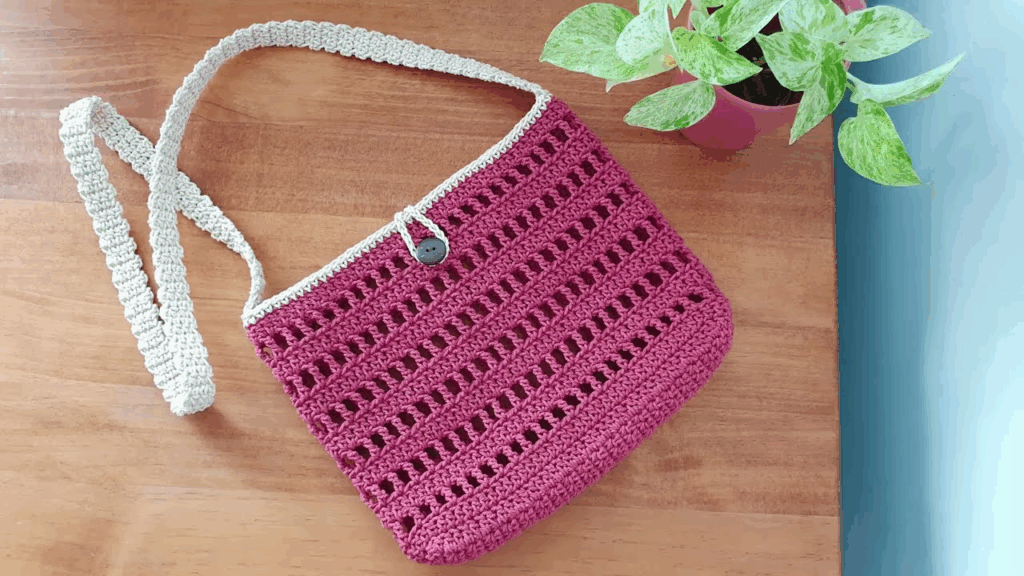
Pattern: How to Crochet a Crossbody Bag Tutorial
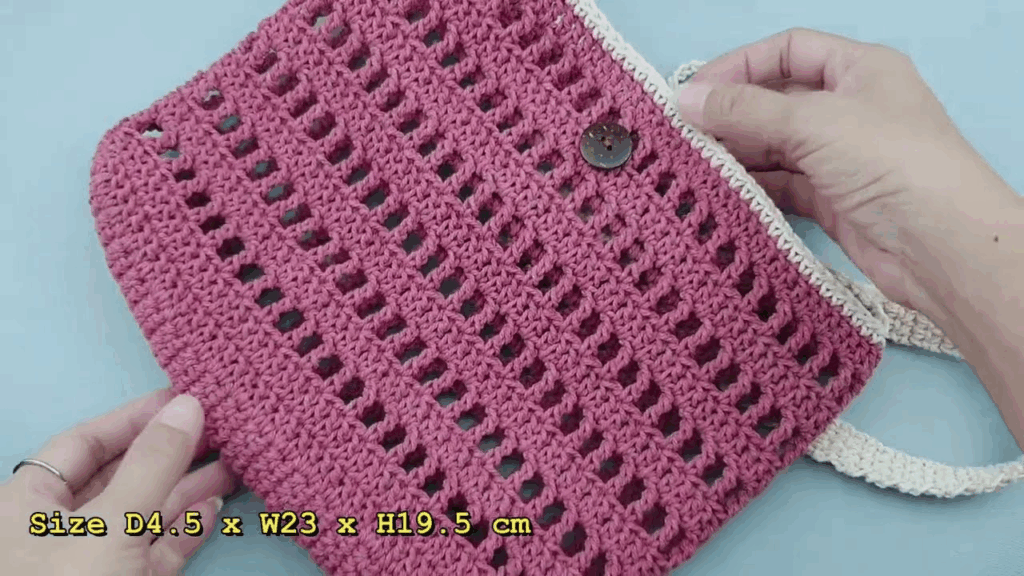
Project Overview: This pattern creates a simple, rectangular crossbody bag with a folded flap and a sturdy, crocheted strap. It’s designed to be practical for everyday use.
Skill Level: Intermediate (Requires comfortable knowledge of basic stitches, working in the round, shaping, and assembly).
Finished Bag Dimensions (Approximate for adult):
- Width: 8.5 inches (21.5 cm)
- Height (Body only, excluding flap): 6.5 inches (16.5 cm)
- Depth: 1.5 inches (4 cm)
- Strap Length: Approximately 45-50 inches (114-127 cm) – adjustable.
Materials You’ll Need:
- Yarn:
- Worsted Weight (Medium #4) Cotton or Cotton Blend Yarn: Approximately 300-400 yards (275-365 meters).
- Why Cotton? Cotton is durable, has good stitch definition, and stretches less than acrylic, making it ideal for bags. A blend can offer extra softness or slight elasticity.
- Choose your preferred color!
- Crochet Hook:
- Size H/5.0mm (or a size that produces a very dense, sturdy fabric with your chosen yarn. Go down a hook size if your fabric feels too loose or flimsy).
- Yarn Needle (Tapestry Needle): For weaving in ends and seaming.
- Scissors
- Stitch Marker (Optional, but recommended): To mark the beginning of rounds.
- Magnetic Snap or Button (Optional): For closure.
- Fabric for Lining (Optional, but highly recommended): Approximately 1/2 yard of cotton fabric. This dramatically increases the bag’s durability and prevents stretching.
- Matching Sewing Thread and Needle (Optional): For attaching lining and snap.
Gauge (Crucial for Bag Size!)
With H/5.0mm hook and chosen yarn, working in single crochet: 16 sc = 4 inches (10 cm) wide 18 rows sc = 4 inches (10 cm) high
- It’s important that your fabric is dense and firm, not loose or gappy. If your gauge is too loose, go down a hook size.
Abbreviations Used:
- ch: chain
- sl st: slip stitch
- sc: single crochet
- hdc: half double crochet
- dc: double crochet
- st(s): stitch(es)
- inc: increase (working 2 stitches into the same stitch)
- BLO: back loop only
- FLO: front loop only
- FO: fasten off
Understanding the Bag Structure
This crossbody bag will be constructed in a few main parts:
- Bag Body: Crocheted in continuous rounds, starting with an oval base and then building the sides upwards.
- Flap: Crocheted directly from the back of the bag body.
- Strap: Crocheted separately and then securely sewn to the bag.
- Assembly & Finishing: Adding optional lining, magnetic snap, and weaving in all ends.
Let’s Start Crocheting Your Crossbody Bag!
Part 1: The Bag Body
We’ll use single crochet (sc) throughout the body for maximum sturdiness.
A. Base of the Bag (Oval Shape)
- Ch 31. (This will be the length of your bag. Adjust by adding/subtracting chains in multiples of 2 if you want a different length).
- Round 1: Work 2 sc in the 2nd ch from hook. Sc in each of the next 28 ch. Work 4 sc in the last ch. (This turns the corner). Now, working down the other side of the foundation chain, sc in each of the next 28 ch. Work 2 sc in the very last ch (this is the same ch as the first 2 sc you made). Do NOT join with sl st, we will work in continuous rounds. (64 sc).
- Place a stitch marker in the first sc of the round.
- Round 2: Work 2 sc in the first st. Sc in each of the next 30 sts. Work 2 sc in each of the next 3 sts. Sc in each of the next 30 sts. Work 2 sc in the last st. (70 sc).
- Round 3: Work 2 sc in the first st. Sc in each of the next 32 sts. Work 2 sc in each of the next 3 sts. Sc in each of the next 32 sts. Work 2 sc in the last st. (76 sc).
- Round 4: Work 2 sc in the first st. Sc in each of the next 34 sts. Work 2 sc in each of the next 3 sts. Sc in each of the next 34 sts. Work 2 sc in the last st. (82 sc).
- Your base should now be a sturdy oval, approx. 8.5 inches long and 1.5 inches wide.
B. Sides of the Bag (Building Height)
- Round 5: Work 1 sc in the BLO (back loop only) of each st around. (82 sc).
- Working in the BLO of this round creates a defined edge for the base of the bag, making it easier to build the sides straight up.
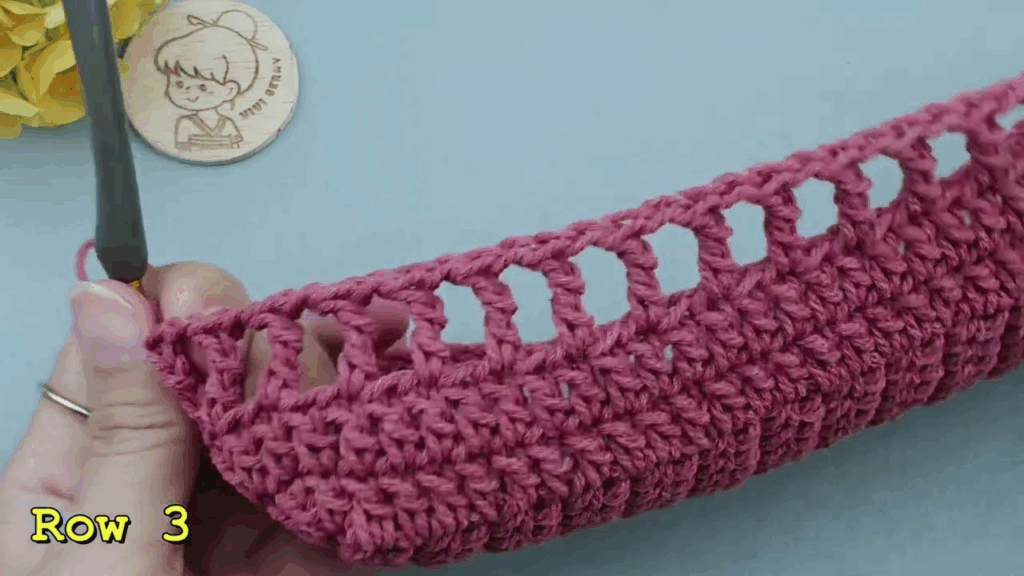
- Round 6 to Round 34 (or until desired height): Work 1 sc in each st around. Do NOT join with sl st at the end of each round, continue working in a spiral. (82 sc per round).
- Continue crocheting until the bag body measures approximately 6.5 inches (16.5 cm) high from the base.
- To finish this section, make a sl st into the next stitch, then FO, leaving a tail to weave in.
Part 2: The Flap
The flap will be crocheted directly onto the back opening of the bag.
- Identify the back: Lay your bag flat. The seam where you started the BLO round might be a good indication of the “back.” Count 41 stitches from that point to the front. You will work across 41 stitches for the flap.
- Join Yarn: Join your yarn with a sl st in the 41st stitch from the last stitch you made on the main body of the bag (counting backwards along the opening edge). This will be one of the “side” stitches.
- Row 1 (Flap): Ch 1. Sc in the same st you joined in. Sc in each of the next 40 sts. (41 sc).
- You should now be at the corresponding “side” stitch on the other side of the bag opening.
- Row 2: Ch 1, turn. Sc in each of the 41 sts across. (41 sc).
- Repeat Row 2 for 15 more rows (total 17 rows of sc for the flap).
- This will give you a rectangular flap. You can adjust the number of rows for a longer or shorter flap.
Shaping the Flap (Optional – Rounded Corners):
- If you want rounded corners for your flap, you can follow these modifications for the last two rows:
- Row 18: Ch 1, turn. Sc in the first 2 sts. Hdc in the next 2 sts. Dc in the next 31 sts. Hdc in the next 2 sts. Sc in the last 2 sts. (41 sts).
- Row 19: Ch 1, turn. Sl st in the first st. Sc in the next 2 sts. Hdc in the next 2 sts. Dc in the next 29 sts. Hdc in the next 2 sts. Sc in the next 2 sts. Sl st in the last st. (39 sts – slight curve).
- FO, leaving a long tail for weaving.
Part 3: The Strap
A simple single crochet strap is durable and easy to make.
- Ch 201. (This will be the length of your strap. Adjust by adding/subtracting chains in multiples of 2 if you want a longer/shorter strap).
- Row 1: Sc in the 2nd ch from hook. Sc in each remaining ch across. (200 sc).
- Row 2: Ch 1, turn. Sc in each sc across. (200 sc).
- Repeat Row 2 for 2-3 more rows (total 3-4 rows of sc for the strap width).
- A strap that is 3-4 rows wide (approx. 0.75 – 1 inch wide) is usually comfortable and sturdy.
- FO, leaving a very long tail (at least 12 inches) on each end of the strap for sewing.
Part 4: Assembly & Finishing
- Weave in All Ends: Before attaching anything, use your yarn needle to weave in all loose yarn tails neatly into the crochet fabric.
- Attach the Strap:
- Lay your bag flat. Determine where you want the strap to attach (typically on the side seams near the top opening).
- Using the long tails you left on the strap, securely sew each end of the strap to the inside top corners of the bag body. Use strong stitches to ensure it’s very durable. You can fold the strap end over slightly and sew through multiple layers for extra strength.
- Attach Magnetic Snap/Button (Optional):
- Position one part of the magnetic snap on the underside of the flap, centered, about 1-1.5 inches from the edge. Use matching sewing thread and needle to securely stitch it in place.
- Close the flap and mark where the other part of the snap should go on the front of the bag. Stitch it securely.
- If using a button, sew the button to the front of the bag, and crochet a small loop on the underside of the flap to go around the button.
- Add Fabric Lining (Optional, but highly recommended for durability):
- This is the most effective way to make your bag long-lasting and prevent stretching.
- Measure the dimensions of your crocheted bag (width, height, depth).
- Cut fabric pieces to match, adding a 1/2 inch seam allowance on all sides. You’ll typically need:
- 1 main rectangle (for back, bottom, and front)
- 2 side rectangles
- 1 flap lining piece (optional, you can just line the body)
- Sew the fabric pieces together to create a bag shape.
- Hem the top edge of the lining.
- Insert the fabric lining into your crocheted bag.
- Hand-sew the top edge of the fabric lining to the inside top edge of your crocheted bag, using small, neat stitches.
- Final Checks: Give your bag a good once-over. Ensure all stitches are secure, ends are woven in, and the strap is firmly attached.
Tips for Success:
- Yarn Choice is Key: Seriously, cotton or a cotton blend will give you the best results for a sturdy, long-lasting bag.
- Dense Fabric: Work your single crochet stitches tightly. A loose fabric will cause your bag to stretch and lose shape. Don’t be afraid to go down a hook size if your fabric isn’t dense enough.
- Consistent Tension: This will ensure your bag grows evenly and looks professional.
- Measure as You Go: Regularly check the dimensions of your bag as you crochet, especially the base and height.
- Blocking (Optional): While not always necessary for sc bags, a light blocking can help define the shape and even out stitches, especially if you added a lining.
- Customization:
- Size: Adjust the starting chain length and the number of rounds for the base/sides to make a bigger or smaller bag.
- Stitch Pattern: You can substitute hdc for sc for a slightly softer fabric, or explore textured stitches like moss stitch or linen stitch.
- Closure: Use zippers, toggle buttons, or simple loops instead of magnetic snaps.
- Strap: Experiment with braided straps, adjustable buckle straps (attaching with D-rings), or different stitch patterns for the strap.
- Embellishments: Add tassels, charms, or appliqués (like a crochet flower!) to personalize your bag.
Enjoy crocheting and using your beautiful new crossbody bag!